![]()
This feature is available only in PaperPort Professional.
In PaperPort Professional, the Capture Assistant consists of two different windows: first the Scanning window appears, then the PaperPort – Scan dialog box.
The Capture Assistant opens once scanning is started (provided the Show Capture Assistant checkbox is turned on in the Scan or Get Photo pane). The current scan profile name is displayed in its title bar. With Capture Assistant you have full control over the scanning and file creating process.
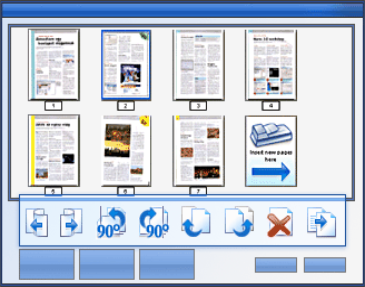
The boundary markers in the example show Create
Single-page items is selected.
This is at the top, where scanned pages appear one by one. While scanning, each new page appears at the place indicated by the Scanner thumbnail. Document boundary markers indicate the starting and end points of page ranges that belong together and will be saved into the same document file. These markers are only displayed if either of the following options is turned on in the currently used scan profile:
Blank page is job separator
Create single-page items
The Page Thumbnail Toolbar is under the thumbnail
view. Depending on the scan profile settings, some buttons may be disabled.
Use this toolbar to rotate, reorder, delete pages and mark pages as blank
/ not blank.
Status message — This shows the number of scanned
pages.
Click the Scan More Pages button
if you want to add more pages to the document(s). This could be necessary
if, for example, the ADF cannot hold all the pages for a document file.
Use the Scan Other Side button
if you are scanning double-sided documents. First put one side of all
pages in the ADF then turn the entire stack over and click the Scan
Other Side button to scan the reverse sides. PaperPort will interleaf
the pages.
Click the Done Scanning button when you have finished scanning all the needed pages.
Select the Modify Document Name and Notes
checkbox to display the PaperPort – Scan
dialog box when scanning is done. It lets you enter or modify the item
properties and the document name.
 Related Topics