Overview of Installation
This document covers the installation of Oracle SOA Suite Server 11g for ReadSoft PROCESSIT with High Availability.
Topology
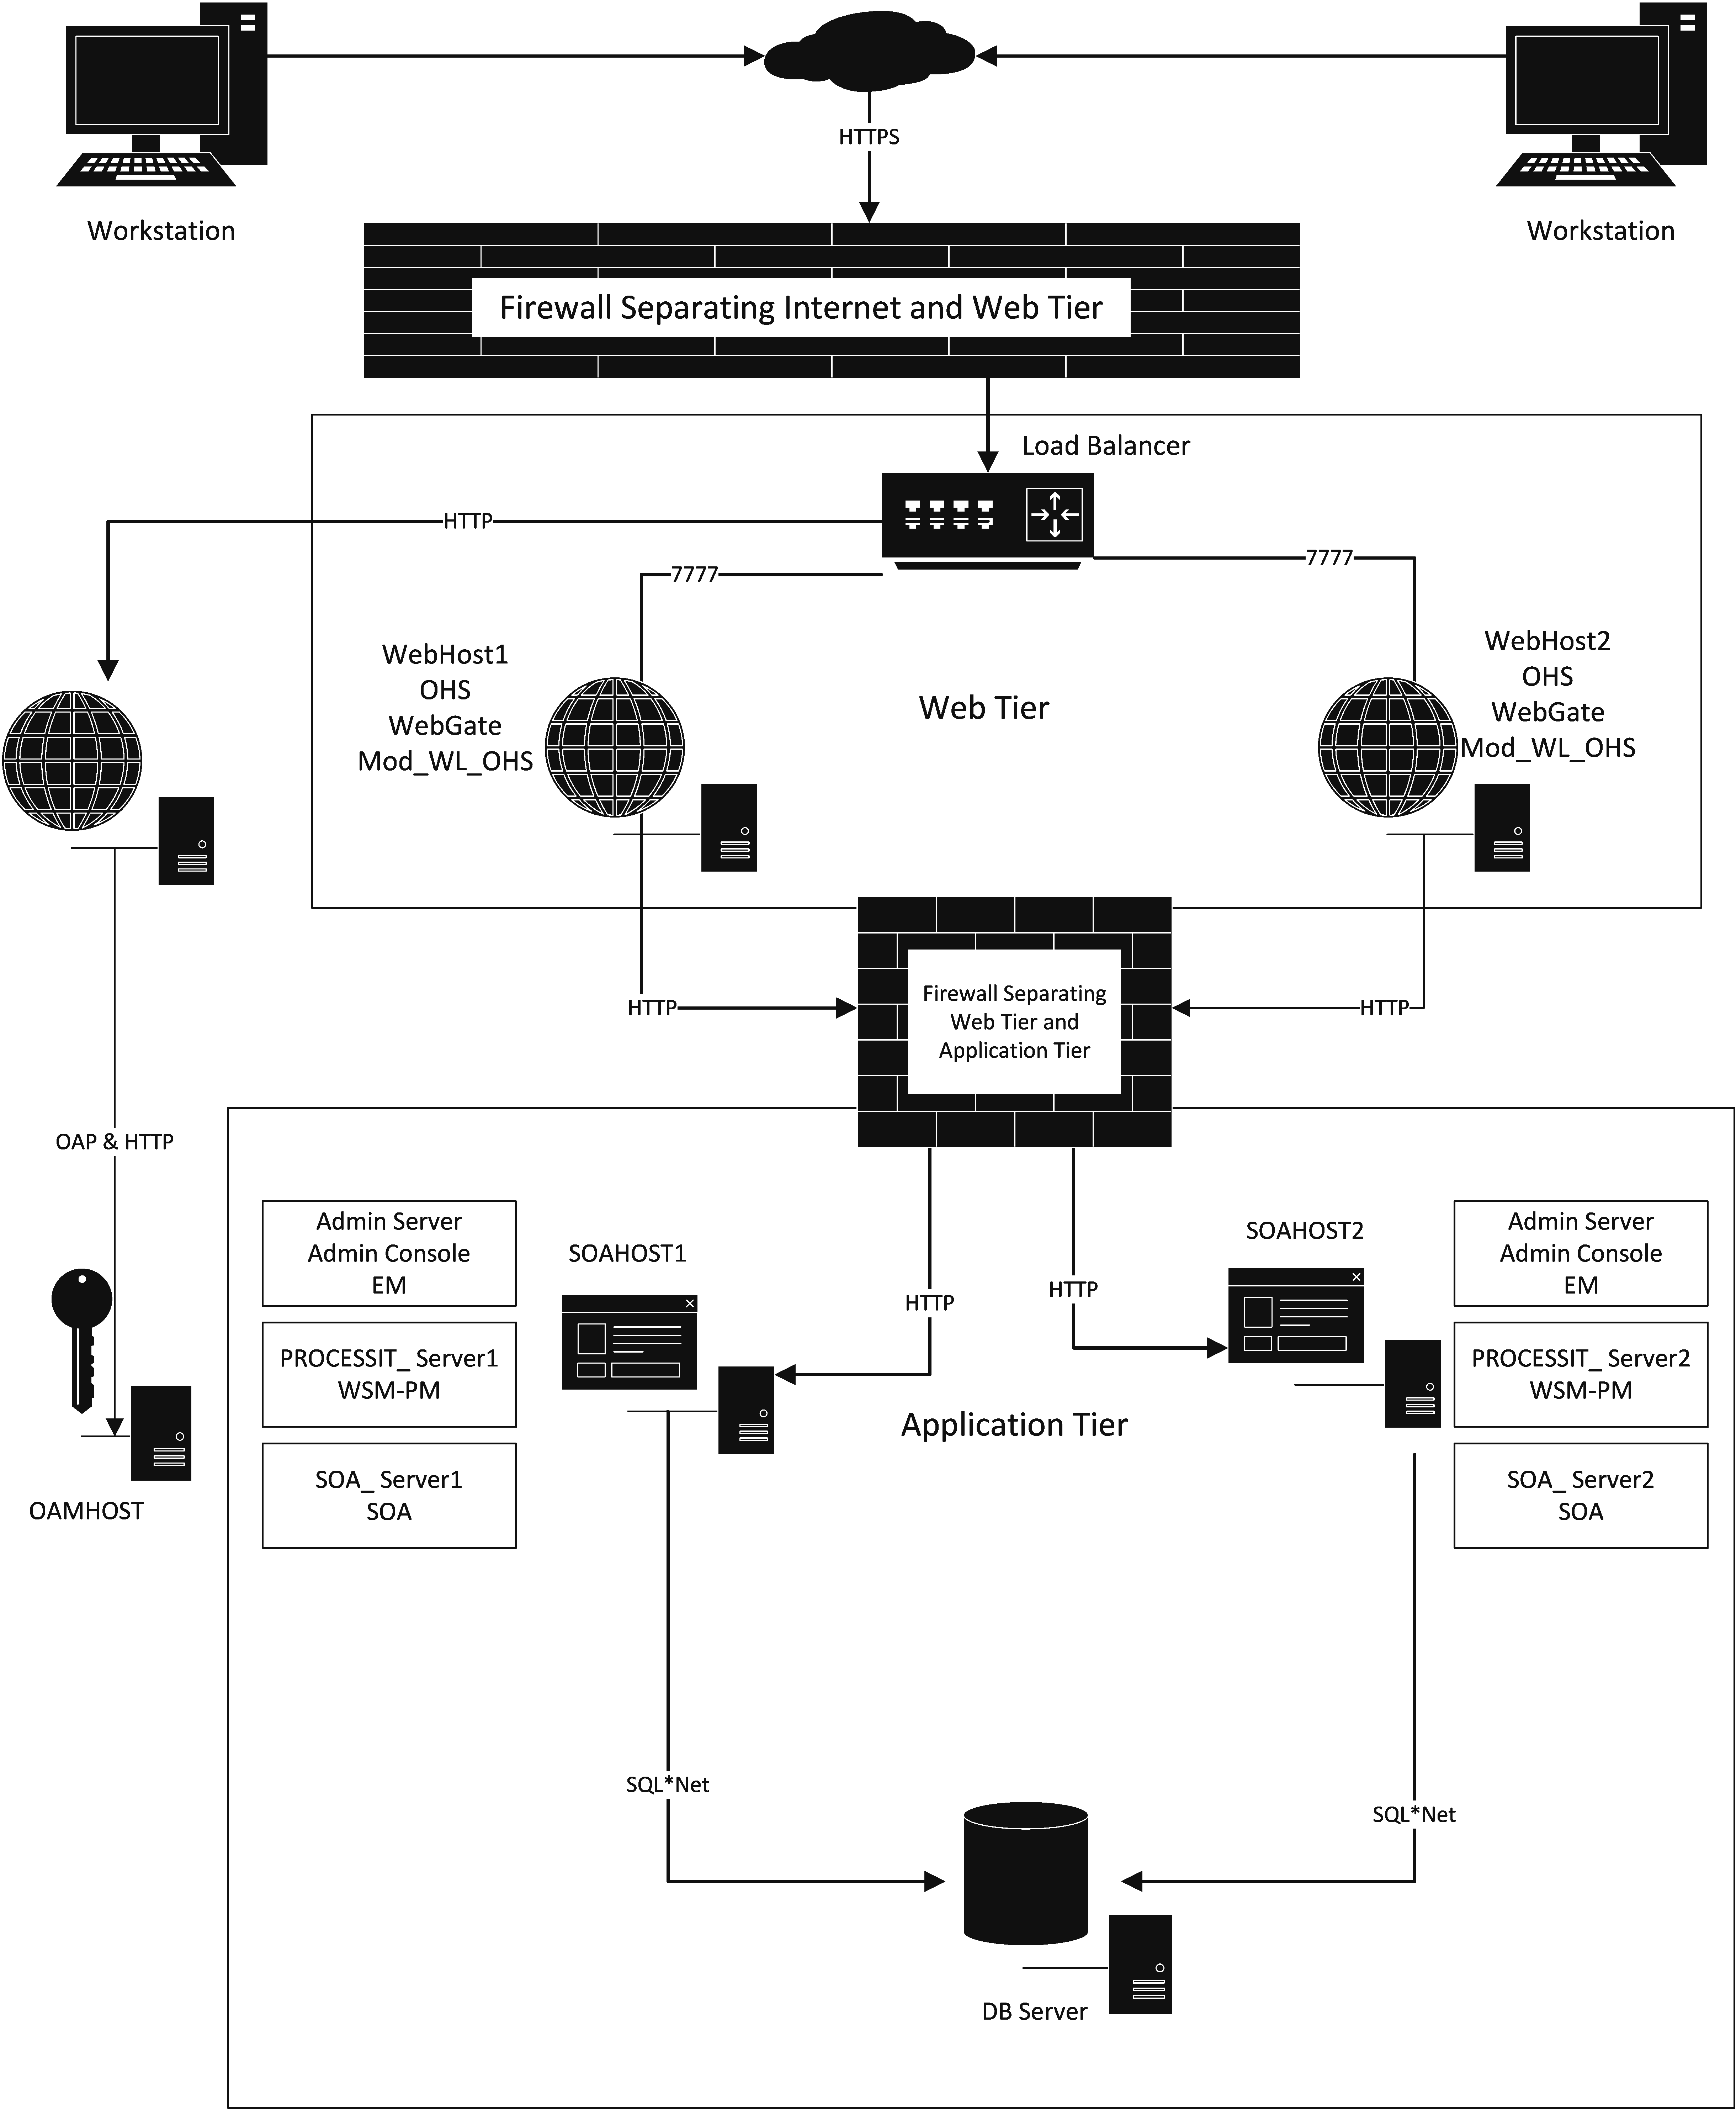
Oracle Access Manager
The primary interface to the Oracle Identity Management is the LDAP traffic to the LDAP servers, the OAP (Oracle Access Protocol) to the OAM Access Servers, and the HTTP redirection of authentication requests.
Web Tier Nodes
Nodes in the web tier are located in the DMZ public zone. In this tier, two nodes WEBHOST1 and WEBHOST2 run Oracle HTTP Server configured with WebGate and mod_wl_ohs. The following is a list of benefits provided by using Oracle HTTP Server as an intermediate point between the load balancer and the different WebLogic Servers:
- It provides a sacrificial area/DMZ. This is a common requirement in security audits and is a major problem with load balancer/WebLogic systems. If a load balancer routes directly to the WebLogic Server, request move from the load balancer to the application tier in one single HTTP jump, causing security concerns.
- It allows the WebLogic Server cluster membership to be reconfigured (new servers added, others removed) without having to change the Web server configuration (as long as at least some of the servers in the configured list remain alive). The plug-in learns about the cluster membership and directs work accordingly.
- Faster fail-over in the event of WebLogic Server instance failure. The plug-in actively learns about the failed WebLogic Server instance using information supplied by its peers, it avoids the failed server until the peers notify the plug-in that it is again available. Load balancers are typically more limited.
- Oracle HTTP Server delivers static content more efficiently and faster than WebLogic Server.
- HTTP redirection over and above what WebLogic Server provides. You can use Oracle HTTP Server as a front end against many different WebLogic Server clusters, and perhaps do content based routing.
- If SSO is required, only Oracle HTTP Server (not WebLogic Server) supports Oracle Identity Management.
Through mod_wl_ohs, which allows requests to be proxied from Oracle HTTP Server to WebLogic Server, Oracle HTTP Server forwards the requests to WebLogic Server running in the application tier.
WebGate (which is an Oracle Access Manager component) in Oracle HTTP Server uses Oracle Access Protocol (OAP) to communicate with Oracle Access Manager running on OAMHOST2, in the Identity Management DMZ. WebGate and Oracle Access Manager are used to perform operations such as user authentication.
The web tier also includes a load balancer router to handle external requests. External requests are sent to the virtual host names configured on the load balancer. The load balancer then forwards the requests to Oracle HTTP Server.
The WebGate module in Oracle HTTP Server uses Oracle Access Protocol (OAP) to communicate with Oracle Access Manager to perform operations such as querying user groups.
Load Balancer
This topology uses an external load balancer. This external load balancer should have the following features:
- Ability to load-balance traffic to a pool of real servers through a virtual host name: Clients access services using the virtual host name (instead of using actual host names). The load balancer can then load balance requests to the servers in the pool.
- Port translation configuration should be possible so that incoming requests on the virtual host name and port are directed to a different port on the backend servers.
- Monitoring of ports on the servers in the pool to determine availability of a service.
- Virtual servers and port configuration: Ability to configure virtual server names and ports on your external load balancer, and the virtual server names and ports must meet the following requirements:
- The load balancer should allow configuration of multiple virtual servers. For each virtual server, the load balancer should allow configuration of traffic management on more than one port. For example, for Oracle HTTP Server in the web tier, the load balancer needs to be configured with a virtual server and ports for HTTP and HTTPS traffic.
- The virtual server names must be associated with IP addresses and be part of your DNS. Clients must be able to access the external load balancer through the virtual server names.
- Ability to detect node failures and immediately stop routing traffic to the failed node.
- Fault-tolerant mode: It is highly recommended that you configure the load balancer to be in fault-tolerant mode.
- Sticky routing capability: Ability to maintain sticky connections to components.
- The load balancer should be able to terminate SSL requests at the load balancer and forward traffic to the backend real servers using the equivalent non-SSL protocol (for example, HTTPS to HTTP).
Application Tier Nodes
Nodes in the application tier are located in the DMZ secure zone.
In this tier, nodes run Oracle WebLogic Server configured with managed servers for running SOA components and ADF applications. The managed servers are configured in an active-active manner.
On the firewall protecting the application tier, the HTTP ports, OAP port, and proxy port are open. The OAP port is for the WebGate module running in Oracle HTTP Server in the web tier to communicate with Oracle Access Manager. Applications requiring external HTTP access use Oracle HTTP Server as the proxy. (The proxy on the Oracle HTTP Server must be enabled to allow this access.)
Typographic conventions
Please note that all commands that should be typed are presented like this.
Hardware Requirements
| Server | Disk | Memory |
|---|---|---|
| Database | 400GB+100GB per year for growth (Assuming images are stored in db) | 16GB |
| OHS n | 40GB | 8GB |
| WLS/SOA n | 40GB | 16GB |
Clock
The clocks of all servers participating in the cluster must be synchronized to within one second difference to enable proper functioning of jobs, adapters ec.
High Level Overview of Deployment Process
- Prepare the Network
- Prepare the File System
- Prepare the Database
- Install Software
- Configure Web Tier
- Create Domain
- Extend Domain for SOA
- Setup Node Manager
Deployment
Prepare the Network
Overview
You must configure several virtual servers and associated ports on the load balancer for different types of network traffic and monitoring. These virtual servers should be configured to the appropriate real hosts and ports for the services running. Also, the load balancer should be configured to monitor the real host and ports for availability so that the traffic to these is stopped as soon as possible when a service is down. This ensures that incoming traffic on a given virtual host is not directed to an unavailable service in the other tiers.
Virtual Servers
Ensure that the virtual server names are associated with IP addresses and are part of your DNS. The nodes running Oracle Fusion Middleware must be able to resolve these virtual server names:
- processit.companyname.com is a virtual server name that acts as the access point for all HTTP traffic to the application. Traffic to SSL may be configured. If so, clients access this service using the address processit.companyname.com:443.
- admin.companyname.com is a virtual server name that acts as the access point for all internal HTTP traffic that is directed to administration services such as WebLogic Administration Server Console and Oracle Enterprise Manager. The incoming traffic from clients is not SSL-enabled. Clients access this service using the address admin.companyname.com:80 and the requests are forwarded to port 7777 on WEBHOST1 and WEBHOST2.
- soainternal.companyname.com is a virtual server name used for internal invocations of SOA services. This url is not exposed to the internet and is only accessible from the intranet. The incoming traffic from clients is not SSL-enabled. Clients access this service using the address soainternal.companyname.com:80 and the requests are forwarded to port 7777 on WEBHOST1 and WEBHOST2.
- soainternal.companyname.com is a virtual server name used for internal invocations of WLS web services. This url is not exposed to the internet and is only accessible from the intranet. The incoming traffic from clients is not SSL-enabled. Clients access this service using the address soainternal.companyname.com:80 and the requests are forwarded to port 7777 on WEBHOST1 and WEBHOST2.
Load Balancer
Several virtual servers and associated ports must be configured on the load balancer for different types of network traffic and monitoring. These should be configured to the appropriate real hosts and ports for the services running. Also, the load balancer should be configured to monitor the real host and ports for availability so that the traffic to these is stopped as soon as possible when a service is down. This ensures that incoming traffic on a given virtual host is not directed to an unavailable service in the other tiers.
The procedures for configuring a load balancer differ, depending on the specific type of load balancer. Refer to the vendor supplied documentation for actual steps. The following steps outline the general configuration flow:
- Create a pool of servers. This pool contains a list of servers and the ports that are included in the load balancing definition. For example, for load balancing between the web hosts you create a pool of servers which would direct requests to hosts WEBHOST1 and WEBHOST2 on port 7777.
- Create rules to determine whether or not a given host and service is available and assign it to the pool of servers described in Step 1.
- Create a Virtual Server on the load balancer. This is the address and port that receives requests used by the application.
- If your load balancer supports it, specify whether or not the virtual server is available internally, externally or both. Ensure that internal addresses are only resolvable from inside the network.
- Configure SSL Termination, if applicable, for the virtual server.
- Assign the Pool of servers created in Step 1 to the virtual server.
| Virtual Host | Server Pool | External |
|---|---|---|
| admin.companyname.com:80 | WEBHOST1.companyname.com:7777 WEBHOST2.companyname.com:7777 | No |
| processit.companyname.com:<80 if non-ssl, 443 if ssl> | WEBHOST1.companyname.com:7777 WEBHOST2.companyname.com:7777 | Yes |
| soainternal.companyname.com:80 | WEBHOST1.companyname.com:7777 WEBHOST2.companyname.com:7777 | No |
| wlsinternal.companyname.com:80 | WEBHOST1.companyname.com:7777 WEBHOST2.companyname.com:7777 | No |
| Virtual IP | Maps to | Description |
|---|---|---|
| VIP1 | ADMINVHN | ADMINVHN is the virtual host name that is the listen address for the Administration Server and fails over with manual failover of the Administration Server. It is enabled on the node where the Administration Server process is running (SOAHOST1 by default). |
| VIP2 | SOAHOST1VHN | SOAHOST1VHN is the virtual host name that maps to the listen address for WLS_SOA1. It is enabled on the node where WLS_SOA1 process is running (SOAHOST1 by default). |
| VIP3 | SOAHOST2VHN | SOAHOST2VHN is the virtual host name that maps to the listen address for WLS_SOA2. It is enabled on the node where WLS_SOA2 process is running (SOAHOST2 by default). |
Firewall and Ports
Many Oracle Fusion Middleware components and services use ports. As an administrator, you must know the port numbers used by these services and ensure that the same port number is not used by two services on a host. Most port numbers are assigned during installation. Typical Firewall Ports include these:
FW0 refers to external firewall. FW1 refers to firewall between web tier and application tier.
| Type | Firewall | Port | Inbound/Outbound |
|---|---|---|---|
| Browser Request | FW0 | 80/443 | Inbound |
| Callbacks and Invocations | FW1 | 80/443 | Outbound |
| LB to OHS | n/a | 7777 | n/a |
| OHS registration with AdminServer | FW1 | 7001 | Inbound |
| OHS management by AdminServer | FW1 | OPMN port (6701) and OHS Admin Port(7779) | Outbound |
| Communication between SOA Cluster members | n/a | 8001 (unicast) | n/a |
| Administration Console access | FW1 | 7001 | Both |
| Node Manager | n/a | 5556 | n/a |
Prepare the File System
Terminology
- ORACLE_BASE: This environment variable and related directory path refer to the base directory under which Oracle products are installed.
- MW_HOME: This environment variable and related directory path refer to the location where Oracle Fusion Middleware resides.
- WL_HOME: This environment variable and related directory path contain installed files necessary to host a WebLogic Server.
- ORACLE_HOME: This environment variable and related directory path refer to the location where Oracle Fusion Middleware SOA Suite is installed.
- ORACLE_COMMON_HOME: This environment variable and related directory path refer to the Oracle home that contains the binary and library files required for the Oracle Enterprise Manager Fusion Middleware Control and Java Required Files (JRF).
- DOMAIN Directory: This directory path refers to the location where the WebLogic Server Domain information (configuration artifacts) is stored. Different Oracle WebLogic Servers can use different domain directories even when in the same node as described below.
- ORACLE_INSTANCE: An Oracle instance contains one or more system components, such as Oracle HTTP Server or Oracle Internet Directory. An Oracle instance directory contains updateable files, such as configuration files, log files, and temporary files.
- JAVA_HOME: This is the location where Java is installed.
- ASERVER_HOME: This is the primary location of the domain configuration. A typical example is: /u01/oracle/config/domains/d4
- MSERVER_HOME: This is a copy of the domain configuration used to start and stop managed servers. A typical example is: /u02/private/oracle/config/domains/d4
- WEB_ORACLE_HOME: This variable contains the binary and library files required for Oracle HTTP Server and is located in MW_HOME/web.
- WEBGATE_ORACLE_HOME: This is the location of the WebGate installation.
Directory Locations
- ORACLE_BASE | Recommended directory: /u01/app/oracle
- Domain Directory for Admin Server Domain Directory | ORACLE_BASE/admin/domain_name/aserver/domain_name (The last “domain_name” is added by Configuration Wizard)
- Mount point on machine: ORACLE_BASE/admin/domain_name/aserver
- Shared storage location: ORACLE_BASE/admin/domain_name/aserver
- Mounted from: Only the node where the Administration Server is running needs to mount this directory. When the Administration Server is relocated (failed over) to a different node, the node then mounts the same shared storage location on the same mount point. The remaining nodes in the topology do not need to mount this location.
- Domain Directory for Managed Server Domain Directory | ORACLE_BASE/admin/domain_name/mserver/domain_name
- If you are using a shared disk, the mount point on the machine is:
ORACLE_BASE/admin/domain_name/mservermounted to/ORACLE_BASE/admin/domain_name/Noden/mserver/ - Each node uses a different domain directory for managed servers.
- If you are using a shared disk, the mount point on the machine is:
- Location for Application Directory for the Administration Server | ORACLE_BASE/admin/domain_name/aserver/applications
- Mount point: ORACLE_BASE/admin/domain_name/aserver/
- Shared storage location: ORACLE_BASE/admin/domain_name/aserver
- Mounted from: Only the node where the Administration Server is running must mount this directory. When the Administration Server is relocated (failed over) to a different node, the node then mounts the same shared storage location on the same mount point. The remaining nodes in the topology do not need to mount this location
- Location for Application Directory for Managed Server | ORACLE_BASE/admin/domain_name/mserver/applications
- This directory is local in the context of a SOA enterprise deployment.
- MW_HOME (application tier) | Recommended directory: ORACLE_BASE/product/fmw
- Mount point: ORACLE_BASE/product/fmw
- Shared storage location: ORACLE_BASE/product/fmw
- Note: For redundancy and to protect against accidental file deletions this shared location can be duplicated onto multiple volumes and half the nodes use the first location and the other half use the second location
- ORACLE_HOME (web tier) | Recommended directory: ORACLE_BASE/product/fmw/web
- Mount point: ORACLE_BASE/product/fmw
- Shared storage location: ORACLE_BASE/product/fmw
- Note: Web Tier installation is typically performed on local storage to the OHS nodes. When using shared storage, consider the appropriate security restrictions for access to the storage device across tiers. If shared disk is used, the shared disk for the web tier should be separate from the shared disk for teh application tier
- WL_HOME | Recommended directory: MW_HOME/wlserver_10.3
- ORACLE_HOME | Recommended directory: MW_HOME/soa
- ORACLE_COMMON_HOME | Recommended directory: MW_HOME/oracle_common
- ORACLE_INSTANCE (OHS Instance) | Recommended directory: ORACLE_BASE/admin/instance_name
Example Shared Storage Configuration
The shared storage filer is called nasfiler.
mount nasfiler:/vol/vol1/ORACLE_BASE/product/fmw ORACLE_BASE/product/fmw -t nfs -o rw,bg,hard,nointr,tcp,vers=3,timeo=300,rsize=32768,wsize=32768If using multiple shared locations for redundancy, the next node would use:
mount nasfiler:/vol/vol2/ORACLE_BASE/product/fmw ORACLE_BASE/product/fmw -t nfs -o rw,bg,hard,nointr,tcp,vers=3,timeo=300,rsize=32768,wsize=32768The options may differ depending on the specific storage device. Contact your storage vendor and machine administrator for the correct options for your environment.
Prepare the Database
Initialization Parameters
Ensure that the following initialization parameter is set to the required minimum value. It is checked by Repository Creation Assistant.
As the SYS user, issue this SHOW PARAMETER command: SQL> SHOW PARAMETER processes;
Set the initialization parameter using this command: SQL> ALTER SYSTEM SET processes=300 SCOPE=SPFILE;
Restart the database for the initialization parameter change to take effect.
Repository Creation Utility
- Change to the rcuHome/bin directory.
./rcu- Welcome. Click Next.
- Create Repository. Select Create and click Next.
- Database Connection Details. Enter connection information for the database for the repository. This should match the database installed previously. Click Next when complete.
- Host Name
- port
- Service Name
- Username
- Password
- Checking Prerequisites. Click OK.
- In the Select Components screen, do the following:
- Select Create a New Prefix, and enter
RSas the prefix to use for the database schemas. - Note the name of the schema because you will need it later
- Select the following:
- AS Common Schemas:
- Metadata Services
- SOA and BPM Infrastructure:
- SOA Infrastructure
- User Messaging Service
- AS Common Schemas:
- Select Create a New Prefix, and enter
- In the Schema Passwords screen, select Specify different passwords for all schema. Enter and confirm passwords for each of the requested schemas. Click Next
- In the Map Tablespaces screen, choose the tablespaces for the selected components, and click Next.
- A confirmation dialog is displayed stating that any tablespace that does not already exist in the selected schema will be created. Click OK to acknowledge this message.
- In the Summary screen, click Create.
- In the Completion Summary screen, click Close.
Configuring SOA Schemas for Transactional Recovery Privileges
You need the appropriate database privileges to allow the Oracle WebLogic Server transaction manager to query for transaction state information and issue the appropriate commands, such as commit and rollback, during recovery of in-flight transactions after a WebLogic Server container crash.
These privileges should be granted to the owner of the soainfra schema, as determined by the RCU operations.
To configure the SOA schemas for transactional recovery privileges:
- Log on to SQL*Plus as a user with sysdba privileges. For example:
sqlplus / as sysdba - Enter the following commands:
SQL> Grant select on sys.dba_pending_transactions to rs_soainfra;

						SQL> Grant force any transaction to rs_soainfra;
Install Software
Overview
The software installation is divided into two parts. The first part covers the required web tier installations, while the second part addresses the required Fusion Middleware (FMW) components.
| Hosts | Oracle HTTP Server (OHS) | Oracle WebLogic Server (WLS) | Oracle SOA Suite (SOA) |
|---|---|---|---|
| WEBHOST1 | X | ||
| WEBHOST2 | X | ||
| SOAHOST1 | X | X | |
| SOAHOST2 | X | X |
Web Tier
Prerequisites
Prior to installing Oracle HTTP Server (OHS), check that your machines meet the following requirements:
- Ensure that the system, patch, kernel, and other requirements are met as specified in the Oracle Fusion Middleware Installation Guide for Oracle Web Tier.
- Because Oracle HTTP Server is installed on port 7777 by default, you must make sure that port 7777 is not used by any service on the nodes.
netstat -an | grep 7777 - If the /etc/oraInst.loc file exists, check that its contents are correct. Specifically, check that the inventory directory is correct and that you have write permissions for that directory.
- Before starting the installation, make sure that the following environment variables are not set:
- LD_ASSUME_KERNEL
- ORACLE_INSTANCE
Installing Oracle HTTP Server on WEBHOST1 and WEBHOST2
When you install Oracle HTTP Server, you are installing the Web Tier and NOT associating it with a domain. However, you do need to create a MW_HOME directory for the Web tier, even though it is not associated with a domain.
- Start the installer for Oracle HTTP Server from Disk 1 of the installation media:
./runInstaller - In the Specify Inventory Directory screen, do the following:
- Enter HOME/oraInventory, where HOME is the home directory of the user performing the installation (this is the recommended location).
- Enter the OS group for the user performing the installation.
- Click OK.
- Follow the instructions on screen to execute /createCentralInventory.sh as root
- Click OK.
- In the Welcome screen, click Next.
- In the Install Software Updates screen, select Skip Software Updates and click Next.
- In the Select Installation Type screen, select Install - Do Not Configure, and click Next.
- In the Prerequisite Checks screen, verify that all checks complete successfully, and click Next.
- In the Specify Installation Location screen, create a MW_HOME that will contain your Web Tier home directory. You are creating two new directories. You are not selecting an existing directory. For this screen, enter the following:
- Fusion Middleware Home Location (installation location): ORACLE_BASE/product/fmw
- Oracle Home Directory: web
- In the Specify Security Updates screen, choose whether you want to receive security updates from Oracle support and if you do, enter your e-mail address.
- In the Installation Summary screen, review the selections to ensure they are correct. If they are not, click Back to modify selections on previous screens. When you are ready, click Install.
- If prompted to run the oracleRoot.sh script, make sure you run it as the root user.
- In the Installation Completed screen, click Finish to exit
Fusion Middleware
Installing Oracle WebLogic Server and Creating the Fusion Middleware Home
To install Oracle WebLogic Server on SOAHOST1 and SOAHOST2:
cd <INST_TOP>- where <INST_TOP> is the directory containing wls1036_generic.jar.- Invoke the WebLogic installer:
java -jar wls1036_generic.jar - Click Next
- Choose Middleware Home directory. Select to Create a new Middleware Home and set the Middleware home. We reccommend to set it to ORACLE_BASE/product/fmw and click Next.
ORACLE_BASE is the base directory under which Oracle products are installed. - Click Next
- Click Yes
- Click Yes
- Check I wish to remain uninformed... checkbox and Click Continue
- Select install type Custom.
- Select components to install. You can just click Next here.
- In the JDK Selection window,select JDK installed previously and click Next.
- Select installation directory. You can just click Next here.
- Installation summary. Click Next.
- The installation runs. Wait for the installation to complete.
- Uncheck the Run Quickstart checkbox and Click Done to complete the installation.
- Validate the installation by verifying that the following directories and files appear in the ORACLE_HOME directory after installing Oracle WebLogic Server:
- coherence_version
- modules
- registry.xml
- utils
- domain-registry.xml
- logs
- ocm.rsp
- registry.dat
- wlserver_10.3
Installing Oracle Fusion Middleware SOA Suite
To install Oracle Fusion Middleware SOA Suite on SOAHOST1 and SOAHOST2:
./runInstaller- Enter the JRE locate. This can vary depending on JDK installed.
- The SOA installer is shown.
- Welcome. Click Next.
- Install Software Updates. Select Skip Software Updates and click Next.
- Prerequisite Checks. Click Next.
- Specify Installation Directory.
- Oracle Midleware Home: Select the previously installed Oracle Middleware Home from the drop-down list.
- Oracle Home Directory:
Oracle_SOA1 - Click Next.
- Application Server. Click Next.
- Installation Summary. Click Install.
- Installation Progress. Click Next.
- Installation Complete. Click Finish.
- Validate the installation by verifying that the following directories and files appear in the ORACLE_HOME directory after installing both Oracle WebLogic Sever and Oracle Fusion Middleware for SOA:
- coherence_version
- modules
- oracle_common
- registry.xml
- utils
- domain-registry.xml
- logs
- ocm.rsp
- registry.dat
- Oracle_SOA1
- wlserver_10.3
Configure Web Tier
Running the Configuration Wizard to Configure Oracle HTTP Server
The steps for configuring the Oracle Web Tier are the same for both WEBHOST1 and WEBHOST2. To configure the Oracle web tier:
- Change the directory to the location of the Oracle Fusion Middleware Configuration Wizard:
WEBHOST1> cd WEB_ORACLE_HOME/bin - Start the Configuration Wizard:
WEBHOST1> ./config.sh - In the Welcome screen, click Next.
- In the Configure Components screen, select Oracle HTTP Server and deselect Associate Selected Components with WebLogic Domain. Make sure that Oracle Web Cache is not selected. Click Next.
- In the Specify Component Details screen, specify the following values:
- Instance Home Location: ORACLE_BASE/admin/webn
- AS Instance Name: webn
- OHS Component Name: ohsn - Where n is a sequential number for your installation; for example, 1 for WEBHOST1, 2 for WEBHOST2, and so on.
- Note: Oracle HTTP Server instance names on WEBHOST1 and WEBHOST2 must be different.
- Click Next.
- In the Configure Ports screen, select a file name and then click View/Edit. In high-availability implementations, it is not mandatory for all of the ports used by the various components to be synchronized across hosts, however it makes the enterprise deployment much simpler. Oracle allows automatic port configuration to be bypassed by specifying ports to be used in a file. The file looks like this:
[OHS] #Listen port for OHS component OHS Port = 7777 [OPMN] #Process Manager Local port no OPMN Local Port = 1880 - You can find a sample staticports.ini file on installation disk 1 in the stage/Response directory.
- Click Next.
- In the Specify Security Updates screen, choose whether you want to receive security updates from Oracle support and if you do, enter your e-mail address.
- In the Installation Summary screen, review the selections to ensure they are correct. If they are not, click Back to modify selections on previous screens. When you are ready, click Configure.
- Multiple configuration assistants are launched in succession; this process can be lengthy. When it completes, click Next, and the Installation Complete screen appears.
- In the Installation Completed screen, click Finish to exit.
Validate the configuration
Once the installation is completed, check that it is possible to access the Oracle HTTP Server home page using this URL: http://WEBHOST1.companyname.com:7777
Configuring the Load Balancer to Route HTTP Requests
Configure your load balancer to route all HTTP requests to the hosts running Oracle HTTP Server (WEBHOST1, WEBHOST2). You do not need to enable sticky sessions (insert cookie) on the load balancer when Oracle HTTP Server is front-ending Oracle WebLogic Server. You need sticky sessions if you are going directly from the load balancer to Oracle WebLogic Server
The instructions for this configuration will vary depending on which load balancer you use. See your load balancer documentation for specific instructions.
Define Virtual Hosts
Define the IP Address and Port in the httpd.conf File
You are defining name-based virtual servers. That means you have to define the IP address and port that will be used for each virtual host you define. You define the IP address and port once, in the httpd.conf file, then you can define the actual virtual host names (and their specific URLs) in the virtual host-specific .conf files.
To define the IP address and port, add the following entry in the httpd.conf file: NameVirtualHost *:7777
Creating .conf Files to Define <VirtualHost> Directives
Define each virtual host in its own .conf file. This will make it easy to manage the URLs for each virtual host you define.
There is an INCLUDE statement in the httpd.conf that includes all *.conf files in the directory. This statement makes it possible to create separate virtual host files for each component, making it easier to update, maintain, and scale-out the virtual host definitions.
Create the following new files to define the <VirtualHost> directives. Create the new files in the following directory: ORACLE_BASE/admin/instance_name/config/OHS/component_name/moduleconf
- processit_vh.conf
- soainternal_vh.conf
- admin_vh.conf
To define each virtual host in its own .conf file:
- Create the soa_vh.conf file and add the following directive:
<VirtualHost *:7777> ServerName https://processit.companyname.com:443 ServerAdmin you@your.address RewriteEngine On RewriteOptions inherit </VirtualHost> - Create the soainternal_vh.conf file and add the following directive:
<VirtualHost *:7777> ServerName soainternal.companyname.com:80 ServerAdmin you@your.address RewriteEngine On RewriteOptions inherit </VirtualHost> - Create the admin_vh.conf file and add the following directive:
<VirtualHost *:7777> ServerName admin.companyname.com:80 ServerAdmin you@your.address RewriteEngine On RewriteOptions inherit RewriteRule ^/console/jsp/common/logout.jsp "/oamsso/logout.html?end_url=/console" [R] </VirtualHost> - Restart both Oracle HTTP Servers:
cd ORACLE_BASE/admin/instance_name/bin
opmnctl stopall
opmnctl startall
Create the Domain
Overview
- Enable VIP1 in SOAHOST1
- Create the WLS Domain with the Configuration Wizard
- Post-Configuration Tasks
- Propogate the Domain Configuration to SOAHOST2
- Configure OHS with the WLS Domain
Enable VIP1 in SOAHOST1
Please note that this step is required for failover of the Administration Server, regardless of whether or not SOA is installed.
You are associating the Administration Server with a virtual hostname (ADMINVHN). This Virtual Host Name must be mapped to the appropriate virtual IP (VIP1) either by a DNS Server or by a custom /etc/hosts entry. Check that ADMINVHN is available according to your name resolution system, (DNS server, /etc/hosts), in the required nodes in your SOA topology. The virtual IP (VIP1) that is associated to this Virtual Host Name (ADMINVHN) must be enabled in SOAHOST1.
Create the WLS Domain with the Configuration Wizard
Run the Configuration Wizard from the Oracle Common home directory to create a domain containing the Administration Server and Oracle Web Services Manager. Later, you will extend the domain to contain SOA components.
To create a domain:
- Ensure that the database where you installed the repository is running.
- Change directory to the location of the Configuration Wizard. This is within the SOA home directory. From SOAHOST1:
cd ORACLE_COMMON_HOME/common/bin - Start the Oracle Fusion Middleware Configuration Wizard:
./config.sh - In the Welcome screen, select Create a New WebLogic Domain, and click Next.
- In the Select Domain Source screen
- Select Generate a domain configured automatically to support the following products.
- Select the following products:
- Basic WebLogic Server Domain - 10.3.6.0 [wlserver_10.3] (this should be selected automatically)
- Oracle Enterprise Manager - 11.1.1.0 [oracle_common]
- Oracle WSM Policy Manager 11.1.1.0 [oracle_common]
- Oracle JRF - 11.1.1.0 [oracle_common]
- In the Specify Domain Name and Location screen, enter the domain name, usually d4. Make sure that the domain directory matches the directory and shared storage mount point recommended previously.
ORACLE_BASE/admin/domain_name/aserver/
And the following for the application directory. This directory should be in shared storage:
ORACLE_BASE/admin/domain_name/aserver/applications - Click Next
- In the Configure Administrator Username and Password screen, enter the username and password to be used for the domain's administrator.
Click Next. - Configure Server Start Mode and JDK. Select Development Mode for WebLogic Domain Startup Mode and select the JDK install previously, then click Next.
- Configure JDBC Component Schema. Only one Component Schema at a time should be checked.
- Check OWSM MDS Schema and complete the fields above with the appropriate connection details. The Schema Owner will be RS_MDS.
- Test JDBC Component Schema. Click Next.
- In the Select Advanced Configuration screen, select the following:
- Administration Server
- Managed Servers, Clusters and Machines
- Deployment and Services
- Click Next.
- In the Configure the Administration Server screen, enter the following values:
- Name: AdminServer
- Listen Address: enter ADMINVHN.
- Listen Port: 7001
- SSL listen port: N/A
- SSL enabled: unchecked
- Click Next.
- In the Configure Managed Servers screen, click Add to add the following managed servers:
Click Next.Name Listen Address Listen Port SSL Listen Port SSL Enabled PROCESSIT_SERVER1 SOAHOST1 7003 n/a No PROCESSIT_SERVER2 SOAHOST2 7003 n/a No - In the Configure Clusters screen, Click Add to add the following clusters:
Name Cluster Messaging Mode Multicast Address Multicast Port Cluster Address processit_cluster unicast n/a n/a Leave it empty - In the Assign Servers to Clusters screen, assign servers to the processit_cluster as follows:
- PROCESSIT_SERVER1
- PROCESSIT_SERVER2
- In the Configure Machines screen, click the Unix Machine tab and then click Add to add the following machines. Leave all other values at the defaults.
Name Node Manager Listen Address SOAHOST1 SOAHOST1 SOAHOST2 SOAHOST2 ADMINHOST localhost - Click Next.
- In the Assign Servers to Machines screen, assign servers to machines as follows:
- SOAHOST1: PROCESSIT_SERVER1
- SOAHOST2: PROCESSIT_SERVER2
- ADMINHOST: AdminServer
- Click Next.
- In the Target Deployments to Clusters or Servers screen, make sure that the wsm-pm application is targeted to the processit_cluster only. Target the library oracle.wsm.seedpolicies to processit_cluster. Make sure that all other deployments are targeted to the AdminServer and click Next.
- In the Target Services to Clusters or Servers screen, select the following:
- On the left, select processit_cluster. On the right, select JDBC System Resource (this automatically selects all the wsm datasources (mds-owsm)).
- On the left, select Admin Server. On the right, select JDBC System Resource> (this automatically selects all the wsm datasources (mds-owsm)).
Make sure that all the remaining services are targeted to the Admin Server.
- Click Next.
- In the Configuration Summary screen, click Create.
- In the Create Domain screen, click Done.
Post-Configuration Tasks
Creating boot.properties for the Administration Server on SOAHOST1
Create a boot.properties file for the Administration Server on SOAHOST1. This is a required step that enables you to start the Administration Server using Node Manager.
To create a boot.properties file for the Administration Server:
- Create the following directory structure:
mkdir -p ORACLE_BASE/admin/domain_name/aserver/domain_name/servers/AdminServer/security - In a text editor, create a file called boot.properties in the last directory created in the previous step, and enter the following lines in the file:
username=<adminuser> password=<password> - Save the file and close the editor
Starting Node Manager on SOAHOST1
To start Node Manager on SOAHOST1:
- Set the StartScriptEnabled property to 'true' before starting Node Manager.
- Run the setNMProps.sh script located in the following directory:
cd ORACLE_COMMON_HOME/common/bin ./setNMProps.sh - Start Node Manager:
It is important that you set -DDomainRegistrationEnabled=true whenever a Node Manager that manages the AdminServer is started. If there is no AdminServer on this machine and this machine is not an AdminServer failover node, you can start the Node Manager using the following command from SOAHOAST1:cd WL_HOME/server/bin export JAVA_OPTIONS="-DDomainRegistrationEnabled=true" ./startNodeManager.sh./startNodeManager.sh
Starting the Administration Server on SOAHOST1
The Administration Server is started and stopped using Node Manager. However, the first start of the Administration Server with Node Manager, requires changing the defaulted username and password that are set for Node Manager by the Configuration Wizard. Therefore, use the start script for the Administration Server for the first start.
Steps 1-4 are required for the first start operation, subsequent starts require only step 4.
- Start the Administration Server using the start script in the domain directory on SOAHOST1:
cd ORACLE_BASE/admin/domain_name/aserver/domain_name/bin ./startWebLogic.sh - Use the Administration Console to update the Node Manager credentials.
- In a browser, go to the following URL:
http://ADMINVHN:7001/console - Log in as the administrator.
- Click Lock & Edit.
- Click d4, Security tab, General, and then expand the Advanced options at the bottom.
- Enter a new username for Node Manager, or make a note of the existing one and update the Node Manager password.
- Click Save and Activate Changes.
- In a browser, go to the following URL:
- Stop the Administration Server process by using CTRL-C in the shell where it was started, or by process identification and kill in the OS.
- Start WLST and connect to Node Manager with nmconnect and the credentials set in the previous steps and start the Administration Server using nmstart. Enter the Node Manager Username and password that you entered in step 2E.
Once you are in the WLST shell:cd ORACLE_COMMON_HOME/common/bin ./wlst.sh
wls:/offline>nmConnect('<nodemanager_username>','<nodemanager_password>','SOAHOST1','5556','d4','ORACLE_BASE/admin/domain_name/aserver/d4')
wls:/nm/d4 nmStart('AdminServer')
Creating a Separate Domain Directory for Managed Servers in the Same Node as the Administration Server
Use the pack and unpack commands to separate the domain directory used by the Administration Server from the domain directory used by the managed server in SOAHOST1.
Before running the unpack script, be sure the following directory exists: ORACLE_BASE/admin/domain_name/mserver
To create a separate domain directory:
- Run the pack command on SOAHOST1 to create a template pack as follows:
cd ORACLE_COMMON_HOME/common/bin ./pack.sh -managed=true -domain=ORACLE_BASE/admin/d4/aserver/domain_name -template=soadomaintemplate.jar -template_name=soa_domain_template - Run the unpack command on SOAHOST1 to unpack the template in the managed server domain directory as follows:
cd ORACLE_COMMON_HOME/common/bin
./unpack.sh -domain=ORACLE_BASE/admin/d4/mserver/domain_name -template=soadomaintemplate.jar -app_dir=ORACLE_BASE/admin/d4/mserver/applications
Applying the Java Required Files (JRF) Template to the processit_cluster
After the domain is created with the Configuration Wizard, you must target a number of resources not included in the WebLogic server installation to the processit_cluster
To target these resources:
- Log in to Oracle Enterprise Manager Fusion Middleware Control with the username and password you specified previously
- On the navigation tree on the left, expand Farm_d4, WebLogic Domain, and then d4, and select processit_cluster.
- Click Apply JRF Template on the right.
- Wait for the confirmation message to appear on the screen.
- Repeat the steps for the Administration Server.
- Expand Farm_d4, WebLogic Domain, and then d4, and select Admin server.
Disabling Host Name Verification
To disable host name verification:
- Log in to Oracle WebLogic Server Administration Console.
- Click Lock & Edit.
- Expand the Environment node in the Domain Structure window.
- Click Servers. The Summary of Servers page appears.
- Select AdminServer(admin) in the Names column of the table. The Settings page for AdminServer(admin) appear.
- Click the SSL tab.
- Click Advanced.
- Set Hostname Verification to None.
- Click Save.
- Repeat steps 5 to 9for the PROCESSIT_SERVER1 server.
- Save and activate the changes.
- Restart the Administration Server for the changes to take effect.
Starting and Validating the PROCESSIT_SERVER1 Server
To start the PROCESSIT_SERVER1 managed server and check that it is configured correctly:
- Start the PROCESSIT_SERVER1 managed server using the Oracle WebLogic Server Administration Console as follows:
- Expand the Environment node in the Domain Structure window.
- Choose Servers. The Summary of Servers page appears.
- Click the Control tab
- Select PROCESSIT_SERVER1 and then click Start.
- Verify that the server status is reported as Running in the Admin Console. If the server is shown as Starting or Resuming, wait for the server status to change to Started. If another status is reported (such as Admin or Failed), check the server output log files for errors.
Propagating the Domain Configuration to SOAHOST2
Propagating the Domain Configuration to SOAHOST2 Using the unpack Utility
Propagate the domain configuration using the unpack utility. Before running the unpack script, be sure the following directory exists
ORACLE_BASE/admin/domain_name/mserver
To propogate the domain configuration:
- Run the following command on SOAHOST1 to copy the template file created previously.
cd ORACLE_COMMON_HOME/common/bin
scp soadomaintemplate.jar oracle@SOAHOST2:/ORACLE_COMMON_HOME/common/bin - Run the unpack command from the ORACLE_COMMON_HOME/common/bin directory, not from the WL_HOME/common/bin directory on SOAHOST2 to unpack the propagated template.
cd ORACLE_COMMON_HOME/common/bin

							./unpack.sh -domain=ORACLE_BASE/admin/domain_name/mserver/domain_name-template=soadomaintemplate.jar -app_dir=ORACLE_BASE/admin/domain_name/mserver/applications
Modify the Upload and Stage Directories to an Absolute Path
After creating the domain and unpacking to the mserver directory, update the upload and stage directories. These directories are defaulted to:
./servers/AdminServer/upload
and
./servers/server_name/stage
As a result, these default directory paths create issues for remote deployments and for deployments using the stage mode. To avoid these issues, update the upload directory to:
/u11/app/oracle/admin/d4/aserver/d4/servers/AdminServer/upload
And update the stage directory to:
/u11/app/oracle/admin/d4/mserver/d4/servers/server_name/stage
Remember to update these directory paths for all servers.
To update these directories:
- Access the Administration Console.
- In the left navigation tree, expand Domain, and then Environment.
- Click on Servers, and then the server's name.
- Under the Configuration, and then Deployments section, change the Upload and Stage directories.
Disabling Host Name Verification for the PROCESSIT_SERVER2 Managed Server
Repeat steps 5 to 9 of Disabling Host Name Verification for the PROCESSIT_SERVER2 server.
Starting Node Manager on SOAHOST2
Once you have propagated the domain configuration and disabled host name verification, start Node Manager using the StartNodeManager.sh script. To start Node Manager on SOAHOST2:
- Run the setNMProps.sh script, which is located in the ORACLE_COMMON_HOME/common/bin directory, to set the StartScriptEnabled property to 'true' before starting Node Manager:
cd ORACLE_COMMON_HOME/common/bin
./setNMProps.sh - Start Node Manager
cd WL_HOME/server/bin
./startNodeManager.sh
Starting and Validating the PROCESSIT_SERVER2 Server
To start the PROCESSIT_SERVER2 managed server using Oracle WebLogic Server Administration Console and check that it is configured correctly:
- Expand the Environment node in the Domain Structure window.
- Choose Servers. The Summary of Servers page appears.
- Click the Control tab
- Select PROCESSIT_SERVER1 and then click Start.
Verify that the server status is reported as Running in the Admin Console. If the server is shown as Starting or Resuming, wait for the server status to change to Started. If another status is reported (such as Admin or Failed), check the server output log files for errors.
Configuring Oracle HTTP Server for the WebLogic Domain
Configuring Oracle HTTP Server for the Administration Server and the PROCESSIT_SERVERn Managed Servers
To enable Oracle HTTP Server to route to the Administration Server and the PROCESSIT_Cluster, which contain the PROCESSIT_SERVERn managed servers, you must set the WebLogicCluster parameter to the list of nodes in the cluster. To set the WebLogicCluster parameter:
- On WEBHOST1 and WEBHOST2, add directives to the admin_vh.conf and soainternal_vh.conf files located in the following directory:
ORACLE_BASE/admin/instance_name/config/OHS/component_name/moduleconf
Add the following directives to the admin_vh.conf file within the <VirtualHost> tags.
# Admin Server and EM <Location /console> SetHandler weblogic-handler WebLogicHost ADMINVHN WeblogicPort 7001 </Location> <Location /consolehelp> SetHandler weblogic-handler WebLogicHost ADMINVHN WeblogicPort 7001 </Location> <Location /em> SetHandler weblogic-handler WebLogicHost ADMINVHN WeblogicPort 7001 </Location> - Add the following directives to the soainternal_vh.conf file within the <VirtualHost> tags:
# WSM-PM <Location /wsm-pm> SetHandler weblogic-handler WebLogicCluster SOAHOST1:7010,SOAHOST2:7010 WLProxySSL ON WLProxySSLPassThrough ON </Location> - Restart Oracle HTTP Server on both WEBHOST1 and WEBHOST2.
WEBHOST1> ORACLE_BASE/admin/instance_name/bin/opmnctl restartproc ias-component=ohs1

									WEBHOST2> ORACLE_BASE/admin/instance_name/bin/opmnctl restartproc ias-component=ohs2
The servers specified in the WebLogicCluster parameter are only important at startup time for the plug-in. The list needs to provide at least one running cluster member for the plug-in to discover other members of the cluster. Note that the listed cluster member must be running when Oracle HTTP Server is started. Oracle WebLogic Server and the plug-in work together to update the server list automatically with new, failed, and recovered cluster members.
Turning on the WebLogic Plug-In enabled Flag
To turn on the WebLogic plug-in enabled flag:
- Log on to the Administration Console.
- Click on the domain name in the navigation tree on the left.
- Click on the Web Applications tab.
- Click Lock & Edit.
- Select the WebLogic Plugin Enabled check box.
- Save and activate the changes.
Registering Oracle HTTP Server With WebLogic Server
Once an Oracle WebLogic domain is created, the Oracle Web Tier can be linked to the domain. The advantage of doing this is that the Oracle Web Tier can be managed and monitored using the Oracle Enterprise Manager Fusion Middleware Control.
To associate the Oracle Web Tier with the WebLogic domain use the following commands:
WEBHOST1> cd ORACLE_BASE/admin/instance_name/bin

				WEBHOST1> ./opmnctl registerinstance -adminHost ADMINVHN -adminPort 7001 -adminUsername weblogic
You must also run this command from WEBHOST2 server for OHS2.
After registering Oracle HTTP Server, it should appear as a manageable target in the Oracle Enterprise Manager Console. To verify this, log in to the Enterprise Manager Console. The WebTier item in the navigation tree should show that Oracle HTTP Server has been registered.
Setting the Frontend URL for the Administration Console and Setting Redirection Preferences
When you access the Oracle WebLogic Server Administration Console using a load balancer, changing the Administration Server's frontend URL is required so that the user's browser is redirected to the appropriate load balancer address.
The Oracle WebLogic Server Administration Console application tracks changes made to ports, channels and security using the console. When changes made through the console are activated, the console validates its current listen address, port and protocol. If the listen address, port and protocol are still valid, the console redirects the HTTP request replacing the host and port information with the Administration Server's listen address and port.
To change the Administration Server's frontend URL:
- Log in to Oracle WebLogic Server Administration Console.
- Click Lock & Edit.
- Expand the Environment node in the Domain Structure window.
- Click Servers to open the Summary of Servers page.
- Select Admin Server in the Names column of the table. The Settings page for AdminServer(admin) appears.
- Click the Protocols tab.
- Click the HTTP tab.
- Set the Frontend Host to admin.mycompany.com and the Frontend HTTP Port to 80 (modify accordingly if HTTPS is used for the admin URL).
- Save and activate the changes.
- Disable tracking on configuration changes in the Oracle WebLogic Server Administration Console so that the console does not trigger the reload of configuration pages when activation of changes occurs.
- Log in to the Oracle WebLogic Server Administration Console.
- Click the preferences link in the banner.
- Click the shared preferences tab.
- Deselect the follow configuration changes check box.
Extend Domain for SOA
Overview
Steps for Extending the Domain for SOA Components:
- Prepare for extending the Domain for SOA Components
- Extend the Domain for SOA Components
- Configure Oracle Coherence for Deploying Composites
- Post-Configuration
- Configure the Oracle HTTP Server with the extended domain
- Configure a Default Persistence Store
- Configure Oracle Adapters
Prepare for extending the Domain for SOA Components
Enabling VIP on SOAHOST1 and VIP3 on SOAHOST2
The SOA domain uses virtual hostnames as the listen addresses for the SOA managed servers. If you have not previously done so, you must enable a virtual IP mapping for each of these hostnames on the two SOA Machines, (VIP2 on SOAHOST1 and VIP3 on SOAHOST2), and correctly resolve the virtual hostnames in the network system used by the topology (either by DNS Server, hosts resolution).
To enable the virtual IPs, follow the steps described in "Enabling Virtual IP Addresses for Administration Servers" if you have yet completed this procedure. These virtual IPs and VHNs are required to enable server migration for the SOA Servers.
Synchronize System Clocks
Oracle SOA uses Quartz to maintain its jobs and schedules in the database. Synchronize the system clocks for the SOA WebLogic cluster to enable proper functioning of jobs and adapters
Extend the Domain for SOA Components
Use the Configuration Wizard to extend the domain created previously to contain SOA components.
- Change directory to the location of the Configuration Wizard. This is within the SOA home directory on SOAHOST1. Oracle recommends having all database instances up.
ORACLE_COMMON_HOME/common/bin - Start the Configuration Wizard.
./config.sh - In the Welcome screen, select Extend an existing WebLogic domain, and click Next.
- In the WebLogic Domain Directory screen, select the following WebLogic domain directory
ORACLE_BASE/admin/d4/aserver/domain_name - Click Next.
- In the Select Extension Source screen, do the following:
- Select Extend my domain automatically to support the following added products.
- Select the following products: Oracle SOA Suite 11.1.1.0
- Click Next.
- If you get a "Conflict Detected" message that Oracle JRF is already defined in the domain, select the Keep Existing Component option and click OK.
- In the Configure JDBC Components Schema screen, do the following:
- Select the SOA Infrastructure, User Messaging Service, and SOA MDS Schema.
- Click Next.
- In the Test JDBC Data Sources screen, confirm that all connections were successful.
- Click Next if all connections were successful. Otherwise, click Previous to correct your entries.
- In the Select Optional Configuration screen, select the following:
- Managed Servers, Clusters, and Machines
- Deployments and Services
- Click Next
- In the Configure Managed Servers screen, add the required managed servers:
- Select the automatically created server and click Rename to change the name to
SOA_SERVER1. - Click Add to add another new server and enter
SOA_SERVER2as the server name. - Give servers SOA_SERVER1 and SOA_SERVER2 the attributes listed below. Do not modify the other servers that are shown in this screen; leave them as they are.
Name Listen Address Listen Port SSL Listen Port SSL Enabled SOA_SERVER1 SOAHOST1VHN1 8001 n/a No SOA_SERVER2 SOAHOST2VHN1 8001 n/a No - Click Next
- Select the automatically created server and click Rename to change the name to
- In the Configure Clusters screen, add the following clusters:
Name Cluster MEssaging Mode Multicast Address Multicast Port Cluster Address soa_cluster unicast n/a n/a SOAHOST1VHN1:8001;SOAHOST2VHN1:8001 - Click Next.
- NOTE: For asynch request/response interactions over direct binding, the SOA composites must provide their jndi provider URL for the invoked service to look up the beans for callback. If soa-infra config properties are not specified, but the WebLogic Server Cluster address is specified, the cluster address from the JNDI provider URL is used. This cluster address can be a single DNS name which maps to the clustered servers' IP addresses or a comma separated list of server ip:port. Alternatively, the soa-infra config property JndiProviderURL/SecureJndiProviderURL can be used for the same purpose if explicitly set by users.
- In the Assign Servers to Clusters screen, assign servers to clusters as follows:
soa_cluster- SOA_SERVER1
- SOA_SERVER2
- In the Configure Machines screen, delete the LocalMachine that appears by default and click the Unix Machine tab. These entries are available:
Name Node Manager Listen Address SOAHOST1 SOAHOST1 SOAHOST2 SOAHOST2 ADMINHOST localhost - Leave all other fields to their default values.
- Click Next.
- In the Assign Servers to Machines screen, assign servers to machines as follows:
- ADMINHOST:
- AdminServer
- SOAHOST1:
- SOA_SERVER1
- PROCESSIT_SERVER1
- SOAHOST2:
- SOA_SERVER2
- PROCESSIT_SERVER2
- ADMINHOST:
- Click Next.
- In the Target Deployments to Clusters or Servers screen, ensure the following targets:
- Target usermessagingserver and usermessagingdriver-email only to SOA_Cluster.
- Target the oracle.sdp.* and oracle.soa.* libraries only to SOA_Cluster.
- Target the oracle.rules.* library only to Admin Server and SOA_Cluster.
- Target the wsm-pm application only to PROCESSIT_Cluster.
- In the Target Services to Clusters or Servers screen, ensure the following targets:
- Target mds-owsm to both PROCESSIT_Cluster and AdminServer.
- Click Next.
- In the Extending Domain screen, click Done.
- Restart the Administration Server.
Configure Oracle Coherence for Deploying Composites
Although deploying composites uses multicast communication by default, Oracle recommends using unicast communication in SOA enterprise deployments.
Unicast communication does not enable nodes to discover other cluster members in this way. Consequently, you must specify the nodes that belong to the cluster. You do not need to specify all of the nodes of a cluster, however. You need only specify enough nodes so that a new node added to the cluster can discover one of the existing nodes. As a result, when a new node has joined the cluster, it is able to discover all of the other nodes in the cluster. Additionally, in configurations such as SOA enterprise deployments where multiple IPs are available in the same system, you must configure Oracle Coherence to use a specific host name to create the Oracle Coherence cluster.
Enabling Communication for Deployment Using Unicast Communication
Specify the nodes using the tangosol.coherence.wka<n> system property, where <n> is a number between 1 and 9. You can specify up to nine nodes as Well Known Addresses, but you can have more than nine nodes in the cluster. Start the numbering at 1. This numbering must be sequential and must not contain gaps. In addition, specify the host name used by Oracle Coherence to create a cluster through the tangosol.coherence.localhost system property. This local host name should be the virtual host name used by the SOA server as the listener addresses (SOAHOST1VHN1 and SOAHOST2VHN1). Set this property by adding the -Dtangosol.coherence.localhost parameters to the Arguments field of the Oracle WebLogic Server Administration Console's Server Start tab
Specifying the Host Name Used by Oracle Coherence
Use the Administration Console to specify a host name used by Oracle Coherence.
To add the host name used by Oracle Coherence:
- Log into the Oracle WebLogic Server Administration Console.
- In the Domain Structure window, expand the Environment node.
- Click Servers. The Summary of Servers page appears.
- Click the name of the server (SOA_SERVER1 or SOA_SERVER2, which are represented as hyperlinks) in the Name column of the table. The settings page for the selected server appears.
- Click Lock & Edit.
- Click the Server Start tab.
- Enter the following for SOA_SERVER1 and SOA_SERVER2 into the Arguments field.
Note that there should be no breaks in lines between the different -D parameters. Do not copy or paste the text to your Administration Console's arguments text field. It may result in HTML tags being inserted in the Java arguments. The text should not contain other text characters than those included the example below.
For SOA_SERVER1, enter the following:-Dtangosol.coherence.wka1=SOAHOST1VHN1 -Dtangosol.coherence.wka2=SOAHOST2VHN1 -Dtangosol.coherence.localhost=SOAHOST1VHN1
For SOA_SERVER2, enter the following:-Dtangosol.coherence.wka1=SOAHOST1VHN1 -Dtangosol.coherence.wka2=SOAHOST2VHN1 -Dtangosol.coherence.localhost=SOAHOST2VHN1 - Click Save and Activate Changes.
Post-Configuration
After extending the domain with the configuration Wizard and configuring Oracle Coherence, follow these instructions for post-configuration.
Disabling Host Name Verification for the SOA_SERVERn Managed Servers
You must disable the host name verification for the SOA_SERVER1 and SOA_SERVER2 managed servers to avoid errors when managing the different WebLogic Server instances.
Restarting the Node Manager on SOAHOST1
- Stop Node Manager by stopping the process associated with it:
- If it is running in the foreground in a shell, simply use CTRL+C.
- If it is running in the background in the shell, find the associate process and use the kill command to stop it. For example:
ps -ef | grep NodeManager
orcl      9139  9120  0 Mar03 pts/6    00:00:00 /bin/sh ./startNodeManager.sh
kill -9 9139
- Start Node Manager with this command
./startNodeManager.sh
Propagating the Domain Changes to the Managed Server Domain Directory
Propagate the start scripts and classpath configuration from the Administration Server's domain directory to the managed server domain directory.
To propagate start scripts and classpath configuration:
- Create a copy of the managed server domain directory and the managed server applications directory.
- Run the pack command on SOAHOST1 to create a template pack using these commands:
cd ORACLE_COMMON_HOME/common/bin ./pack.sh -managed=true -domain=ORACLE_BASE/admin/domain_name/aserver/domain_name -template=soadomaintemplateExtSOA.jar -template_name=soa_domain_templateExtSOA - Run the unpack command on SOAHOST1 to unpack the propagated template to the domain directory of the managed server using the following command:
./unpack.sh -domain=ORACLE_BASE/admin/domain_name/mserver/domain_name -overwrite_domain=true -template=soadomaintemplateExtSOA.jar -app_dir=ORACLE_BASE/admin/domain_name/mserver/applications
Starting the SOA_SERVER1 Managed Server
Before starting the SOA_SERVER1 managed server please make sure the PROCESSIT_SERVER1 managed server is up and running. Otherwise SOA_SERVER1 will not start.
Start and validate the SOA_SERVER1 managed server using the Administration Console.
To start the WLS_SOA1 managed server on SOAHOST1 using the Oracle WebLogic Server Administration Console:
- Access the Administration Console at the following URL:
http://ADMINVHN:7001/console - Expand the Environment node in the Domain Structure window.
- Click Servers.
- Click the Control tab.
- Select SOA_SERVER1 and then click Start.
Verify that the server status is reported as Running. If the server is shown as Starting or Resuming, wait for the server status to change to Started. If another status is reported, such as Admin or Failed, check the server output log files for errors.
Propagating the Domain Configuration to SOAHOST2 Using the unpack Utility
Propagate the domain you just configured to SOAHOST2 using the unpack utility.
To propagate the domain configuration:
- Run the following command on SOAHOST1 to copy the template file created in the previous step to SOAHOST2.
cd ORACLE_COMMON_HOME/common/bin scp soadomaintemplateExtSOA.jar oracle@SOAHOST2:ORACLE_COMMON_HOME/common/bin - Run the unpack command on SOAHOST2 to unpack the propagated template.
cd ORACLE_COMMON_HOME/common/bin
/unpack.sh-domain=ORACLE_BASE/admin/domain_name/mserver/domain_name/ -template=soadomaintemplateExtSOA.jar -overwrite_domain=true -app_dir=ORACLE_BASE/admin/domain_name/mserver/applications
Starting the SOA_SERVER2 Managed Server
Use the Administration Console to start the SOA_SERVER2 managed server.
To start the SOA_SERVER2 managed server and check that it is configured correctly:
- Start the SOA_SERVER2 managed server using the Administration Console.
- Verify that the server status is reported as Running in the Administration Console. If the server is shown as Starting or Resuming, wait for the server status to change to Started. If another status is reported (such as Admin or Failed), check the server output log files for errors.
Configuring Oracle HTTP Server with the Extended Domain
After propagating the domain configuration to SOAHOST2, configure the Oracle HTTP Server with the extended domain.
Configuring Oracle HTTP Server for the SOA_SERVERn Managed Servers
To enable Oracle HTTP Server to route to the SOA_Cluster, which contains the SOA_SERVERn managed servers, set the WebLogicCluster parameter to the list of nodes in the cluster.
- On WEBHOST1 and WEBHOST2, add directives to the soa.vh.conf file located in the following directory:
ORACLE_BASE/admin/instance_name/config/OHS/component_name/moduleconf
Note that this assume you created the soa_vh.conf file previously while deining virtual hosts
Add the following directives inside the <VirtualHost> tags:
<Location /soa-infra>
    SetHandler weblogic-handler
    WebLogicCluster SOAHOST1VHN1:8001,SOAHOST2VHN1:8001
    WLProxySSL ON
    WLProxySSLPassThrough ON
</Location>

# SOA inspection.wsil
<Location /inspection.wsil>
    SetHandler weblogic-handler
    WebLogicCluster SOAHOST1VHN1:8001,SOAHOST2VHN1:8001
    WLProxySSL ON
    WLProxySSLPassThrough ON
</Location>

# Worklist
<Location /integration>
    SetHandler weblogic-handler
    WebLogicCluster SOAHOST1VHN1:8001,SOAHOST2VHN1:8001
    WLProxySSL ON
    WLProxySSLPassThrough ON
</Location>

# UMS prefs
<Location /sdpmessaging/userprefs-ui>
    SetHandler weblogic-handler
    WebLogicCluster SOAHOST1VHN1:8001,SOAHOST2VHN1:8001
    WLProxySSL ON
    WLProxySSLPassThrough ON
</Location>

# Default to-do taskflow
<Location /DefaultToDoTaskFlow>
    SetHandler weblogic-handler
    WebLogicCluster SOAHOST1VHN1:8001,SOAHOST2VHN1:8001
    WLProxySSL ON
    WLProxySSLPassThrough ON
</Location>

# Workflow
<Location /workflow>
    SetHandler weblogic-handler
    WebLogicCluster SOAHOST1VHN1:8001,SOAHOST2VHN1:8001
    WLProxySSL ON
    WLProxySSLPassThrough ON
</Location>

#Required if attachments are added for workflow tasks
 <Location /ADFAttachmentHelper>
    SetHandler weblogic-handler
    WebLogicCluster SOAHOST1VHN1:8001,SOAHOST2VHN1:8001
    WLProxySSL ON
    WLProxySSLPassThrough ON
</Location>

# SOA composer application
 <Location /soa/composer>
    SetHandler weblogic-handler
    WebLogicCluster SOAHOST1VHN1:8001,SOAHOST2VHN1:8001
    WLProxySSL ON
    WLProxySSLPassThrough ON
</Location>

<Location /frevvo>
    SetHandler weblogic-handler
    WebLogicCluster SOAHOST1VHN1:8001,SOAHOST2VHN1:8001
    WLProxySSL ON
    WLProxySSLPassThrough ON
</Location>
</VirtualHost>
The servers specified in the WebLogicCluster parameter are only important at startup time for the plug-in. The list needs to provide at least one running cluster member for the plug-in to discover other members of the cluster. The listed cluster member must be running when Oracle HTTP Server is started. Oracle WebLogic Server and the plug-in work together to update the server list automatically with new, failed, and recovered cluster members.
Setting the Frontend HTTP Host and Port
To set the frontend HTTP host and port for the Oracle WebLogic Server cluster:
- In the WebLogic Server Administration Console, in the Change Center section, click Lock & Edit.
- In the left pane, choose Environment in the Domain Structure window and then choose Clusters.
- Select the SOA_Cluster cluster.
- Select HTTP.
- Set the values for the following:
- Frontend Host: soa.companyname.com
- Frontend HTTPS Port: 443
- Frontend HTTP Port: 80
- Click Save.
- To activate the changes, click Activate Changes in the Change Center section of the Administration Console.
- Restart the servers for the Frontend Host directive in the cluster to take affect.
When HTTPS is enabled in the load balancer and the load balancer terminates SSL (the SOA servers receive only HTTP requests, not HTTPS), as suggested in this guide, the endpoint protocol for webservices is set to http. Since the load balancer redirects HTTP to HTTPS this causes the following exception when testing webservices functionality in Oracle Enterprise Manger Fusion Middleware Control: (javax.xml.soap.SOAPException: oracle.j2ee.ws.saaj.ContentTypeException)
To resolve this exception, update the URL endpoint:
- In the Enterprise Manager Test Page, check Edit Endpoint URL.
- Within the endpoint URL page:
- Change http to https.
- Change the default port number (80) to SSL port (443).
Configure a Default Persistence Store
Each server has a transaction log that stores information about committed transactions that are coordinated by the server that may not have been completed. The WebLogic Server uses this transaction log for recovery from system crashes or network failures. To leverage the migration capability of the Transaction Recovery Service for the servers within a cluster, store the transaction log in a location accessible to a server and its backup servers.
The recommended location is on a Storage Area Network
To set the location for the default persistence stores:
- Log into the Oracle WebLogic Server Administration Console.
- In the Change Center section, click Lock & Edit.
- In the Domain Structure window, expand the Environment node and then click the Servers node. The Summary of Servers page appears.
- Click the name of the server (represented as a hyperlink) in Name column of the table. The settings page for the selected server appears and defaults to the Configuration tab.
- Click the Configuration tab, and then the Services tab.
- In the Default Store section of the page, enter the path to the folder where the default persistent stores will store its data files. The directory structure of the path is as follows:
ORACLE_BASE/admin/domain_name/soa_cluster_name/tlogs - Repeat steps 3, 4, 5, and 6 for the SOA_SERVER2 server.
- Click Save and Activate Changes.
- Restart both SOA servers.
- Verify that the following files are created in the following directory after SOA_SERVER1 and SOA_SERVER2 are restarted:
ORACLE_BASE/admin/domain_name/soa_cluster_name/tlogs- _WLS_WLS_SOA1000000.DAT
- _WLS_WLS_SOA2000000.DAT
To enable migration of the Transaction Recovery Service, specify a location on a persistent storage solution that is available to other servers in the cluster. Both SOA_SERVER1 and SOA_SERVER2 must be able to access this directory. This directory must also exist before you restart the server.
Configure Adapters
Enabling High Availability for JMS Adapters
When the Oracle JMS adapter communicates with multiple servers in a cluster, the adapter's connection factory property FactoryProperties must list available servers. If it does not list servers, the connection establishes to only one random server. If that particular server goes down, no further messages are processed.
To verify that the adapter's JCA connection factory:
- Log into your Oracle WebLogic Server Administration Console using the following URL:
http://servername:portnumber/console - Click Deployments in the left pane for Domain Structure.
- Click JMSAdapter under Summary of Deployments on the right pane.
- Click the Configuration tab.
- Click the Outbound Connection Pools tab and expand oracle.tip.adapter.jms.IJmsConnectionFactory to see the configured connection factories.
- Click the specific instance you are using (for example, eis/wls/Queue). The Outbound Connection Properties for the connection factory opens.
- Click Lock & Edit.
- In the FactoryProperties field (click on the corresponding cell under Property value), enter the following:
java.naming.factory.initial=weblogic.jndi.WLInitialContextFactory; java.naming.provider.url=t3://soahostvhn1:8001,soahost2vhn1:8001;java.naming.security.principal=weblogic;java.naming.security.credentials=mypassword - Click Save after you update the properties. The Save Deployment Plan page appears.
- Enter a shared storage location for the deployment plan. The directory structure is as follows:
ORACLE_BASE/admin/domain_name/cluster_name/dp/Plan.xml - Click Save and Activate.
Update the deployment in the console:
- Click Deployments and select the JMS Adapter.
- Click Lock & Edit then Update.
- Select Update this application in place with new deployment plan changes (A deployment plan must be specified for this option.) and select the deployment plan saved in a shared storage location; all servers in the cluster must be able to access the plan).
- Click Finish.
- Activate the changes.
Setup Node Manager
Changing the Location of Node Manager Log
It is recommended to place your Oracle Fusion Middleware deployment's NodeManager's log in a different location from the default (which is inside the MW_Home where Node Manager is located).
To change the location of the Node Manager log, edit the nodemanager.properties file located in the following directory: MW_HOME/wlserver_10.3/common/nodemanager
It is recommended to locate this file outside of the MW_HOME directory, and inside the admin directory for the deployment.
Add the following line to nodemanager.properties: LogFile=ORACLE_BASE/admin/nodemanager.log
Restart Node Manager for the change to take effect.
Starting the Node Manager on SOAHOST1
Start Node Manager on SOAHOST1 using the startNodeManager.sh script.
SOAHOST1> cd WL_HOME/server/bin
SOAHOST1> ./startNodeManager.sh
Starting the Node Manager on SOAHOST2
Start Node Manager on SOAHOST2 using the startNodeManager.sh script.
SOAHOST2> cd WL_HOME/server/bin
SOAHOST2> ./startNodeManager.sh