Customizing the connections between an imported solution and XBOUND document types
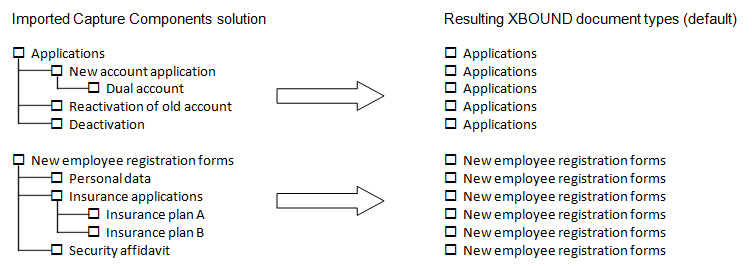
When you import a solution from Capture Components Administration, a default connection is created between the in the imported solution and XBOUND document types: The uppermost document specifications in the structure are linked to XBOUND document types with the same names.  Examples:
All of the fields that all of the document specifications contain will be created in the resulting XBOUND documents.

If the XBOUND process does not already contain document types with those names, they are created when you click in the Import Solution activity settings.
You can (optionally) specify or adjust:
If you have a list of external types, you can specify how they correspond to document specifications in the imported solution.
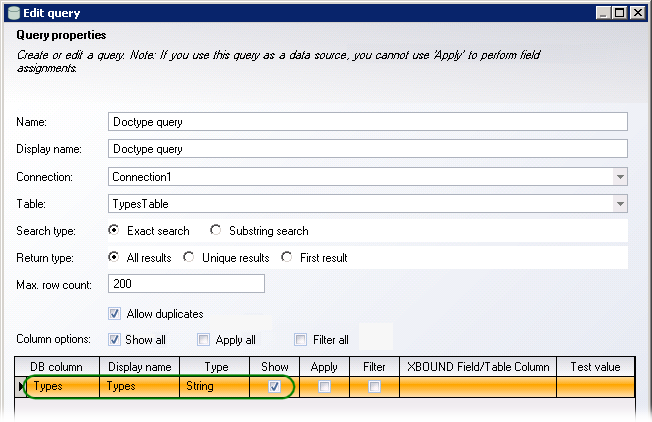
Using the Validation Designer you can configure a suitable master data query, which contains a list of these external types. (For instructions on how to create such a query, refer to ReadSoft Capture Framework Help.) In the dialog, only the column should be selected. (Show example.) The results of the query must be one (and only one) column of data. Be sure to click at the bottom of the dialog to ensure correct results.
In some cases a single document type might be connected to all Capture Components document specifications, while in other cases a one-to-one mapping is appropriate. You are free to configure the connections between XBOUND document types and document specifications in any way you find appropriate.
| Important to keep in mind |
|---|
The connection between a document specification and an XBOUND document type determines (1) the XBOUND document type that is assigned during Classification and (2) which fields will be created in those documents when you process them. You can connect multiple document specifications with a single XBOUND document type. In this case, when you process that type of document, all of the fields that were created in all of those document specifications will be created in those documents. Example: If you want to be able to change the RCC document type in Verification, the following must be true: The classification field must be displayed with the document classes that are available for it – which must be set up manually or (if you use document classes that are added by master data) using a master data query. The XBOUND document type is not changed – which it is not if…:
When you finish this process (in the last step below), document types that do not already exist in your XBOUND system will be created. Since a RCF Verification form is needed for each document type, do not create more documents types than needed.
|
Use this procedure
Open the dialog. The right pane contains a list of . You can expand them to see the sub-documents that they contain.
Click to expand the dialog and reveal settings.
Adjust how other objects that exist in your system correspond to document specifications in the imported solution.
Select a query from the drop-down list and click . A list of external types that are not yet mapped to the document specifications from the Capture Components solution is displayed under .
Now you can configure how these external types correspond to Capture Components document specifications:
Select one or more objects from this list, and a document specification from the table to the right, and click the  button to map, or connect, them. The type is removed from the unmapped list and added to the list on the right, under the selected Capture Components document specification.
Select a mapped external type from the list on the right and click the  button to unmap it. It is re-added to unmapped list.
The right pane displays the following:
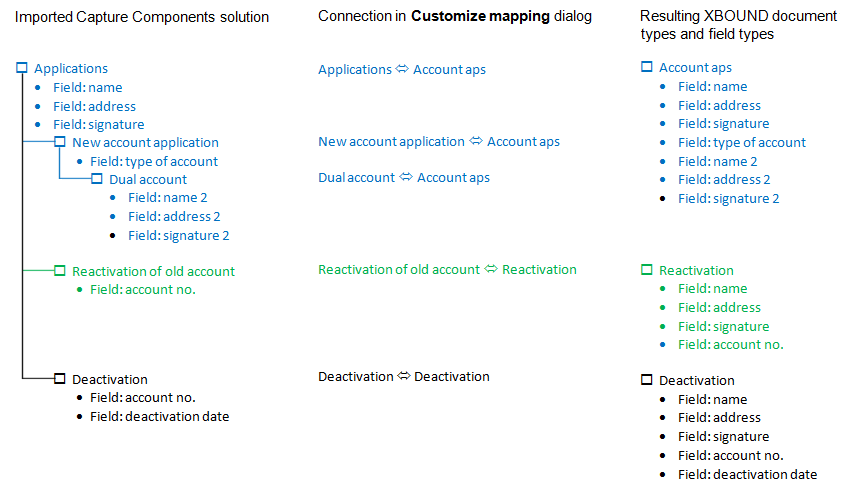
Under you see a tree view of document specifications and any external types that are to be mapped to them. Together, these are in turn mapped to XBOUND document types. This is what determines which data is extracted from these documents during processing.
Under the column, you see XBOUND document types that Capture Components document specifications (and any external types under them) are mapped to.
You can change the name of any by clicking it (or pressing ) to rename it, giving it the name of the desired XBOUND document type. To change the name of a large group of sub-documents at once, right-click the parent XBOUND document type and select .
Optional: Select to leave the XBOUND document type structure untouched during classification.
When you are finished, click in the dialog.
Consider what is about to happen (and what will not happen) and then click in the Import Solution settings.
The mapping is saved.
If the names listed in the column do not yet exist as XBOUND document types, they are created at this point, along with the fields from the corresponding document specifications.
Existing XBOUND document types also have fields added to them.
Document types are never deleted by this process. If you performed this process before and document types were created as a result, undoing those changes in the mapping and then clicking here will not delete them. If you want to delete existing document types, use the XBOUND Process Designer plug-in (click ).
Likewise, field definitions are never deleted by this process. If you want to delete existing field definitions from your document types, use the XBOUND Process Designer plug-in (click ).
Tip: Fields can be used to configure business logic. For instructions, refer to Capture Framework Help.)
Related topics
Routing specific document types to avoid Knowledge Processing
Master data query example