Adding an XBOUND Management Center console
To use the XBOUND Management Center, you must open or create a console.
Use this procedure:
Start the XBOUND Management Center by selecting > > > .
When the Management Center is displayed, click the link for adding a new console.
There are two ways to proceed:
 To
create a console based on a default template:To
create a console containing multiple plug-ins, or one or more
plug-ins with customized settings:
To
create a console based on a default template:To
create a console containing multiple plug-ins, or one or more
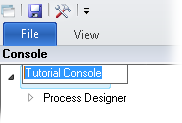
plug-ins with customized settings:Optional: In the upper left corner, click (twice, slowly) the default name that the console was given and type a new, more descriptive name:
Click the button (
 ). (Where are consoles
saved?)
). (Where are consoles
saved?)
There are countless tasks that you can perform in a Management Center
console, depending on which type of console you opened. ![]() Some
of the most common tasks in a Process Designer console are:
Some
of the most common tasks in a Process Designer console are:
Customizing the work area: Overview
Opening an XBOUND Management Center console