Quick Connect enables users to scan documents and deliver them to predetermined network locations, Web locations, databases, or to an SMTP server, with minimal data entry requirements. It is ideally suited to environments where large numbers of documents must be scanned quickly into automated or manual workflows.
To be able to use this connector with the Email and folder watching service, you need to create a profile in such a way that it does not require user interaction (express).
For the generic connector configuration options, click here.
|
Field/Button |
Description |
|---|---|
|
New |
Adds a new destination. |
|
Edit |
Edits an existing destination |
|
Copy |
Copies the selected destination. |
|
Remove |
Removes the selected destination. |
|
Move up |
Moves the selected destination up in the list. |
|
Move down |
Moves the selected destination down in the list. |
|
Expression |
Displays the Expression dialog. |
|
Field/Button |
Description |
|---|---|
|
Name |
The name of the destination. |
|
Type |
The type of the destination. The following destination types are available: |
|
Field/Button |
Description |
|---|---|
|
Folder location |
Destination information for the scanned documents.
Note that Quick Connect does not support long UNC paths, thus full path names are limited to 260 characters, |
|
Secure connection (FTPS explicit) |
Check this box to enable a secure connection. Only available for FTP folders. |
|
Enable subfolder navigation |
Enables users to select a subfolder at the device. |
|
Root path |
Only valid for Windows folders. Clicking the key icon before this textbox allows ShareScan to retrieve the root path data from Data Publishing. When the icon is highlighted, the name of the data published key defining root path must to be specified in the textbox (for example, a barcode name). The root path (a UNC path) is retrieved from this data published key during runtime. If the key icon is not highlighted, the root path has to be specified in the textbox manually. If the Data Publishing is used, subfolder routing and subfolder navigation works normally. |
|
Maximum folder level |
The number of subfolder levels users may navigate. The default is 3. |
|
Subfolder routing... |
This button displays a dialog which configures subfolder names where documents are stored. The text box under Folder Location specifies the root folder of the destination. A user can navigate subfolders underneath this root folder. If subfolder navigation is enabled at the device, Quick Connect creates subfolder underneath the user-specified folder and stores documents in the created folder. If subfolder navigation is disabled, Quick Connect creates a subfolder underneath the root folder and stores documents in the created folder. The location where documents are stored is:
|
Only available for Secure FTP destination type.
|
Field/Button |
Description |
|---|---|
|
FTP type |
|
|
Ssl mode |
|
|
Passive |
Mark this checkbox for a passive FTP connection (the client initiates both connections to the server; this solves the problem of firewalls filtering the incoming data port connection to the client from the server) |
|
Field/Button |
Description |
|---|---|
|
Authentication type |
Available for FTP folder, Secure FTP, WebDAV folder; the following options exist for each type:
|
|
Authenticate user |
The options are:
|
|
User ID |
All Authentication types require a user name and password if Logon As is selected as the user authentication method. |
|
Password |
Specifies the password for the Logon as user. |
|
Domain |
Select either Logon as or RunTime authentication mode to enable this combo box.
|
|
Tree |
Only available for Novell Netware folders; has the same function as the Domain combo box. |
|
Field/Button |
Description |
|---|---|
|
Server |
Specifies the SMTP server via name or IP address. |
|
Port |
Specifies the port number used. The default is 25. |
|
Account |
Sets the account to be used for authentication. The following options are available:
|
|
Reply To: |
Specifies the sender's email address. Available only for Generic account None Authentication. |
|
Domain |
Specifies the domain name used as initial value on the Logon form. Available only for Personal account - Windows Authentication. |
|
Tree |
Specifies the tree name used as initial value on the Logon form. Available only for Personal account - Netware Authentication. |
|
LDAP settings |
Displays the LDAP server settings dialog. Available only for Personal account - LDAP Authentication. |
|
Cc sender: |
Checking this box sends a copy of each message to the sender. |
|
To listbox |
Use the Add button to add the SMTP addresses of the recipients. |
|
Subject |
Set the subject of the message. |
For more information on database types and settings, see Database types and settings.
|
Field/Button |
Description |
|---|---|
|
DB type |
The configured database types are displayed here. The available types are as follows:
|
|
Data source |
Displays the data source. |
|
Catalog |
Displays the catalog name, if supported. |
|
Table |
Displays the table name with schema, if applicable. |
|
Document data (BLOB) |
Displays the column name for the document's data (BLOB). |
|
Document name |
Displays the column name for the document name. |
|
Document extension |
Displays the column name for the document extension. |
|
Configure |
Displays a situation-based dialog. If the administrator is defining a new Database destination, clicking this button displays the Configure Data Source dialog to define database connection. If a defined database connection exists, the Select recent data source dialog with previously used connections is displayed, thus the administrator can reuse existing connection setting or go to Configure data source dialog via the New… button. If an existing connection setting is selected or new connection setting has defined, the connector displays the Map document destination dialog to define data mapping. |
Note:
Since Microsoft deprecated the Microsoft Jet 4.0 OLE DB Provider (https://msdn.microsoft.com/en-us/library/ms810810.aspx), and future Windows update may remove it from the system. Configuring a 'Microsoft Excel 97-2003' data source on machines without a Microsoft Jet 4.0 OLE DB Provider results in an error message. In case you still wish to use the old format .xls files, install 32 bit version of Microsoft Access Database Engine 2016 Redistributable (https://www.microsoft.com/en-us/download/details.aspx?id=54920) or later and configure Database type for Microsoft Excel 2007-2010 in the Configure data source dialog by selecting old format .xls files via setting the filter to All files (*.*) on the Windows File Open dialog.
|
Field/Button |
Description |
|---|---|
|
Name Location, and Logon |
Enables you to create a list of destinations to which the connector profile can send scanned documents. Clicking the Add button displays the Add destination to ... window, where you can set the attributes of the chosen destination. When you add a destination to the list, you specify the destination name, type, and location, as well as the authentication information. The New destination window then lists all the destinations. |
Note:
To make sure that users have to log on, at most once, at the device, you cannot mix certain combinations of destination type and authentication in a destination list.
Example:
If you add a Windows Folder or Novell Netware Folder destination that uses Runtime authentication, and then you add an FTP Folder destination, the Authenticate User combo box is shown without Runtime authentication mode.
Invalid options will not be available in the Authenticate User list.
This destination type represents another ShareScan workflow that receives its input from the output of this connector profile / destination.
By using the Connector destination type, it is possible to chain ShareScan workflows with the limitation that the second (3rd, etc.) workflows in such a chain must be an Express workflow (i.e. not having any user interface / forms to display), similarly to the Watcher workflows.
For more details on Express workflows, see the Watcher.
To transfer document metadata between the original and the chained (connector destination) workflow, you can use the XML Index File fields: whichever metadata (data from Data Publishing, like barcode values, data provided by Database Lookup Extender etc.) item you want to use in the chained workflow, you simply need to specify it as a field the Index File of the connector profile using a Connector destination, and create a mapping in the Data Publishing Mapper.
The Connector destination type can also be used as an item in a Destination list. In this way, the same document(s) can be stored via multiple connectors.
The following scenarios details how to properly configure the QuickConnect Connector destination:
Make sure that the Connector destination type is available and the created profile results in a hidden watcher configuration:
HKLM\SOFTWARE\Wow6432Node\Kofax\ShareScan\ShareScanAdmin\ShowHiddenCascadingWatchers to true<QC profile name>@<destination name> }- QuickConnect-<target express profile name>false) Observe that the Rule has the name Rule - <GUID>, where the GUID is an automatically generated unique identifier of the connector destinationMake sure that in Quick Connect connector, Connector destination type is available and the created profile results in a hidden watcher configuration in the Destination list:
|
Field/Button |
Description |
|---|---|
|
Choose connector profile for processing
|
This list displays the configured Express connectors / profiles (i.e. the profiles with no UI runtime). If no connector / profile is available with Express setup, a warning message informs the user that the profile and corresponding services require Express mode. Note: These profiles will not replicate in an AutoSync environment. |
|
Route only |
Mark this checkbox if you want to pass your files to their destinations without processing and/or transformation. |
|
Do not recreate PDF files |
Mark this checkbox to process incoming files as if they are all actual scans. When the Route only checkbox is marked, this checkbox is greyed out. |
|
Click to edit index field mappings of this destination |
Click this link to open the Data Publishing mapper tool with the published keys filtered for the keys derived from the index field of Quick Connect and the connector keys filtered to the destination Connector selected. |
|
Field/Button |
Description |
|---|---|
|
Server |
The IP address, DNS name, or URL of the LDAP server associated with the directory you want to use. |
|
Port |
The LDAP server port number. The default is 389. |
|
Server requires SSL |
Mark this checkbox if connecting to the LDAP server requires SSL. |
|
User ID |
The ID of the administrator who logs on to the LDAP server. This administrator account is used to query e-mail address for runtime-log-on user from the LDAP server. |
|
Password |
The password associated with the server account. |
|
Connect anonymously |
Allows anonymous connection to the LDAP server, if the server supports anonymous authentication. |
|
Base DN |
The DN of the base or root of the directory in which to search. This varies depending on the server you are using and the portion of the directory you wish to search. |
|
Test |
Pressing this button checks the connection to the specified LDAP server. If the test succeeds, the OK button is enabled. |
Setting a database as a destination enables you to configure a connector profile so that users at the device can scan and index documents and store them in the specified database. You can configure the profile to store the index information in a file, in the same database as the scanned document, or in a different database.
To set a database as a destination:
On the Configure tab, click New.
The New destination window opens.
Under Destination, click Configure.
The Configure data source window opens.
Or
Configure an existing data source
The data source is the database where the scanned documents will be stored.
Note:
The Index file tab displays the mapped database column name in the Table Column in the Index File list view.
|
Database type |
Settings |
|---|---|
|
Microsoft Access |
Specifies the path to the Access database ( If the database is on a local drive and does not require a user name and password, select the Blank Username and Password check box. If the database is on a UNC path, enter the appropriate credentials. The user must have permission to access the specified path. |
|
Microsoft SQL |
Specifies the SQL server, user name, and password used to access the SQL Server, and the Catalog/Database.
|
|
Oracle |
Specifies the listener, user name, and password used to access the Oracle database.
|
When you set a database as a destination, you can use the Map document destination feature to map the name and file extension of the scanned document to STRING fields in a table in the database. This enables you, or a database administrator, to create associations between the scanned document and any index information that the user enters on the Index screen for the document, wherever that index information is stored.
|
Database type |
Settings |
|---|---|
|
Connection information |
Displays current database connection information:
Use the Modify button to edit the displayed information, and the Refresh button to clear table selection and field mapping. |
|
Select Table Name |
Displays available tables in the current data source. If a table is selected from the list, it gets bold and the Map Fields data grid view gets enabled. |
|
Map Fields |
Displays which fields are mapped to which database columns. The administrator selects a column name from dropdown list. The column for Document Data (BLOB) must be specified but Document Name and Document Extension is optional. If an already assigned column is reselected, the dialog shows an error message and clears column selection. |
You can create a file name field or an index field that uses a database as the source of field values. Users at the device can then select from a list of available values for that field.
If the database administrator modifies, in a database, values that are associated with a Quick Connect field, users will have access to the changed values. You do not need to make any changes to the field in the Administration Console.
To use a database as the source of field values:
On the File name or the Index file tab, click New.
The appropriate Field editor window opens (File name field editor or Index file field editor).
Click Configure.
If you have previously configured a data source, the Select recent data source window opens.
On the File name or the Index file tab, click New.
The appropriate Field editor window opens (File name field editor or Index file field editor).
Click Configure.
If you have previously configured a data source, the Select recent data source window opens.
If you do not want to use an existing data source, click New.
The Configure data source window opens. Follow the instructions to configure a new data source.
Click OK to return to the Field editor window.
The window displays the settings you have configured.
Click OK to save the settings and return to the File name or Index file tab.
The tab displays the name and summary information for the Database field you created.
You can define parameters, operators, and constant values via the Expression dialog. The parameters are published to the Data Mapping tool and mapped to published data from a document service. Document service publishes data as string and the connector converts the string to specific data type according to parameter type.
|
Field/Button |
Description |
|---|---|
|
New |
Allows adding a new parameter via a dialog, where you can set the name and type of the new parameter. The available data types are the following: |
|
Edit |
Edits the selected parameter. |
|
Remove |
Removes the selected parameter from the list view. |
|
Operator |
Select a parameter to display the available operators defining how to compare parameter and constant values. The set of operators varies according to parameter type. |
|
Constant |
Select a parameter to display the constant value which is compared to parameter value during runtime. The input text must be formatted properly to successfully process the equation. |
The file name generated at the eCopy-enabled device is composed of one or more fields. Note that if file name is not published by document service, Quick Connect uses its file naming rule even if you check Use Document Service file name.
To define file naming fields:
Repeat this procedure for each new file naming field.
Or
Select Use Document Service file name to use the file name configured for the Document Service.
Click the Save current profile button.
The system saves your settings as part of the connector profile.
Note:
If a scanned document already exists in a selected destination you are presented with a number of options.
|
Field/Button |
Description |
|---|---|
|
New |
Adds a new entry via the File name field editor. |
|
Edit |
Edits an existing entry via the File name field editor. |
|
Remove |
Removes the selected entry from the list view. |
|
Move up |
Moves the selected entry up in the list view. |
|
Move down |
Moves the selected entry down in the list view. |
|
Use Document service's file name |
Checks published entry name by a document service. If the file name is published, the connector uses the published name as an output file name instead of the File naming form and constructing the file name according to file naming rule. |
|
If file name already exists: |
Set the method for resolving file name conflicts:
Note: Only PDF and PDF/A output formats are supported (Settings>Document>File Format>File Format Options). If you select an output file format other than PDF or PDF/A, an error message pops up after you click the Save Current Profile button. Only the following destinations are supported: If either Database or SMTP message destination types are provided, a dialog pops up after you click the Save Current Profile button informing you that these destination types are not supported and requiring confirmation on whether you want to save the profile. |
|
Field Type |
Description |
|---|---|
|
Name |
Specifies a unique file name field name. Not case sensitive. If you increase the minimal length, this field becomes required. |
|
Type |
Specifies a type of field. Type-dependent settings change according to the field. For more information, see the Field types table below.
|
|
Export to Index File |
Specifies whether the entry name field value is exported to the index file. If checked, a field which has a name of |
|
Field Type |
Description |
|---|---|
|
Alphanumeric |
Inserts text into the file name. The text can contain any printable characters except those restricted from Windows file naming conventions or any characters you define as separators.
|
|
Batch number |
Inserts the current batch number into the file name.
|
|
Batch-based index value |
You can only use batch-based index values if you have the eCopy Barcode Recognition Service. Batch-based indexing enables you to create index files with separate barcode values for each batch. |
|
Database |
Inserts a value from the database into the file name. Click the Configure button and configure a data source. |
|
Date |
Inserts the date on which the document was scanned into the file name. Format: The format in which you want the date to appear in the file name. |
|
Device name |
The name of the device from which the document is scanned. No additional settings. |
|
Numeric |
Inserts numeric characters into the file name.
|
|
Separator |
Character: The character that you want to use to separate the fields in the file name. The character that you select cannot be used in any other file name field. |
|
List |
Enables you to create a list of values from which the user can select a single value at the device. If you select the Required option, the user at the device must select a value from the list. If you do not select this option, the user at the device can leave the field blank. If you select the Required option and do not select the User modify option, you must set one of the list items as the default value. |
|
Time |
Inserts the time at which the document was scanned into the file name. Format: The format in which you want the time to appear in the file name. |
Setting up an index file enables the user at the device to enter indexing information for the scanned document in one or more fields. Quick Connect writes the field names that you create on the Index file tab to an index file, and creates data mapping information between field names and database columns. The default values that you associate with each index field, or the values entered for the field by the user at the device are also stored in the index file or database table.
The information describes the content of the document, such as a case ID, a client name, or a document type. Quick Connect saves the index information with the scanned document. This option is useful with back-end applications that can process the scanned documents (image files) and index files in the destination folder.
To configure an index file:
Click the Save current profile button.
The system saves your settings as part of the connector profile.
|
Field/Button |
Description |
|---|---|
|
New |
Adds a new field via the Index file field editor. |
|
Edit |
Edits an existing file via the Index file field editor. |
|
Remove |
Removes the selected file from the list view. |
|
Move up |
Moves the selected file up in the list view. |
|
Move down |
Moves the selected file down in the list view. |
|
Mapping |
The Select Recent Data Source or Map Index Fields dialog is displayed directly, if no connection settings are stored to the registry. In the dialog you can assign Index fields to database columns. If at least one index field is configured and the Database button is clicked, this button gets enabled. |
|
File format |
The following file types are available:
Note: When selecting the Database option, the Mapping button is enabled on the toolbar. |
|
Convert XML file |
Select XML index file format to enable this control. If this control is checked, the controls in XSLT group are enabled. |
|
XSLT group |
The following options are available via the XSLT group:
|
|
Create single index file when Batching is enabled |
If checked, the connector creates a single index file per job. If unchecked, an index file per batch is created. |
|
Repeat unchanging index values |
Available only if Create single index file when Batching is enabled is checked. If checked, the connector records the system- or job-based index values for every batch. If unchecked, the connector records the system- or job-based index values only once and records batching-based index values for every batch. |
|
Field Type |
Description |
|---|---|
|
Name |
Specifies a unique file name. Not case sensitive. |
|
Type |
Specifies a type of field. Type-dependent settings change according to the field. For more information, see the Field Types table below.
|
|
Field Type |
Description |
|---|---|
|
Alphanumeric |
Records the text which contains any printable character into the index file. |
|
Batch-based index value |
Pulls published value from DataPublishing based on current batch number and records into the index file. |
|
Database |
Records the selected value from the database into the index file. |
|
Date |
Records the formatted text of the date into the index file when the job was started |
|
Destination path |
Records the location where the document is sent into the index file. The location information differs according to destination type:
|
|
Device name |
Records the name of the device on which the client is running into the index file. The device name is retrieved when the connector starts. |
|
File name |
Records the file name of the document into the index file. |
|
Logged on user |
Records the logged on user’s name into the index file. If the destination uses Runtime authentication, the connector records runtime-logon-user name (either Bypass session logon user, CAC user or connector’s log on user). If authentication mode is Logon as, it uses pre-configured user name. Otherwise it records an empty string. |
|
Number of pages |
Records the number of pages in the document into the index file |
|
Numeric |
Records the text which contains only numeric characters into the index file. |
|
File size (kB) |
Records the file size of the document in kB into the index file. |
|
List |
Records the selected value from the list into the index file. |
|
Time |
Records the formatted text of the time into the index file when the job was started. |
The index file has the same name as the scanned document, but has a different file extension. The available formats of the index file are:
Example:
CSV
filename,device,date,time,user-tag1<CRLF>
MyDocument.pdf,MEAP01,03052003,110534AM,value 1
TSV
filename<TAB>device<TAB>date<TAB>time<TAB>user-tag1<CRLF>
MyDocument.pdf<TAB>MEAP01<TAB>03052003<TAB>110534AM<TAB>value 1
XML
<?xml version="1.0" encoding="UTF-8" standalone="yes"?>
<data>
<index id="filename">MyDocument.pdf</index>
<index id="device">MEAP01</index>
<index id="date">03052003</index>
<index id="time">110534AM</index>
<index id="user-tag1">value 1</index>
</data>
When the Document splitting option is enabled on the Settings pane, you can configure Quick Connect to create a single index file that records the index values entered at the device for all scan jobs of a batch.
The connector uses the file name that you create on the File name tab to create a name for the index file. If you do not configure a file name, the connector uses the default file naming rule.
If the file name includes the Batch number field, the connector sets the current batch number in that field; otherwise, the connector adds an underscore (_) to the batching number, as in “document-20070131_1.pdf”.
If a file name already exists and the Create unique file name option is configured on the File name tab, the connector adds a period to the rolling number, as in document-20070131_1.1.pdf.
System: The index field retains the same index value when the user at the device starts a new scan job.
Used with the following field type: Device Name.
Scan Job: The index values in index fields of this type are the same for the entire scan job.
Used with the following field types: Alphanumeric, Numeric, Date, Time, List, Authenticated user, Destination path, Database.
Splitting job: A scan job can comprise multiple document splitting jobs. The index values in index fields of this type change for each document splitting job.
Used with the following field types: File name, Number of pages, File size, and Batch-based index value.
This feature enables you to specify a database that will store index values entered at an eCopy-enabled device. You can map any type of Quick Connect index field to fields in an SQL, Access, or Oracle database. When a user enters values in mapped index fields, the connector profile stores the values in the associated database fields.
Note:
The connector profile stores all mapped index values in the target database as STRING data, regardless of the type of index field.
If you store scanned documents in a database and you want to create a relationship between the database fields where the documents are stored and the database fields where the index values are stored, make sure that one of the mapped index fields is of the type “File name”. Index fields of type “File name” automatically use the file name of the scanned document that is stored in the database destination.
Example:
You configured a connector profile to scan insurance claims using the following file naming format:
eCopyClaims<Date><Time>
You configured the profile to store the scanned documents, named as shown below, in the target database:
eCopyClaims20060523123318.pdf
eCopyClaims20060523123319.pdf
eCopyClaims20060523123320.pdf
You created several Quick Connect index fields to capture account information and mapped them to fields in a database.
To associate the database record used to store the scanned documents with the database record used to store the scanned document’s index values, you must have an index field of type “File name” that captures the file name during scanning.
To map index fields to fields in a database:
Under File format, select Database and then click Map Fields.
The Configure data source window opens.
If you have not yet configured a data source, configure it now.
To use the current data source, proceed to step 4.
If you do not want to use the current data source, click Modify to select a different data source. When the Select recent data source window opens, click New and follow the instructions for configuring a new data source.
If you previously configured a data source, the Map index fields window opens, displaying the connection information.
Under Map fields, which displays the index fields you created, select the Quick Connect index field you want to map to a database field. You do not have to map all the Quick Connect fields.
In the Database field column, which only displays fields of STRING data type, select the target field. The index values that the user at the device enters in the index fields will be stored in the database fields after the document is scanned.
If you have the eCopy Barcode Recognition Service, you can use batch-based index values. Batch-based indexing enables you to create index files with separate barcode values for each batch by assigning a base name (Publishing Name) to the position of the barcode.
All Publishing Names also have batch information available for Quick Connect to use. Note that only the first value found per Publishing Name is published for the session.
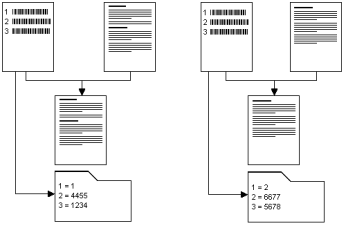
For example, a document is divided into two batches. It begins with a page that contains three barcodes and is split by another page that also contains three barcodes. On both pages the barcodes follow the same sequence but have different values:
Batch-based indexing example
|
Barcode Number |
Batch-based index value - Publishing Name |
Index value, |
Index value, |
|---|---|---|---|
|
1 |
Document Number |
1 |
2 |
|
2 |
Locator |
4455 |
6677 |
|
3 |
Extension |
1234 |
5678 |
The following diagram shows the four page document and how, after processing, the scanned document is stored with the correct index information.
To configure batch based indexing in Quick Connect:
Click New.
The relevant Field editor opens.
When you configure a device and select this connector profile, you must then select the corresponding Service profile that you set up in the Barcode Recognition Service.
Quick Connect can read data published to a Data Publishing service by a connector. For example, a company can install a barcode recognition service and then use Quick Connect to access the barcode data that the service publishes.
The ShareScan administrator is responsible for the following tasks:
Work with the developer of the service, which may be available from eCopy or from a third party, to identify the data that the Service publishes and the names of the fields that will contain the published data. For example, assume that the document to be scanned contains barcodes. The service extracts data from the following barcode fields and publishes the data to a COM object:
Barcode1, which contains a user name.
Barcode2, which contains a date.
Barcode3, which contains a company name.
Barcode4, which contains a city.
When a user scans a document at an eCopy-enabled device, the Manager starts the installed Service. The Service creates the COM object and publishes data from the scanned document to the COM object. The Manager passes the COM object to Quick Connect, which searches the COM object for the configured field names. If Quick Connect finds a match, for example, if it finds a field named “Barcode1”, it reads the value in that field and writes the value over the default value in the “Barcode1” index field in the index file. Quick Connect then sends both the scanned image document and the index file to the target destination.
