The OmniPage Launchpad lets you quickly set up and run document conversion tasks. Its Build panel on the left allows you to choose an input layout description, an output file type and a saving target. These three choices make up a Go-flow that is stored in a slot on the right. Further settings can be made using the Settings bar. The current Go-flow has a gold border and its name appears in gold lettering.
Only one Go-flow can be run at a time.
![]()
Click the Start processing button on the left of the Settings bar to run the currently selected Go-flow, or click the currently selected Go-flow button itself.
Overview of running a Go-flow
The following flow diagram summarizes the running of a Go-flow. Steps 3 and 4 are optional.
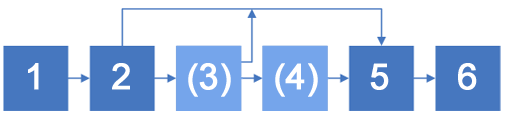
Run Go-flow Select source (Zoning) (Proofing) Name file/folder End
Steps in the Go-flow
You are asked to define the input of the Go-flow. These are your choices.
![]()
File System: this includes all local and remote locations you can access from your computer.
![]()
Evernote: This is a cloud storage site.
![]()
MS SharePoint: SharePoint is a Document Management System (DMS).
![]()
![]()
eDOCS or iManage. These appear only if installed on your computer.
![]()
Scanner. This appears only if you have previously installed a scanner with OmniPage Ultimate.
A zoning window appears if you requested it. It displays the first loaded page, and you receive a zone drawing cursor. You can draw a single zone to define the page part you want processed. To draw a zone that is not rectangular, see Drawing zones manually. Click Page ready to move to the next page or Document ready to move to the next document. After working through all pages or documents, the window closes.
A proofing window appears if you requested it. It displays part of the first loaded page and stops on any suspected character, displaying the image part it came from. You can accept the given solution with Ignore, or choose a suggestion or type it a correction and confirm it with Change. Click Page ready to move to the next page or Document ready to move to the next document. After working through all pages or documents, the window closes.
Your saving choice depends on the setting you made with the second button in the Settings bar:
![]()
Create a single document from all pages. In this case you choose a saving folder and enter a file name for this single file.
![]()
Create a new document from each input file. In this case you choose only a saving folder. Each output file takes the input file name; the difference is only the file type extension.
If your file extension is the same for both input and output (for example transforming ‘PDF Image-only’ to ‘PDF Searchable Image’), take care to choose a different saving destination from the input location.
If you request input from Evernote or a Document Management System such as SharePoint, or you requested saving to one of these sites or to a mailing system that is not already open, you may also be prompted to log-in and provide a password or a profile.
A progress monitor window displays progress and tells when the Go-flow is completed. If you chose to view results in the Settings bar, your resulting document is displayed in its associated application. If you requested multiple files for saving, they are all displayed.
If the processing encountered problems or could not be completed, a warning message appears below the Go-flow slot. Click on this for detail on the problem.
Click Stop in the top right corner of the Progress monitor window. If you do this, there will be no processing result.
For fully automatic (unattended) processing, you should use Workflows or Jobs together with watched folders inside OmniPage Ultimate.