Select Use custom view in Verify in the form definition settings.
Select Custom view as a Verify job option.
The first time the view is displayed for a form definition in a Verify job, it is docked to the right side of the screen. To dock it to a different one, drag the custom view header to the desired side, such as the bottom. The next time you run the job, the view is docked in the new position
Type information in the field as it is highlighted in the custom view. The corresponding field is highlighted in the image.
Press TAB or ENTER to proceed to the next field. The information is automatically validated, and you are prompted if the format is incorrect. If you leave a field empty, you are allowed to move to the next field.
Double-click a field in the image to highlight it
Enter information in the corresponding field in the custom view.
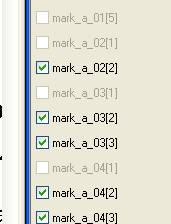
There are a couple of things to keep in mind when verifying mark fields (refer to this example).
To remove a checked mark field (in the example, say that mark_a_02[2] should not be checked):
Double-click the checked field, mark_a_02[2], in the custom view area to put it in focus (red frame around it).
Press F9, and you are asked if you want to delete the field.
Click Yes. The field becomes grayed out in the custom view. Even though the box remains checked in the custom view, the field will not show up in the output.
To check a mark field that is currently empty (in the example, say that mark_a_04[1] should be checked):
Double-click the mark field, mark_a_04[1], in the custom-view area. The message, "Field empty. Create?" is displayed.
Click Yes. Mark_a_04[1] is checked in the custom-view area, and it is no longer grayed out.
Disable the custom view by pressing Esc.
Press PgUp and PgDown to switch back and forth.