Configuring application-specific settings
For background information, see Common Configuration Manager plug-in.
For individual XBOUND applications, you can apply special settings that differ from the settings that are shared by most of the XBOUND applications. These settings will apply to all users, but only for a single application.
Use this procedure to configure settings for a single application:
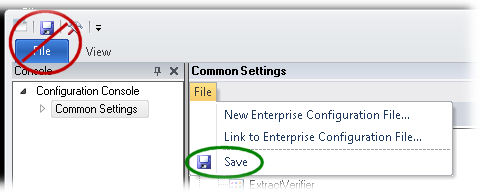
Using the XBOUND Management Center, open a console containing the Common Configuration Manager.
Note: In order to save changes in the Common Configuration Manager, you must run the Management Center as an Administrator.
In the navigation pane, expand and then select the application that you want to configure.
On the right side, select the category that you want to configure, and specify the desired settings. (More information about the settings.)
Binding tab
Here you configure the technical settings for how an XBOUND application connects to the XBOUND server.
Select the connection type.
 Supported
communication protocols:
Supported
communication protocols:Type the URL that is used to access the XBOUND server.
Further application servers that can be used for failover or for automatic load balancing (see below).
Enable round robin to use additional application servers are used for automatic load balancing.
Or, disable round robin to use the additional application server(s) only for failover.
Failover example:File System Logging tab
Here you can activate logging to the file system and adjust the settings.
Select if applications are to log to the Windows file system.
Type the name of the file into which the log messages are to be written.
Select the directory to which the log file is to be written.
Select the format of the logging (either XML or text).
Select the desired level of logging (described in Setting up logging).
Service Logging tab
Here you can activate logging to the central service log and adjust the settings. You can query the central service log using the Log Explorer or Process Monitor.
Select if applications are to log on to the service logging database.
Select the connection type.
Supported
communication protocols:Specify the URL of the logging server, including the protocol and port number. Example: tcp://testserver:4445 (the protocol is TCP and the port number is 4445).
Tip: You can specify multiple servers using a pipe symbol ( | ) as separator. If the first server fails, the next one is used. Example: tcp://testserver:4445|tcp://logserver:4445
Log level
Select the desired level of logging (described in Setting up logging).
Event Log tab
Here you can activate logging to the Windows Event Log and adjust the settings.
Select whether applications log messages to the local Windows Event Log.
Select the desired level of logging (described in Setting up logging).
Other Settings tab
When XBOUND processes save data temporarily, by default the Temp directory is used. If you want the data to be temporarily saved in another directory, specify which one.
How often the XBOUND Activities service checks for new documents (in milliseconds).
Note: Collectors do not use this setting. Collectors check their sources every 30 seconds. This is not adjustable.
Type a time interval (in milliseconds) for how often XBOUND Activities services perform a new login to XBOUND.
Specify when XBOUND is to warn you about the number of remaining licenses. If the number of licenses falls below this amount, a warning is displayed in the Log Explorer.
Select >:
The settings that you have configured differently from the common settings are not underlined (they have no link). You can delete these application-specific settings by emptying the field and pressing . Then the link reappears with a tooltip, which can be helpful.
These settings are saved in C:\ProgramData\ReadSoft\xbound\xboundConfiguration.foxconfig.
Configuring common application settings