Setting up logging
Use the below procedure to enable and adjust application-related logging in XBOUND.
Note that there are other ways of logging:
If you are using RCC, you can set up separate logging for the Administration module – see Capture Components Administration Help for details.
Procedure
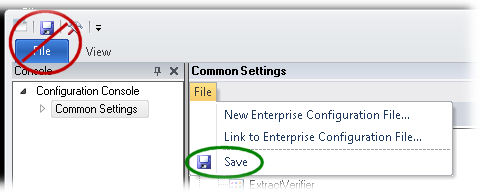
Using the XBOUND Management Center, open a console containing the Common Configuration Manager.
Note: In order to save changes in the Common Configuration Manager, you must run the Management Center as an Administrator.
In the navigation pane, select whether to set up logging for all applications (if so, select ) or for a specific application (if so, expand and then select the application, for example Process Monitor).
Select where the log messages are to be saved:
File system
On the tab, select if you want the log information saved to a separate file. Then specify the file name, folder, and format (XML or text).
Disadvantage: Many log files are created. These must be purged regularly.
Note: Logging to a central file folder requires the appropriate rights.
Service logging
On the tab, select if you want the log information saved to the logging database.
Advantages:
The logging database can be used by different servers.
The log messages can be accessed individually.
The logging database is native to XBOUND. XBOUND accesses this database to provide information to users (for example using the Log Explorer and Process Monitor).
There is an agent for maintaining this database – see Agent for Service Logging Removal.
Specify the binding and the application server name.
Note: You must close all open XBOUND applications (Document Manager, Document Verifier, etc.) and the Management Center. Then restart the XBOUND Platform Service. Finally, restart the applications you need. You must also create a log view before log messages can be displayed in Log Explorer.
Windows Event Log
On the tab, select if you want the information to be added to the operating system's event log.
Advantages:
Other applications (third-party components) can also log to the event log.
These log messages can be viewed manually in the Windows Event Log or using an external program.
Disadvantage:
Old messages could be automatically deleted or overwritten by newer messages (if it is configured like this).
Select the log level:
Select >:
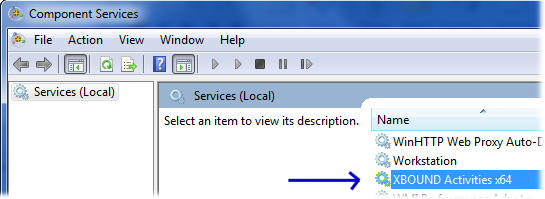
 For
logging to file when running XBOUND as native 64-bit components, perform
these additional steps:
For
logging to file when running XBOUND as native 64-bit components, perform
these additional steps: Optional: By default, warnings about long database operations are not logged. You can activate that function separately.