Specifying which documents to route to a process step
After you add process steps to your process and specify their sequence, you can customize the process rules to control which documents to include or exclude from the processing step. For example, you can include only a specific document type, or you could exclude document that contain a field with a certain field value.
This is required when you branch the process flow, if you want to prevent documents from being routed along multiple branches of your process.
It is also possible to use AND/OR expressions or sub-expressions to specify complicated conditions.
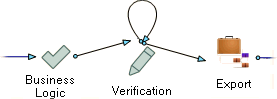
Tip 1: You can use this procedure to keep documents in the current process step until they meet specific criteria. To do this, draw the arrow in a loop, just as it is shown in this example. Then configure the rule as described in the instructions.
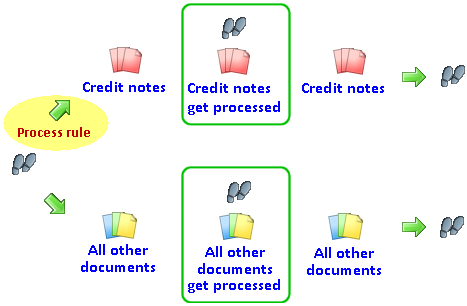
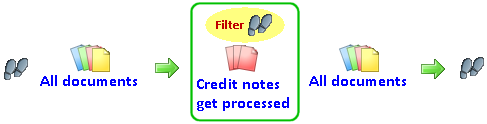
Tip 2: A similar procedure to the one described in this topic is
processing documents and media
that meet specified criteria, using filtering. In that case, documents
that do not meet the specified criteria are simply passed to the next
step. With a process rule, such documents would not even reach the step
that the arrow points to. ![]() Example that compares the two:
Example that compares the two:
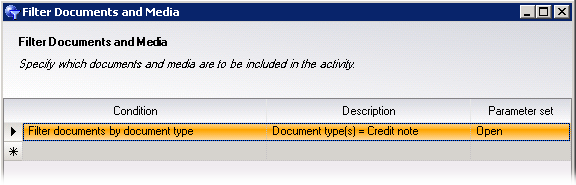
Note: Document types are required. See Creating or editing a document type.
Use this procedure
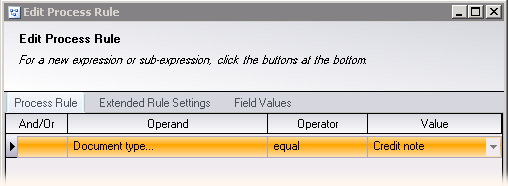
In the Process Design view of the Process Designer, double-click the process rule (the arrow) for which you want to formulate a rule.
In the dialog, click the button.
Click in the column and select a condition to base processing on:
– Documents of the type you specify are processed (or excluded from processing).
– Documents with the validation status (status object value) and (optionally) the document type you specify are processed (or excluded). Opens the dialog.
– Documents with status fields with a specified name and value are processed (or excluded). Opens the dialog.
– Documents of a certain type, with the field name and field status you specify, are processed (or excluded). Opens the dialog.
– Documents of a certain type, with the field name and field value you specify, are processed (or excluded). Opens the dialog.
Click in the column and select the desired operator.
You can select from these operators (depending on which operand was selected):
– The operand is equal to the value you specify
– The operand is not equal to the value.
– The operand is less than the value.
– The operand is less than the value or equal to the value.
– The operand is greater than the value.
– The operand is greater than the value or equal to the value.
– The operand matches the pattern of the value (the value being interpreted as a regular expression).
Click in the column and select a value from a list or type a value. (The available options depend on which operand you selected.)
Repeat for each additional expression you want to add.
To combine an expression with another expression using a higher priority (such as is signified by using parentheses in mathematical expressions), select an expression and then click instead of .
In the column, specify how to connect the expressions.
Optional: Apply the process rules to sub-documents.
Click .
Save the process by clicking the button:
After you specify a condition, the process rule arrow turns green (if
there is no condition, it is blue) and contains a flag symbol (![]() ).
).