Sending a Message for Authorization
Some users do not have the right to send out certain messages without authorization.
If a user does not have the right to send certain messages directly, in addition to the final recipient in the To field, he also needs to specify an authorizer in the Auth field. The message will then be relayed to the authorizer.

Picture 65: User profile authorizer options
This means that before a message can be sent, it first has to be authorized by someone. If a message is sent to a user without authorization rights, this user checks whether it has TOPCALL Service restricted/not in the "Restricted use of services" tab (picture XYZ1). If it not restricted, then only it can be able to reject the message, else the message cannot be rejected.

Picture XYZ1: Restrict use of services
The User Rights at Auth./Sig. tab has a Show authorizer recipient option. Depending on this option, the user can view or change the authorizer.
If a user is not equipped with the rights to change the authorizer, it must be defined in the default template of this user; otherwise, the message will not be sent.
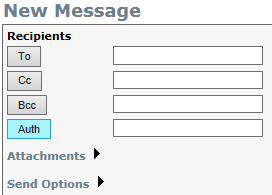
Picture 66: Send Message – edit authorizer