Shortening the workflow
The operating principle of User data entry is illustrated and detailed below.
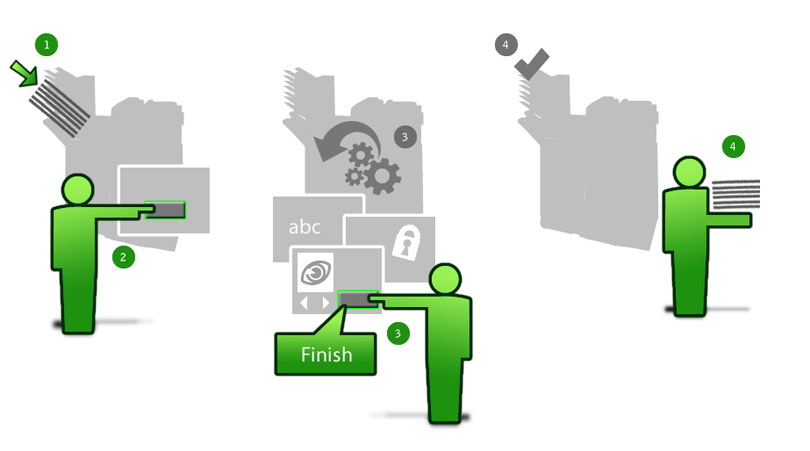
- Press the Connector button to start scanning.
- Enter document information, set encryption, specify a document name, and so on.
- Touch Finish on the Preview screen (you do not need to wait until all page thumbnails are loaded).
- Collect your papers.
- User data entry during scan and background processing are enabled.
- Custom file naming is set with 'if file name exists return error' setting.
If the user specifies an already existing file name during the workflow, no error message appears (since the file storing occurs later in time).
To achieve what the new workflow has to offer, you need to do these configuration steps:
- In the Administration Console, go to
and select the
During scan check box next to the
User data entry setting. Click the
Save Current Profile button.
After you have enabled User data entry, the option Display before Preview screen and its sub-elements are turned on automatically. This means that if you have screens, such as document encryption, file naming or Activity Tracking additional fields, these are instantly displayed (while scanning is still underway) and responsive.
- Make sure the Enabled option next to the Background Processing setting is selected (selected by default for all connectors) under . If you attempt to save a new connector profile with Background processing disabled, a warning message pops up requiring confirmation. When this option is enabled, you do not have to wait at the MFP while your final document is created.
- Set the options Bypass redirect screen and Logoff automatically to Enabled.
- If you use any document services (extenders) in your connector profile, ensure that they are configured in express mode (no screens/forms displayed).
Your own MFP model may have such characteristics or behavior that alters these workflows up to some extent. See the relevant vendor installation guide on what considerations and configuration steps such situations may require.
How it works
Use User data entry together with Background processing and its various options to construct efficient workflows for your MFP users. Proceed along these two basic lines:
- When you turn Background processing on, you are basically shortening the time users in your organization need to spend at the MFP.
- When you use User data entry, you are giving MFP users the option to utilize otherwise idle time.
At the end of the day you may well construct a workflow that is as short as it can be with the minimum of user idling.
Baseline workflow
This is the baseline legacy workflow with no workflow shortening settings.
Users scan into a network share (with Quick Connect) and set document encryption and specify a file name manually for each document. The output format is .docx, no MFP-side thumbnail review is required. In the legacy eCopy workflow (with Background processing OFF):
- Log in.
- Touch QuickConnect on the main screen.
- Wait for page thumbnails to load.
- Press Next.
- Set the document encryption.
- Specify the document name.
- Press Send.
- Wait for processing and sending to complete (creating .docx from scans involves OCR, and can be very time-consuming).
- Touch Done on the final screen to log out and collect your sheets.
Background processing on
This type of workflow shortening is already available in legacy software versions.
With Background processing on, the workflow starts to shorten:
- Log in.
- Touch QuickConnect on the main screen.
- Wait for page thumbnails to load.
- Press Next.
- Set document encryption.
- Specify document name.
- Press Send.
- Touch Done on the final screen to log out and collect your sheets.
Save more user time: use more parameters of Background processing
This type of workflow shortening is already available in legacy software versions.
Turn on Bypass redirect screen and Logoff automatically. The workflow drops another step as follows:
- Log in.
- Touch QuickConnect on the main screen.
- Wait for page thumbnails to load.
- Press Next.
- Set document encryption.
- Specify document name.
- Press Send.
- Collect your sheets.
Utilize idle user time spent while waiting for preview thumbnails being loaded
This configuration option is unique to the new type of MFP user workflow and is not available in legacy software versions.
In the Workflow setting group locate User data entry. Select the During scan check box. Leave the check boxes under Display before preview screen selected.
This setup will let your users set document encryption and specify document name while Preview thumbnails are created in the background.
- Log in.
- Touch QuickConnect on the main screen.
- Press Next on the Preview screen.
- Press Send.
- Collect your sheets.
Hide the Preview screen
This configuration option is unique to the new type of MFP user workflow and is not available in legacy software versions. Compared to the previous scenario, this one involves a single extra step: locate the Preview Screen setting in the Workflow group and select the Hide check box.
The Preview screen will not load. As soon as users are done setting document encryption and specifying document name, they simply touch Send and can leave the MFP.
- Log in.
- Touch QuickConnect on the main screen.
- Press Send.
- Collect your sheets.