An XBOUND tutorial
Contents
Chapter 3: Setting up your workspace (a console) in XBOUND
Chapter 4:Processes and clients
Chapter 5: Processing documents
Chapter 6: Working with several processes
Chapter 7: Controlling process flows
Chapter 8: Using barcodes to determine document structure
Chapter 9: Processing documents and media that meet specified criteria
Chapter 10: Splitting documents by document type
Chapter 11: Cleanup: Deactivate or delete the Tutorial
Chapter 12: For a deeper understanding
Chapter 1: Introduction
This introduction is for those who have the task of configuring document processing in XBOUND. You will learn how to define clients and processes, as well as how to control document processing within the processes. Previous knowledge is not required.
You need an installed XBOUND system in order to perform the procedures described here. (See Installing XBOUND.) The Tutorial assumes that no clients or processes have been set up.
Every chapter of this tutorial builds on the previous chapter. In most cases you need the configuration from the previous chapters in order to proceed.
Users who are experienced in the Windows environment can expect to complete this tutorial in 4 to 6 hours.
When there are very special requirements, it can be necessary to extend XBOUND by implementing new functions. For this purpose, XBOUND provides an interface to program (or customize) XBOUND yourself. That is not covered in this tutorial.
Chapter 2: Preparation
Several Windows services coordinate document processing in the background. They are installed and started during installation. Ensure that the XBOUND Collect Service is running. At the same time, ensure that the XBOUND Activities service is not running, since we want to pause processing after the import step so that we can follow the processing step by step. (How to adjust the services.)
Select menu > > > > .
In the dialog, right-click and select or .
Right-click and select .
If an error message is displayed, try double-clicking the service and adjusting the settings on the tab.
While completing this tutorial, we will import a total of five sample batches that are provided in the XBOUND installation. Each batch consists of a directory containing image files and a corresponding trigger file.
Using Windows Explorer, copy the C:\Program Files\ReadSoft\xbound\Docs\TutorialBatches directory, including all subdirectories and trigger files, to another location in the file system – one where the Windows service XBOUND Collect Service has access (for example to a shared path on a file server).
Change the file extension of the first trigger file (20140313000070.trigger) to rdy. This makes it ready for import into XBOUND.
Chapter 3: Setting up your workspace (a console) in XBOUND
Start the XBOUND Management Center by selecting > > > .
When the Management Center is displayed, you are prompted to add a new console or open an existing one. Click .
In the middle pane, click .
In the right pane, click :

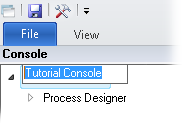
In the upper left corner, click and give the console a descriptive name:
(If the pane is not visible on the left, select > .)
Click the button (
 ) and save the console wherever you
wish.
) and save the console wherever you
wish.
Chapter 4: Processes and clients
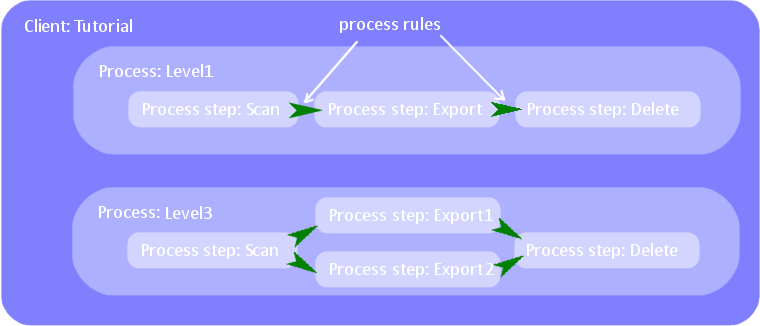
Documents always go through a process. A process is a complete rule specifying what XBOUND does with the documents. Any number of processes can run simultaneously.
In XBOUND, processes can (and must) be created in the context of a client. A client is a logical arrangement of processes that belong together. You could create one client for the processes of a particular customer and another for developing or test purposes, for example.
4.1 Creating a client
Right after XBOUND is installed, there are not yet any clients or processes defined. So the first step is to create a client using the Process Designer:
In your new console, select > .
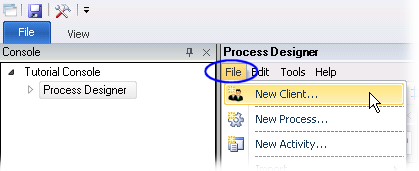
Type Tutorial in the field.
Click .
Now you can see the new client in the left pane of the Process Designer.
4.2 Creating a process
Use this procedure to create a process in your new client:
Select > .
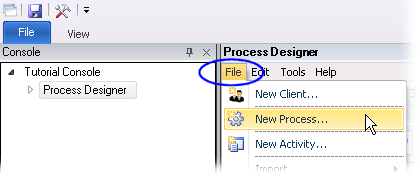
In the field, select the client in which the process is to be created (Tutorial).
Type Level1 in the field.
Click .
Notice the new process in the left pane of the Process Designer.
4.3 Adding process steps
Documents are processed in multiple process steps within a process. Each process step describes certain operations that are to be performed on the documents.
Let us define a simple process. It will consist of only three steps to process paper documents:
Scan – documents are imported into XBOUND after scanning.
Export – documents are exported from XBOUND into the file system as directories and files.
Delete – processed documents are deleted from XBOUND.
Each of these operations is executed by a particular XBOUND module or activity. (See XBOUND activities: Overview.)
The activities are displayed in the right pane of the Process Designer, which is a kind of toolbox for defining processes. These activities are available for the process steps that we are going to create:
To create a process using these activities:
Click Level1 in the left pane of the Process Designer.
Drag from the right pane (in the group) into the middle pane.
Drag activity from the right pane (in the group) into the middle pane.
Drag from the right pane (in the group) into the middle pane.
Initially, new process steps bear the names of the corresponding activities. It is often useful to provide shorter or more descriptive names:
Right-click the process step and select .
Type Scan as the new name.
Click .
Use the same procedure to rename to Export and to Delete.
4.4 Specifying the process flow
After you create process steps, you must specify the sequence in which they are to be executed. We use process rules to do this. Process rules are displayed as arrows between the process steps.
Link the three process steps with two process rules as follows:
Hold the cursor over the Scan icon until it turns into a hand:


If the cursor will not turn into a hand, make sure that Scan is not selected. Select Delete, for example, and then point to Scan again.
Click and hold while you move the cursor to Export, and release. This creates an arrow between the two processes.
In the same way, create an arrow between Export and Delete.
Save the process by clicking the button:
4.5 Configuring process steps
In many cases, the details of the process steps must be configured. The available options depend on which activity you are configuring. (See a list of all activities.) And for a Scan Documents process step, it is important to at least open and close it in order to save the default configuration.
Let us configure our Scan and Export process steps as below:
Double-click Scan.
Click to set the default configuration.
Double-click Export.
Set to the directory where you want documents to be exported.
Tip: When you have questions, you can open XBOUND Help by pressing on your keyboard. You can do this at any time when you are using the program. The help topic describes the specific dialog you are viewing and its settings.
Click .
No configuration is needed for Delete.
4.6 Activating the process
The process is now defined, but it is not yet active. This means that no documents can be processed yet in it, and the process is invisible in the Process Monitor (which we will get to shortly).
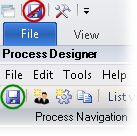
In the Process Designer, inactive processes are listed with this button
by their name: ![]()
Activate the process now:
Right-click Level1 and select .
Confirm by clicking . The symbol for working processes (
 ) is
applied, and you can see the process in the Process Monitor.
) is
applied, and you can see the process in the Process Monitor.Save the process by clicking the button:
You have just created your first XBOUND process.
4.7 Configuring the collector
XBOUND supports several systems for scanning documents, for example XBOUND Scan Client or scanners of the ImageTrac family. For each system there is a corresponding collector, and each collector must be configured before use.
At this point we will import the first sample batch. It consists of:
The directory ...\TutorialBatches\20140313000070.
The trigger file ...\TutorialBatches\20140313000070.rdy.
Proceed as follows:
Using the Process Designer, select > > . We select this particular collector because our sample batch was scanned using XBOUND Scan Client.
In the dialog that is displayed, click the symbol.
In the dialog that is now displayed, in the setting, specify the location where you copied the sample batches.
Note: Do not enter the export directory but the directory that contains the sample batches.
Note these settings, which will help you to follow the import while it is happening (see the next section):
– rdy
– bsy
– imp
– err
Close both dialogs by clicking .
4.8 Tracing the import progress
If the service is installed and running correctly, the test batch is imported into XBOUND automatically, typically within a few seconds. You can see this happening in Windows Explorer, when the file extension of the trigger file 20140313000070.* changes from .rdy to .bsy and then to .imp. These file extensions come from the dialog, and you can specify different extensions if that is helpful.
You can see import progress from the file extension of the trigger file:
.rdy: The batch is ready for import.
.bsy: The batch is being imported right now.
.imp: The import of the batch is finished. The batch is now a root document in XBOUND.
.err: An error occurred while importing the batch. You can find information on the cause of error in the Windows Event Viewer or the log file of the Collect Service.
If the file extension of the trigger file remains unchanged from rdy, ensure that the Collect Service is running and that the application server is configured correctly (see Installing XBOUND).
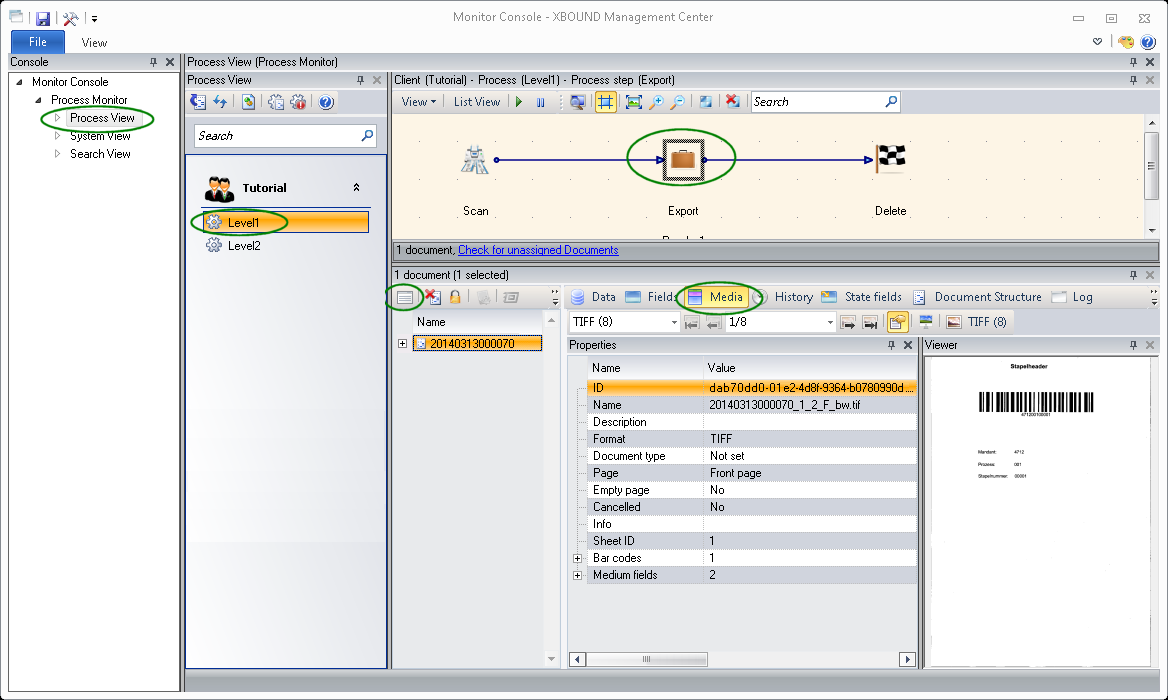
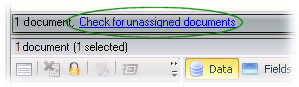
4.9 Displaying documents, media and fields
We created exactly one root document with our example. Now you can display the root document in the Process Monitor as follows:
First we need to add the Process Monitor to our console. Click (
 )
in the upper left corner of the window. The dialog is displayed.
)
in the upper left corner of the window. The dialog is displayed.Select in the left pane.
Note: If that plug-in is not available there, you must first
 add it to the XBOUND
Management Center:
add it to the XBOUND
Management Center:Click the arrow (
 ) to move the
plug-in to the right pane. The dialog is
displayed.
) to move the
plug-in to the right pane. The dialog is
displayed.Click to use the plug-in's default connection settings.
Click and then .
The Process Monitor is now visible in the pane (on the left). Save the console (
).Select > .
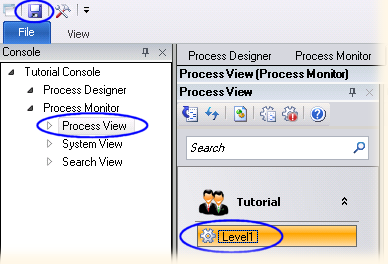
If it is not selected by default, select Level1 in the middle pane.
Select the Export step in the right pane.
In the lower pane you can now see the document. Click , , and other buttons to get an idea of what data is available. (If you do not see those buttons, click this one:
 )
)
Tip: Any time your XBOUND process does not work as expected and documents get Error status, a good first step is to click in the Process Monitor. The most recent error message is displayed here, regardless of whether the problem is resolved. Checking the error message often leads directly to a solution to the problem.
Chapter 5: Processing documents
Now the documents have been imported by the XBOUND Collect Service and are available in XBOUND for processing. Imported documents are processed in two different ways within XBOUND:
In the background (automatically) by the XBOUND Activities service (in some cases also by the XBOUND Collect Service).
Interactively (manually) by the various XBOUND clients.
So far, our sample process contains steps that require manual processing. All of the work is performed in the background, by the Windows services.
Start the XBOUND Activities service.
A look in the Process Monitor will show you that our imported document is still waiting at the middle process step of our sample process. To understand why, you must understand how the XBOUND Activities service processes the documents. This is explained in the next section.
5.1 Assigning activities and applications to the XBOUND Activities service
It is possible to run the XBOUND Activities service on one or more computers. You can assign one or more activities to each computer (or service instance, to be more precise) for the documents to be processed on this computer. This allows you to obtain efficient load sharing and optimal utilization of your XBOUND license.
Even if you use the XBOUND Activities service on only one computer, you must assign the activities to it, in order for the documents to be processed by it.
Note: Only automatic activities need to be assigned to the service. The following manual activities do not need to be assigned:
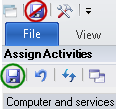
Our sample process contains process steps for importing, saving (exporting from XBOUND), and deleting documents. The import was already taken care of by the Collect Service. Now you must assign and to the XBOUND Activities service so that those activities will run.
5.2 Adding the Assign Activities plug-in to your console
Start the XBOUND Activities service on the desired computer. (
How?)Return to your Tutorial console. Here we need to add the Assign Activities plug-in.
Click the button (
). The dialog is displayed.Select the plug-in in the left pane.
If the plug-in is not available, you must first add it to the XBOUND Management Center (file name xboundPlugInAssignActivity.dll).
Click the arrow (
) to move the
plug-in to the right pane. The dialog is
displayed.Click to use the plug-in's default connection settings.
Click and then . is now visible in the pane (on the left).
5.3 Assigning activities to the XBOUND Activities service
In the left pane, select .
In the middle pane, under , find the desired computer and select .
In the row, select the box in the column.
In the column, select the number of activity instances to be executed. (For our purposes, one is enough.)
Do those same two steps in the row.
Click the button:
5.4 Tracing the processing
When the applications are assigned as described and the XBOUND Activities
service is running, all documents are processed by it. In the Process
Monitor you can after a short time click
(![]() ) and see that there are no
more documents waiting.
) and see that there are no
more documents waiting.
Now you have a working process:
Batches are imported as soon as they are available. This is done by the collector in the Scan process step. (You remember that available batches are recognized by the trigger file).
In our simple process, imported documents are simply saved (exported). This is done automatically (by the XBOUND Activities service) in the Export process step. You specified the export directory, so look in that directory now and see the root document as a directory that contains the images.
When processing is complete, the documents are automatically deleted from XBOUND (by the XBOUND Activities service) in the Delete process step. (We delete processed documents so that they do not clutter up the XBOUND system.)
Chapter 6: Working with several processes
You will rarely run only a single process using XBOUND. It is useful to define several processes, even if you are only developing or testing XBOUND. So let's create a new sample process that will familiarize you with more XBOUND functionality. We will base the new sample process on the existing one, so that you can see how to copy and then build on a process.
It is often useful to copy a process. Let us create a copy of the Level1 process of the Tutorial client, and call it Level2 (still within the Tutorial client).
6.1 Copying a process
Return to the Process Designer in your Tutorial Console. (Select in the pane.)
Select > . The dialog is displayed.
Select and click .
In , select the Tutorial client.
Select the Level1 process and click .
In , select the Tutorial client again, to create a copy in the same client.
Click and then .
The copy is displayed under with the name Level11. Right-click the process and rename it Level2.
Activate the Level2 process. (Right-click it and select .)
Save the process by clicking the button:
6.2 Importing documents into several processes
In the last section we created a new process called Level2. Now try to import the second test batch of our tutorial into this process:
To prevent the imported batches from being processed and deleted immediately, stop the XBOUND Activities service. (
How?)
At the same time, ensure that the XBOUND Collect Service is still
running.Using Windows Explorer, change the file extension of the trigger file ...\TutorialBatches\20140313000071.trigger to rdy.
Watch the trigger file in Windows Explorer. After a few seconds you will see that the file extension of the trigger file changes from rdy to err. The root document cannot be seen in either of the processes in the Process Monitor. Why?
Open the Windows Event Viewer of the computer on which the Collect Service is running. There you will find an error message in . It says:
"The root document 20140313000071 matches the process steps Tutorial / Level1 / Scan and Tutorial / Level2 / Scan. Only one match is allowed."
The problem here is that the collector cannot determine which of our two Scan process steps should import the batch. We must define a criterion that allows it to choose the right Scan process step.
You may remember that a document was created for the first batch in XBOUND in our first successful test import. It contained certain fields with information on the scanned batch. These fields (or, to be more precise, the batch information from which the fields are to be created) can be used by the collector as a distinguishing feature to choose the correct Scan process step.
The most flexible criterion to use for selecting the scan process step is the batch name. Let us use that to import both batches into XBOUND.
In the default configuration of the collector for the XBOUND Scan Client, the collector just takes the batch’s 14-digit time stamp (which is also the batch’s directory name) as the batch name.
6.3 Specifying the actual names of the batches to import
Using the Process Designer, select the Level1 process under .
Double-click the Scan process step.
In the table, click in the column of the row and type 20140313000070.
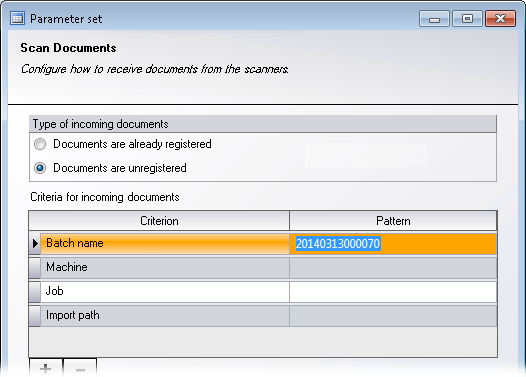
(Normally we would type a regular expression here that matches all of the batch names that we want to import. However, at the moment we want to import only one batch, so we are entering the actual batch name. Do not be concerned by this at the moment; we will work with regular expressions soon.)
Click .
Save the process by clicking the button:
Under select Level2.
Double-click the Scan process step.
In the table, click in the column of the row and type 20140313000071.
Click .
Save the process.
6.4 Importing the batches
Using Windows Explorer, change the file extension of the two trigger files the two trigger files (20140313000071.imp and 20140313000070.err) to rdy. This will cause both batches to be imported.
Watch until the trigger files get the file extension imp, which means that the batches have been imported.
Return to the Process Monitor and click (
 ) You can now see both batches, each in its
own process.
) You can now see both batches, each in its
own process.
6.5 Regular expressions
Up to now we have specified fixed criteria. However, you would not want to edit the process steps in the Process Designer for every single batch in a production environment. This is where regular expressions come in.
Using the Process Monitor, select Level1 and then Export to display the imported batch of Level1 process.
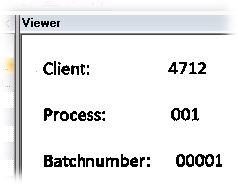
Ensure that you are looking at the view of the view, and click . (Show me.) Look at the first imported sheet, which contains a barcode. Right-click the image and select > . Near the top of the image you can see the value of the barcode: 471200100001.
The first sheet is a so-called batch header. The barcode printed on this batch header has three parts:
A four-digit code for the client. (We have selected the value 4712 at random. We will link it to the Tutorial client.)
A three-digit code corresponding to the process number. (Level1 will use 001, Level2 will use 002, etc.)
A five-digit sequential number.
If you scroll down in the image, you can see it written out:
Note: This barcode configuration is not built into XBOUND, but just an example selected for this tutorial. You can select a completely different barcode structure.
Open the configuration of the XBOUND Scan Client collector again. (Return to the Process Designer and select > > .)
Double-click the first line.
The dialog is displayed. Type ^(\d{12})$ in the box.
Confirm by clicking in the two dialogs to close them.
Now you have configured the collector in such a way that it takes over the batch barcode as root document name. ^(\d{12})$ is a regular expression saying that the barcode has twelve numeric digits that are to be taken as root document name. (
More details.)For both Scan process steps, type regular expressions that reproduce the convention for the structure of the batch names described above:
For the Scan process step in Level1, type ^4712001\d{5}$ under in the line.
For the Scan process step in Level2, type ^4712002\d{5}$ under in the line.
 Save the processes.
6.6 Importing the batches again
Restart the XBOUND Activities service so that the root documents from before are exported and deleted.
Wait a few moments and then stop the service again.
Enable the batch two batches for import again by using Windows Explorer to change the file extension of the two trigger files (20140313000071.imp and 20140313000070.imp) to rdy.
If XBOUND is configured as described, this is what happens:
The collector first extracts the root document name from a batch that is to be imported.
The collector checks all scan process steps, checking whether the name matches one of the specified patterns.
If exactly one matching scan process step is found, then the batch will be imported.
If no matching scan process step is found, or if several are found, then the batch receives an error status (file extension err), and a log message is written to the Windows Event Viewer (as you have already seen).
Return to the Process Monitor, click (
), and note how the root
document appears in the Level2
process. It bears the name 471200200001, which is the value of the
batch barcode. The root document in Level1
process received the name 471200100001.
Chapter 7: Controlling process flows
When specifying process flows, you can create branches in your process. You can run the documents in parallel through these branches, or you can run the documents through only one branch. If the document is to be processed in only one of the branches, then you must defined process rules with conditions that decide which of the branches a document is to be processed in.
7.1 Branching the process
Let us create a process with two branches:
Stop the XBOUND Activities service, if it is running (to prevent imported batches from being processed further and immediately deleted).
Using the Process Designer, create a new process called Level3 in the Tutorial client.
Create a process step for the Scan documents activity within this process, and name it Scan.
Double-click the process step to open it.
Now we need to specify a regular expression that matches all of the batch names that we want to import. Without going into detail about regular expressions, let us click in the column of the row and type ^4712003\d{5}$.
Click .
Create two export process steps using Adapter for File System (Structured).
Name them Export1 and Export2.
Specify a different export path for each one.
Draw arrows from Scan to each of the new process steps:
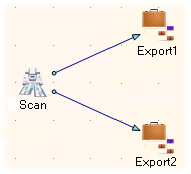
Right-click Scan and select . The dialog is displayed.
Select and click .
Activate the process.
Save the process.
7.2 Checking the result
Using Windows Explorer, change the file extension of the trigger file 20140313000072.trigger to rdy.
Watch as the batch is imported by the XBOUND Collect Service and the file extension changes to imp.
Return to the Process Monitor, refresh, and select the Level3 process. You will see that one document is waiting each of the Export document process steps Export1 and Export2. But you imported only one document, didn’t you?
The Level3 process specifies that imported documents are to be processed in both of the subsequent process steps. So you see the same document waiting in both process steps. How is this possible?
In fact the document is not located in a particular process step, but just a task for the document. In the upper pane of the you actually see the number of tasks waiting in the process steps. The document exists independently from tasks. In fact, documents can exist in XBOUND without any task.
To demonstrate this, start the XBOUND Activities service. After a short time the tasks disappear and you can see (using Windows Explorer) that the root document was exported to both of the directories that you configured. In the Process Monitor, you can see this message in the status bar of the process overview: "1 document."
The tasks are deleted because processing—as we have defined it so far—ends with the two Export process steps. However, the root document still exists as a document in XBOUND, since we have not yet defined a process step that deletes it.
Click in the Process Monitor to display the root document.
Select the document and click (
 ) to remove
it from XBOUND.
) to remove
it from XBOUND.
Note: You would have the same
result (export to two different directories) if you used ![]() two
Export process steps in a row.
We introduced this (quasi) parallel processing to show the simplest possible
example. However, in the real world parallel processing of documents in
different branches can be quite useful.
two
Export process steps in a row.
We introduced this (quasi) parallel processing to show the simplest possible
example. However, in the real world parallel processing of documents in
different branches can be quite useful.
7.3 Synchronizing tasks
In the Level3 process, create a Delete Documents process step. Name it Delete.
Draw arrows from Export1 and Export2 to Delete.
Save the process.
If you imported batch 20140313000072 again, you would face a problem: Both tasks would run, and the document would be processed twice in the Delete step. The first time, the Delete Documents application would refuse to delete the document, since multiple tasks exist for the document. Only when the second task arrives is deletion successful (since only one task exists). This is successful, but not very elegant; consider the unnecessary error messages and system load.
Instead, in the Delete process step let's make XBOUND reduce both incoming tasks to one before the document is processed. You could also say that the incoming tasks are synchronized.
To synchronize tasks in a process step, XBOUND has to know how many tasks are to arrive at this process step. (As we will see in the next section, this does not always correspond to the number of arrows ending at this process step.)
Since the process can be quite complex, it is generally not possible for XBOUND to determine the number of all tasks to be synchronized from the process structure. You must specify this number yourself. In our example the number is 2.
Now synchronize the Delete process step for two incoming tasks:
Right-click the Delete process step and select .
In , type 2.
Select .
Click .
Save the process.
7.4 Checking the result
To illustrate, let us disable (or pause) two process steps so that we can see documents step through the system.
In the Process Monitor, select the Export1 process step.
Click :

Do the same with the Delete process step.
The disabled process steps have a red "pause" symbol on them.
Release the batch named 20140313000072 for Level3 for import again by using Windows Explorer to change the file extension of the trigger file 20140313000072.imp to rdy.
Return to the Process Monitor. After a few moments (and after clicking ), you will see a pending (Ready status) task in the Export1 step, and the Delete step has a task with the status Synchronize. The latter originated in Export2, which was not disabled.
After scanning (import), XBOUND created two tasks, one for each of the Export steps. One was executed and proceeded to Delete. There it got Synchronize status, because the second process step must be executed before proceeding to the third one – and that is on hold in the disabled Export1 step.
Restart Export1 by selecting it and clicking :

Click (
)
again. Soon you see that a task is pending in Delete.
The task in Export1 was executed
by XBOUND and routed to Delete.
There it was synchronized
with the other task and merged in one task – which is now pending.Restart the Delete process step in order to finish processing this root document.
7.5 Controlling document flow
With branched processes, the goal is normally not parallel processing but to route the document through one branch or the other. Which path the document takes is determined by the document properties. This is called routing.
In the last section we drew arrows between the process steps. These arrows are called process rules because they determine how documents are routed. But so far we have not included any conditions. This is why XBOUND created a task for each arrow and, as you saw in the previous section, it duplicated the task when two arrows originated from the same process step.
Next we will specify a condition for one of these process rules. Conditions are based on document properties, so we must first specify what those properties are.
7.6 Creating document types and field definitions
Often the content of one or more document fields forms the basis of how a document is routed. Before you formulate a process rule that defines how this is to be done, you must first specify which fields you expect in that document. You do this by creating field definitions.
Field definitions always apply to a particular document type. Document types indicate the functional category of a document, and they are associated with a specific process.
Use this procedure to create the document type Batch in the Level3process:
In the Process Designer, select the Level3process.
In the area, click :

Click . The dialog is displayed.
In , type Batch as the name for the new document type.
Click .
Save the process.
Now XBOUND knows that documents with the document type Batch are to be expected in our Level3 process.
Create a field definition called Name for this document type. Use this procedure:
Select the Batch document type.
Near the bottom of the window, click the open lock symbol (
 ).
).In the column, type Name as the name of the new field definition.
Click the closed lock symbol (
 ).
).Save the process.
Now XBOUND knows the Batch document type and that a Name field is expected in documents of this type.
7.7 Assigning a document type to imported documents
So far you have imported batches without assigning a document type to the resulting documents. Let us configure the Scan process step so that the root document that it creates contains the Batch document type.
Use this procedure:
In the area, click :

Double-click the Scan process step in the Level3 process. The settings for the Scan Documents activity are displayed.
In the box, select Batch as the document type that is to be assigned to the imported batch.
Click .
Save the process.
7.8 Specifying a condition in a process rule
Now we can write a condition that routes the incoming documents: If the Name field has a certain value, then the root document is processed in the first branch of the process. Otherwise, it is processed in the second branch.
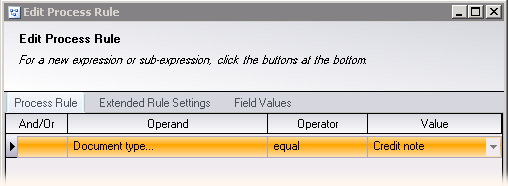
Write a condition for the process rule from Scan to Export1, specifying that the Name field is to have the value 471200300001. Use this procedure:
Double-click the process rule (the arrow) between Scan and Export1.
Click .
Select in .
In , select Batch.
In , select Name.
Click .
In the field, type the value to be checked for (in this case 471200300001).
Click .
Save the process.
After entering the condition, you see in the Process Designer that the process rule is not blue anymore, but green, and it has a flag symbol. This shows that the rule has a condition.
7.9 Checking the result
For illustration, return to the Process Monitor and pause Export1 and Export2.
Release batch 20140313000072 for import for Level3 again by changing the file extension of the trigger file 20140313000072.imp to rdy.
Back in the Process Monitor, click (
). You will see that one
document is pending in Export1
in the Level3 process. XBOUND checked
the condition that you added to one of the two process rules leading
from the Scan process step. Because
the condition was met, XBOUND generated a task for that branch.No task was forwarded by XBOUND to the other branch, because a condition was met on the first process branch. (You can read about how XBOUND proceeds when multiple process rules originate from a single process step in Synchronizing several tasks.)
Use Windows Explorer to change the file extension of the trigger file 20140313000073.trigger to rdy.
Back in the Process Monitor, click (
). After a moment you
will see that a second batch (now a root document) is pending for
processing in Export2 process step,
which the blue arrow points to. Obviously the condition hidden behind
the green arrow was not met. If you look at the first
page, you will see why: The batch barcode has the value 47120030002.You no longer have a parallel process flow, but conditional branching. This means that tasks are not duplicated, but basically just forwarded. There can be only one task per document, so task synchronization is no longer needed in the Delete process step.
Therefore, switch back to the Process Designer and reset the synchronization by setting the number of expected tasks in the Delete step to 1. (Right-click Delete and select .)
Do not forget to save the process.
7.10 Delayed processing
You have seen how we can pause or disable process steps in order to keep root documents (or rather, their tasks) at a process step for illustration purposes. Occasionally it is necessary to delay document processing in production environments. For example, often you want to wait a certain period of time after documents are processed before deleting them.
For such purposes, you can configure a process rule to specify how much time must pass before the task can be executed. Use this procedure to configure a one-minute delay for each of the process rules that point to Delete:
In the Process Designer, double-click one of the process rules (arrows between process steps) that points to the Delete process. The dialog is displayed.
Click .
Under , select how long to delay processing the task (one minute).
(Tip for future reference: Often it is necessary to apply a process rule to not just root documents but to sub-documents, as well. For that you have the settings, which are described in more detail in Applying process rules to sub-documents.)
Click .
The process rule arrow now contains a clock symbol (
 ).
One minute must pass before the task can execute the next process
step.
).
One minute must pass before the task can execute the next process
step.Repeat the above steps on the other process rule that points to the Delete step.
Save the process.
Return to the Process Monitor and restart the Export1 and Export 2 process steps.
After a short time (click ), you will see both tasks pending at the Delete process step, with Waiting status.
The change of status is carried out in the background by a system agent, namely the Agent for Document Resubmit. At a specified time interval it looks for pending tasks and sets them to the status if their waiting time has passed. This means that the time configured in the process step is a minimum time. Depending on the time interval specified for the agent, and how the two times coincide, more time can pass than what the process step was configured for.
7.11 Changing the polling cycle of a system agent
The interval at which the agent checks waiting tasks can be configured. In a production environment, an interval of 1800 seconds (a half hour) is a reasonable value. To try it out, set it to 30 seconds:
Click the button (
)
and add the System Agent Manager to the console.If the plug-in is not available, you must first add it to the XBOUND Management Center (file name xboundPlugInSystemAgents.dll).
Click in the pane.
Drag from the pane (at the bottom) to a service in the pane.
Optional: Type a new name and click .
In the pane, click in the column for the new entry.
Type the interval in seconds (30).
Click .
Select for the new entry.
- Restart
the XBOUND System Agent Service to which you assigned the agent.
In the Process Monitor you can see that both Waiting tasks are soon executed, and the documents are deleted from the XBOUND system.
Chapter 8: Using barcodes to determine document structure
Documents are used in XBOUND to represent business transactions for which physical records (usually in paper form) exist. Papers can be scanned and imported to XBOUND as electronic documents.
Business transactions often have a hierarchical structure. For example, an invoice can consist of the actual invoice plus attachments. The attachments are usually only archived, while data like invoice number, data and amount are typically extracted from the actual invoice pages.
Furthermore, "invoices" can be divided into two types: Invoices and credit notes.
Invoices and credit notes are grouped in root documents in order to simplify the processing of large volumes of documents.
So we have the following document model:
A batch consists of invoices and credit notes in any sequence.
An invoice (or credit note) consists of the actual invoice or credit note plus optional attachments.
During import, a root document is created that contains media created from scanned pages. The above structure exists implicitly, but it is not yet shown in XBOUND.
For further processing it is very useful to show the document structure in XBOUND. We do this by dividing the root document into sub-documents, which themselves can contain sub-documents.
A simple yet robust structuring procedure uses identification sheets (separator sheets) with barcodes to indicate where a document begins and ends The separators are inserted manually into the stack of papers before scanning.
In this chapter we will do the following:
8.2 Configure barcode interpretation so that separator sheets are classified when a batch is imported
8.4 Use the interpreted barcodes to create sub-documents so that batches containing such separator sheets are divided into three sub-documents upon import
8.7 Separate vouchers from attachments, creating sub-sub-documents
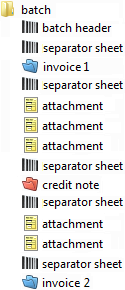
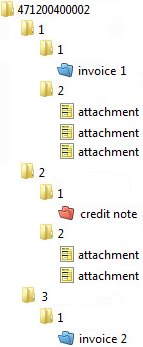
This is the structure of the two batches before and after processing:
Before import |
| After processing (8-5) |
|
|
|
Before import | After processing (8-7) | |
|
|
|
We will proceed one step at a time so that you can see how this is achieved.
8.1 Setting up the process
First complete these preparation steps:
Using the Process Designer, select > and create a copy of the Level2 process in the same client.
Change the name of the copy from Level21 to Level4.
Create document types called Batch, Invoice, Credit note, Voucher, and Attachment in this process. (Click and then .)
Configure Scan by specifying the regular expression ^4712004\d{5}$ as criterion of the name and by selecting Batch as the .
Delete the arrow between Scan and Export by clicking it and then pressing on your keyboard.
Create a Classify by Barcodes process step and name it Interpret barcode.
Draw an arrow from Scan to Interpret barcode.
Create a Build Document Structure process step and name it Structure.
Draw an arrow from Interpret barcode to Structure.
Draw an arrow from Structure to Export.
Configure a separate export directory in Export.
Save the process.
Assign and to the XBOUND Activities service. (See Assigning activities and applications to the XBOUND Activities service above.)
8.2 Configuring barcode interpretation
Let us configure the Interpret barcode process step so that the barcodes on the separator sheets can be recognized and the corresponding document types assigned.
Using the Process Designer, double-click the Interpret barcode step. The corresponding settings are displayed.
Select Invoice as the document type.
Type the regular expression ^555100$ in the box.
Select under . This means that when a barcode with the value 555100 is found, the page that follows will be an invoice.
Click .
In the second row of the table, select Credit note as the document type.
Type the regular expression ^555300$ in the box.
Select under . This means that when a barcode with the value 555300 is found, the page that follows will be a credit note.
Click to close the configuration dialog.
Activate and save the process.
Switch to the Process Monitor, click , select the Level4 process, and pause the Structure step (since it is not yet configured).
Using Windows Explorer, change the file extension of the trigger file 20140313000074.trigger to rdy.
Wait a few moments until the rdy changes to imp. (Alternatively, restart the XBOUND Activities service so that it notices the change immediately.)
8.3 Checking the result
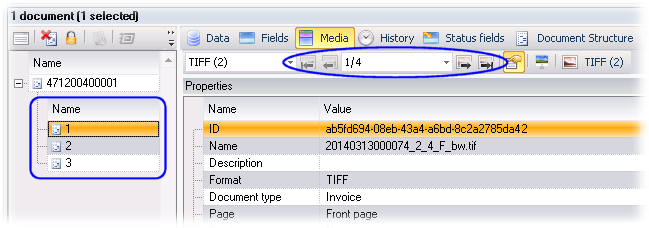
Return to the Process Monitor and click . Notice that the 47120040001 document has moved to the Structure step.
Click Structure. The root document is displayed in the lower pane. Click it there.
Click and use the arrow buttons to browse the 14 sheets that are included in the root document.
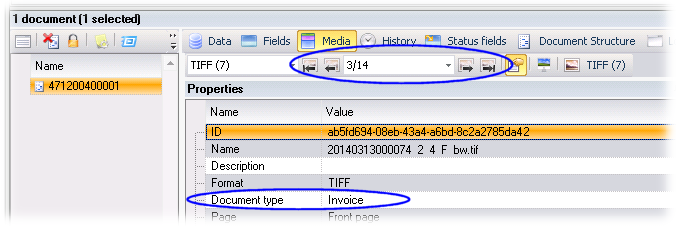
You can see that each separator sheet (except the first one, which was meant to identify the batch) has a listed. Those sheets are now classified.
So what we have is a root document with two invoices and a credit note, each of which begins with a corresponding separator sheet. There are no attachments.
8.4 Using the interpreted barcodes to create sub-documents
Now we can use the classified separator sheets to divide the root document into sub-documents. This is achieved by the default settings in the Structure step. (The settings are described here.)
8.5 Ignoring blank pages
You have seen in the Process Monitor that our sample batches have both front and back pages. However, the back pages are blank. Let us prevent those back pages from all further processing.
Using the Process Designer, double-click the Export process step. Notice that is not selected. However, the process does not yet contain a step that detects that pages are blank. Let us remedy that.
Create a Detect Empty Pages process step and name it Detect blanks.
Double-click Detect blanks and select and . This means that front pages will be ignored in this step, and blank back pages will be excluded from further processing.
Delete the arrow between Structure and Export.
Draw new arrows from Structure to Detect blanks and from Detect blanks to Export.
Save the process.
Assign to the XBOUND Activities service.
8.6 Checking the result
Click in the Process Monitor.
Pause the Delete step and restart the Structure step.
Restart the XBOUND Activities service (or wait a few moments).
When the document is processed in Structure, Detect blanks, and Export, it ends up pending in the Delete process step.
Click the Delete step to display the root document.
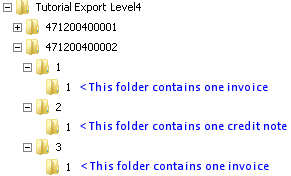
Notice that three sub-documents of the corresponding type were created in the root document. Each contains its separator and an invoice or credit note (each with front and back pages).
A simplified
view of what happened to the structure:As you can see, the back pages are still present in the XBOUND system. However, they were not exported because those pages are being ignored due to the setting in Detect blanks. To verify this, use Windows Explorer to navigate to the export directory that you specified. There are only two images in each subdirectory, rather than four.
8.7 Separating vouchers from their attachments
We have not yet worked with attachments. (The sample batch 47120040001 did not contain any.) In this section we will make use of two other document types which we already set up: Voucher and Attachment. We will use these to separate vouchers (meaning actual invoice or credit note pages) from their attachments.
In the Process Designer, rename Interpret barcode to Interpret barcode 1 and Structure to Structure 1.
Insert two more process steps between Structure 1 and Detect blanks:
Interpret barcode 2 (use the Classify by Barcodes activity)
Structure 2 (use the Build document structure activity)
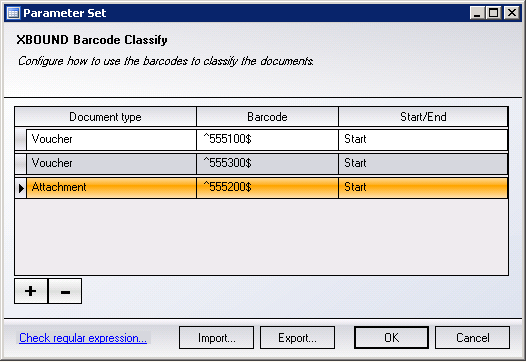
Double-click Interpret barcode 2 and configure it as follows:
Assign the barcode patterns ^555100$ and ^555300$ (two table entries) to the Voucher document type.
Assign the barcode pattern ^555200$ to the Attachment document type.
Double-click Structure 2 and deselect.
Save the process.
Using Windows Explorer, change the file extension of the trigger file 20140313000075.trigger to rdy. (This batch contains attachments.)
Restart the XBOUND Activities service (or wait a few moments).
8.8 Checking the result
Click in the Process Monitor.
After the root document named 471200400002 was processed in Structure 2, it was immediately exported and is now pending in the Delete process step (which we disabled).
In the top part of the screen, click the Delete step to display the root document.
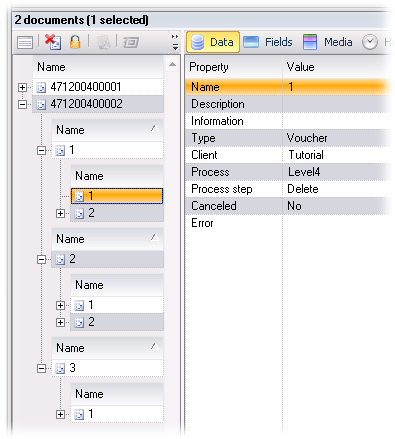
Notice that we now have two sub-document levels:
The first separates each invoice or credit note from the next.
The second separates each voucher (invoice or credit note) from its optional attachments.
The separators with the barcodes were deleted.
A simplified
view of what happened to the structure:
Chapter 9: Processing documents and media that meet specified criteria
With XBOUND you can configure process steps in such a way that only documents or media that meet specified criteria are processed – for example:
Only documents with a specific document type are processed.
Only documents that contain a specific field value are processed.
Only media with certain medium formats are processed.
Only media containing certain barcodes are processed.
This filtering prevents documents and media that do not meet the specified criteria from being processed in the process step. (More information.)
9.1 Creating a filter
In this section we will filter documents by their properties in order to export invoices and credit notes without their attachments:
In the Process Designer, right-click Export in the Level4 process and select . The dialog is displayed.
Under , select .
Click and select the Voucher document type.
Click .
Click .
Save the process.
9.2 Checking the result
Using Process Monitor, delete the root document named 471200400002.
Reimport it: Using Windows Explorer, change the file extension of the trigger file 20140313000075.imp to rdy.
Restart the XBOUND Activities service (or wait a few moments).
As soon the root document is exported, you can see in the export directory in Windows Explorer that only the vouchers were exported, and no attachments or separators.
You can also see that the export structure duplicates the document structure in XBOUND:
Chapter 10: Splitting documents by document type
Now we want invoices and credit notes to be exported to separate directories. We could try to achieve this using filter settings as described above. However, invoice and credit note documents are intermediate levels in our example, and the documents themselves are always of the type Voucher or Attachment. Therefore, if we try to filter for invoices, the vouchers and attachments are suppressed. If we accept vouchers and attachments, too, then we get all vouchers and attachments – including those of the credit notes.
One solution would be to define new document types for the credit notes and attachments, and filter those documents out. However, let us instead use the Split Documents activity to create root documents that contain either only credit notes or only invoices in their first sub-level.
10.1 Splitting up the documents
In the Level4 process, insert a Split Documents process step before the Export step. Adjust the arrows accordingly.
Double-click the new process step.
Under , select .
Select .
Select Credit note click .
Click .
Save the process.
10.2 Checking the result
Using Process Monitor, delete the root document named 471200400002.
Reimport it: Using Windows Explorer, change the file extension of the trigger file 20140313000075.imp to rdy.
Restart the XBOUND Activities service (or wait a few moments).
Switch to Process Monitor, where you can see that the one root document has split into two. One root document contains the invoices, and the other contains the credit note.
10.3 Exporting to different directories based on document type
Now we have two root documents that contain either only invoices or only credit notes. We will export them into separate directories using two export process steps:
Rename the Export process step to Export invoices.
Double-click the process step and configure a new export directory for the invoices.
Insert an additional Adapter for File System (Structured) process step called Export credit notes between Split documents and Delete, parallel to the Export invoices process step, like this:
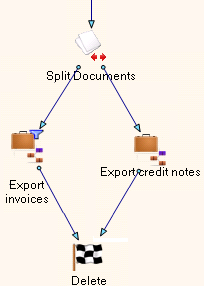
Double-click Export credit notes and configure an export directory for the credit notes.
Right-click Export credit notes and select . The dialog is displayed.
Configure the filter so that it only applies to the Voucher type. It will look like this:

Double-click the arrow between Split documents and Export credit notes and configure a process rule to permit only documents that contain at least one Credit note:
Save the process.
10.4 Checking the result
When you import the batch again, invoices and credit notes will be exported to separate directories.
Switch to Process Monitor and click so that you can see the updated process.
Delete the root documents named 471200400002 and 2.
Reimport: Using Windows Explorer, change the file extension of the trigger file 20140313000075.imp to rdy.
Restart the XBOUND Activities service (or wait a few moments).
Return to the Process Monitor to ensure that the imported documents have reached the Delete step.
Return to Windows Explorer, where you can see that invoices and credit notes were exported into separate directories as configured.
Chapter 11: Cleanup: Deactivate or delete the Tutorial
To ensure that the objects and processes that you created here do not interfere with other work being done in XBOUND:
Using the Process Monitor, delete all remaining tutorial documents from XBOUND.
Using the Process Designer, deactivate and save all of the processes. Alternatively, delete the processes or the entire client.
Chapter 12: For a deeper understanding
Gaining a deeper understanding of the following areas will make it easier to create and configure your own processes and get them into production.
12.1 Managing collectors
The XBOUND Collect Service runs different tasks that must be carried out independent of processing documents in the process steps.
You can add new collectors using the Process Designer. You can install and run the Collect Service on several computers. You can also limit the data that a collector processes.
Read more about collectors in XBOUND collectors: Overview.
12.2 Managing activities
When a new document (for example a batch of scanned attachments) is imported into XBOUND, there is typically a task available to process this document in a particular process step. You can see this in the Process Monitor. Each process step represents a very specific processing task.
In the tutorial you used the Process Designer to create process steps by selecting activities and dragging them into your processes.
In addition to the activities that are already available in XBOUND, it is possible to add your own.
12.3 Managing agents
There are tasks in XBOUND which cannot be done by activities or collectors. Examples:
Resubmitting tasks
Deleting old log messages
These tasks are done by so-called system agents (or just agents).
Read more about agents in XBOUND system agents: Overview
12.4 Managing rights and privileges
Within XBOUND you can control which actions certain users or groups can perform by assigning them rights or privileges.
A right allows users to perform certain actions on a single object. For example, you can specify which users are allowed to delete a certain process.
A privilege allows certain actions independent of individual objects. For example, you can specify which users are allowed to log on to XBOUND. Privileges, however, can refer to certain object types. For example, you can specify which users can delete media.
In XBOUND, a number of privileges are predefined, and you can assign these privileges immediately using the Security Manager. The Security Wizard can also be used.
Read more in Security in XBOUND: Overview.