Create a capture control layout
-
Navigate to
.
The Control layouts page appears.
-
Select
New.
The New capture control layout dialog box is displayed.
- Enter a unique Name for the control layout.
- On the Control type list, select the capture control type. Available options are Scan, Scan create new job, Document review, Validation, and Verification.
-
To make the layout your default layout, select
Default.
- Only one layout can be set as default for one control type.
- If no layout is assigned to the capture control, default layout is applied at runtime if available.
- If no layout is assigned, and there is no default layout set, then the ThinClient form applies the built-in layout at runtime.
-
Select
Configure for
Layout type and select one of the following layout types.
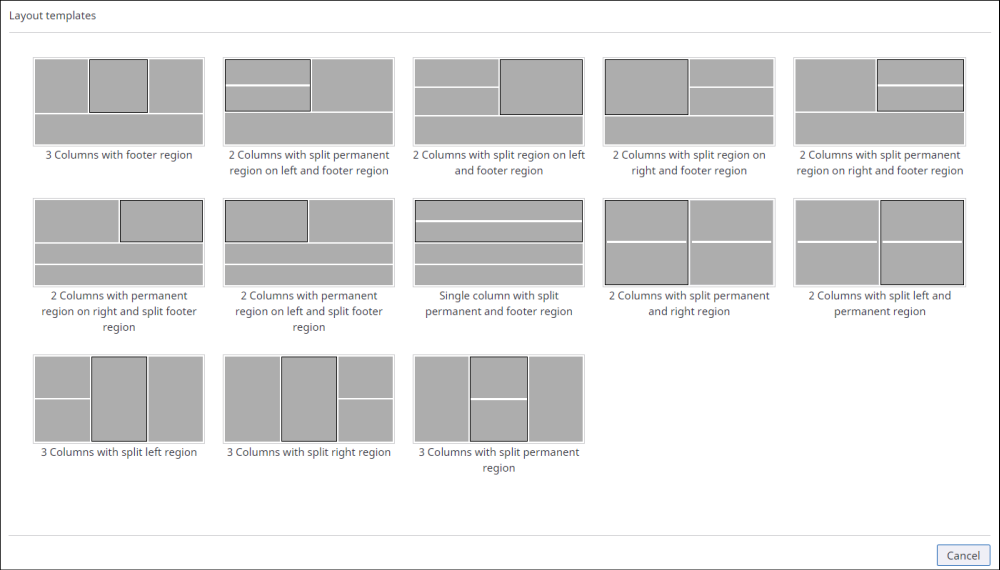 The panel with black border indicates that it is a permanent region.
 - To set the dimensions for the panels, select either Fixed or Percentage for Width mode and Height mode.
- Select the Panel type. Available options are Navigator, Fields, Image viewer, and Thumbnails.
-
Configure the properties of the panels.
Property Description Visible If selected, enables the panel at runtime.
Collapsed If selected, collapses the panel at runtime.
The permanent region is not collapsible. However, if there are two panels in the permanent region, you can collapse the bottom panel.Width The width and height of the panel in Fixed (in pixels) or Percentage based on the mode selected at the layout level.
-
The width and height set as Fixed (pixels) are treated as a relative unit. The real size in pixels is calculated based on the actual size of a Capture control.
-
Width property is not available for docked panels, as it takes the width of the main panel.
Height Error panel Configure the error panel:
-
Collapsed: If selected, collapses the error panel.
-
Height: The height of the error panel can be Fixed (in pixels) or in Percentage based on the mode selected at the layout level.
Error panel is available for Navigator (Document review activity) and Fields (all other activities) panels only.
Undock on other monitor If selected, undocks the control on another monitor.
This option is only available for the Image viewer panel.Maximized: Maximizes the panel to the window size to a specific position.
To undock the panel from a specific position, clear Maximized and set the Top and Left positions.
You can undock the Image viewer directly to the second monitor without manual movement.
This feature is only supported in Google Chrome and Microsoft Edge. It is not supported in Opera or Firefox.
Procedure
-
Ensure the TotalAgility site is accessed over HTTPS.
-
In the browser settings, navigate to Settings > Privacy and security > Site settings.
- Under Recent activity (or View permissions and data stored across sites), open the TotalAgility site, and set Pop-ups and redirects and Window management to Allow.
-
If using Chrome and Edge versions 99 and earlier, perform this additional step:
-
Navigate to:
-
For Chrome: chrome://flags/#enable-experimental-web-platform-features
-
For Edge: edge://flags/#enable-experimental-web-platform-features
-
-
Enable Experimental Web Platform features
-
-
When you undock the Image Viewer for the first time, a Window Management Permission dialog is displayed.
-
Select OK.
-
Select Allow when prompted to move the window between monitors.
-
-
-
Select
Save.
The newly created control layout appears on the Control layouts page.