
AutoCapture Menu window
QuickCapture Pro receives information from the AutoCapture server about groups, menus, forms and actions set in AutoCapture and displays this information in the AutoCapture Menu window. By default, the AutoCapture Menu window appears to the left of the main window of the application. If options for connecting to the AutoCapture server were set up correctly then available AutoCapture menus, forms and actions are displayed in the AutoCapture Menu window. Until correct connection options are set up, the only node displayed in this window is No AutoCapture Server.
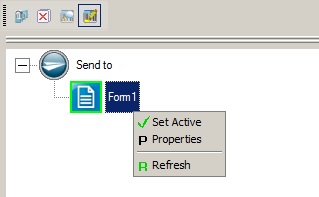
Any form or action in the AutoCapture Menu window can be set active by clicking Set Active on the shortcut menu for a form. A green check mark next to the Set Active command indicates that a form is active. To set a tree element active, either double-click the element or right-click the element and click Set Active on the context menu. To switch an element to inactive, click Set Active again or double-click this element.
To set the properties for a form or action, right click the element and click Properties. This displays the Item Properties dialog box.
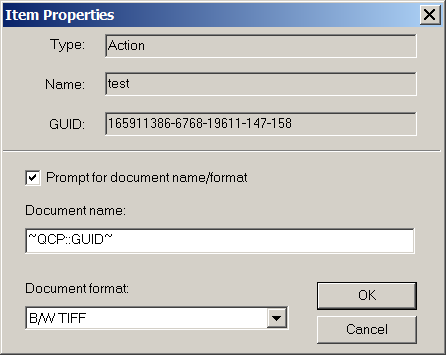
Document name and Document format specify the default values when you send a document to AutoCapture. You can select the Prompt for document name/format check box to prompt the user for the document name and format. If this check box is not selected, values entered for Document name and Document format will be used without prompting the user. You can enter a name in the Document name box or use the RRT, ~QCP::GUID~. The GUID is used if Document name is left empty.
The check mark on Set Active means that the active image will be sent to this menu item after you click the Send to AutoCapture button. If no element in the AutoCapture Menu window is active, QuickCapture Pro prompts you to choose the AutoCapture element that you want to use to send images.
To refresh the elements in the window to match the current state of the server, click Refresh on the shortcut menu.