Use calendars
Use the Calendars functionality to customize the working schedule, which allows for accurate time tracking for your organization. In Insight, you can use this feature for two cases:
- Show only working days (or hours) in charts broken down by time. This feature provides for a better visualization of your business processes, hiding non-business intervals from charts.
- Calculate working days/hours in a certain time interval. For example, you may track your working hours from 10 AM to 6 PM from Monday to Friday and exclude weekends. In this case, if the order is received at noon on Friday and processed at noon on Monday, that means the processing time is 8 hours, and not 72 hours.
In the example below, you can create a business calendar and use it for these different cases.
Create a business calendar
-
In Admin Console, on the
Documents Tree,
right-click
Calendars and select
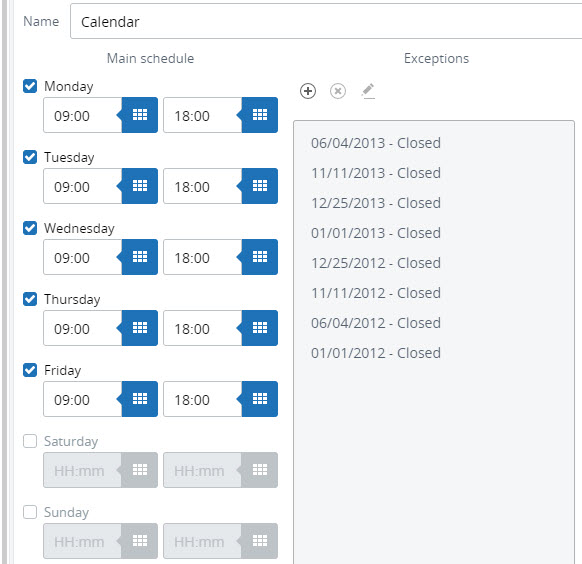
New Calendar. Name it
Calendar and click
OK.
By default, the working time is set from 9 AM to 6 PM Monday-Friday. You can also add exceptions by clicking the plus icon in the Exceptions section. Select the date and the hours to be excluded from the working schedule. Click OK and repeat as many times as required for each exception.
-
You can use the a sample calendar provided for this lesson that
has working hours from 9.00 to 18.00 Monday through Friday and specified
holidays.
Save
 the changes. The business
calendar is ready.
the changes. The business
calendar is ready.
Use business calendar to hide non-business time intervals from charts
The Adventure Works sample database contains a table with employees with their hire dates. For training purposes, you can use a sample graph that shows the number of new hires by days. To complete a sample exercise, do the following:
- Create a new record.
-
Create bar charts with different time and calendar settings.
You can verify the three bar charts on the Calendar View in the Sample project. The charts illustrate how different calendars and time settings affect the representation of data. The first bar chart shows all non-zero data, the second chart shows all data, and the third chart shows only business intervals.
Create a record
- To create a new record, on the Documents Tree, right-click Records and select New Record. Name the record Employee and click OK.
-
Add database tables as sources for the new record.
- Click the plus sign and then the ellipsis icon in the Select new source section.
-
Select the
dbo.Employee
table.
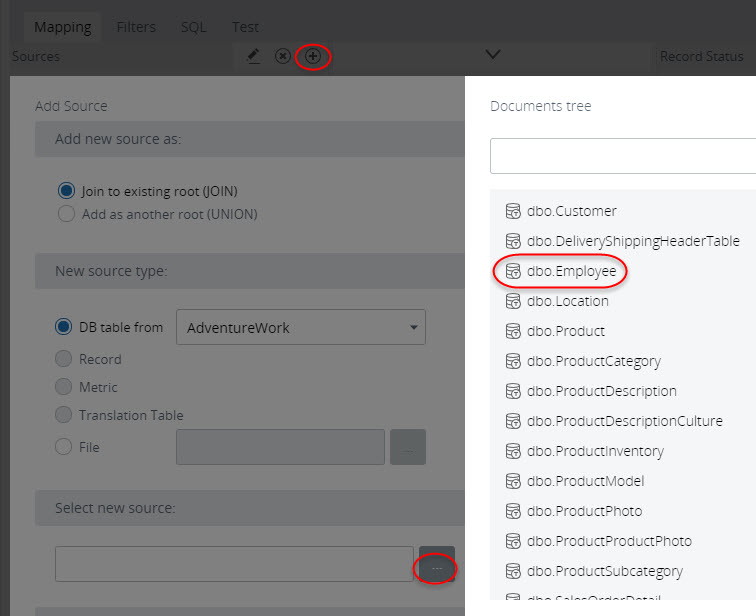
- Click OK.
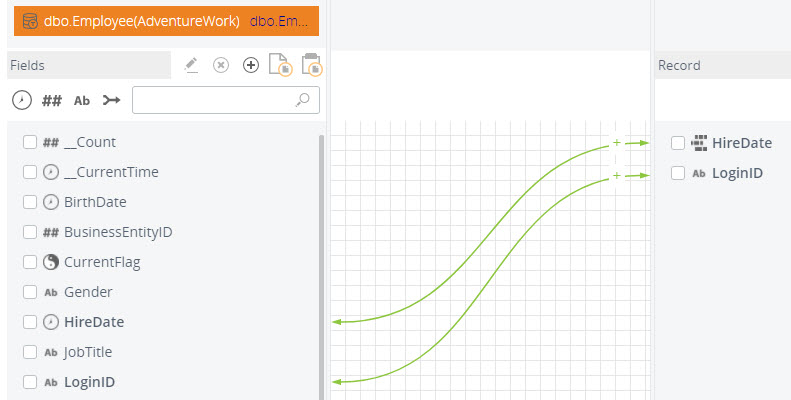
Now all the fields from the selected tables are added to the list on the left. -
You do not need all the fields, so select only the table
fields that are required for the grid. Map the following fields (drag from left
to the right):
- HireDate (click Yes to accept using this field as the default time filter)
- LoginID
-
Save
the record.
Now it is ready to be used in components.
Create a View
-
On the
Documents Tree,
right-click on
Views and select
New View.
Name the View Calendar and click OK. An empty View opens with the canvas.
-
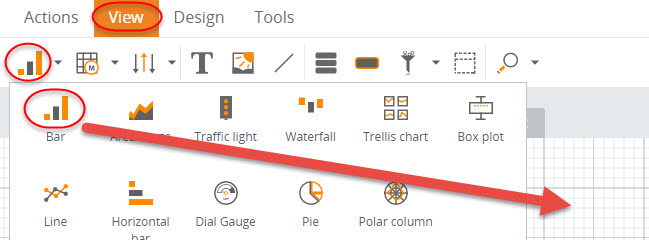
Create three similar bar charts. Drag a bar chart to the
canvas.
-
Configure the wizard.
-
In the
Data tab,
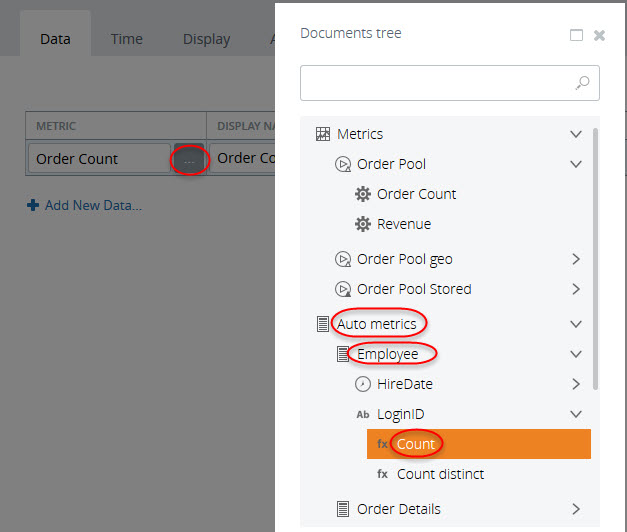
select a metric to calculate the data. For the sample exercise, select an
auto-metric. Click the ellipsis sign in the Metric column and select the metric
as shown in the screen shot.
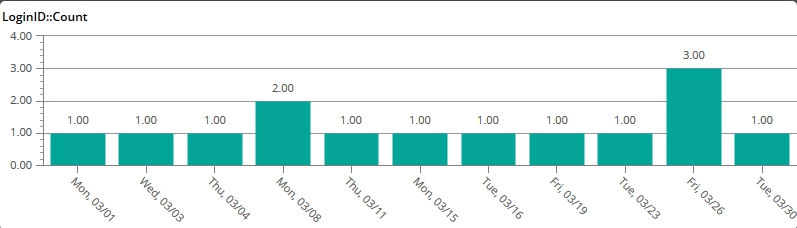
- On the Time tab, select Fixed time window and set it from 3/1/2004 12:00 AM to 4/1/2004 12:00 AM.
- On the Display tab, set Days as the breakdown for the X-axis.
- Click OK. The chart is ready.
This first chart shows all non-zero values (by the default configuration). That means if at one day no new employees are hired, this date is hidden.
-
In the
Data tab,
select a metric to calculate the data. For the sample exercise, select an
auto-metric. Click the ellipsis sign in the Metric column and select the metric
as shown in the screen shot.
-
Create a second bar chart that will show all days
notwithstanding if new hires occurred. In the same View, copy the same bar
chart as shown in the previous steps and paste it below the first one on the
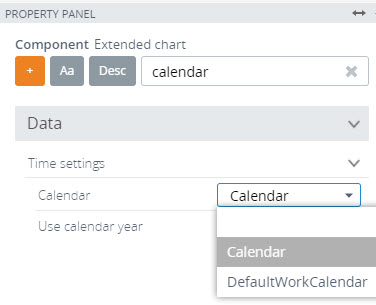
canvas. Highlight the chart, in the
Property Panel
find the
Show all time
intervals property, and select
All.

This second chart shows now all dates.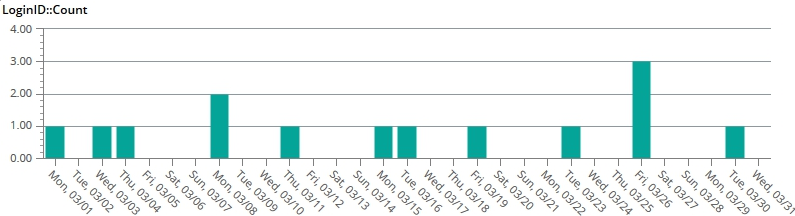
-
Create a third bar chart that will exclude non-business days
(weekends and holidays). In the same View, copy the same bar chart as shown in
the previous steps and paste it below the two charts on the canvas. Highlight
the chart, find the
Calendar property
in the
Property Panel,
and select our business calendar.
-
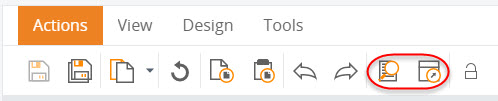
Create automatic anchors and save
the View.
-
Open the View in the Preview/Viewer.
Now you can visually see the difference due to using the business calendar.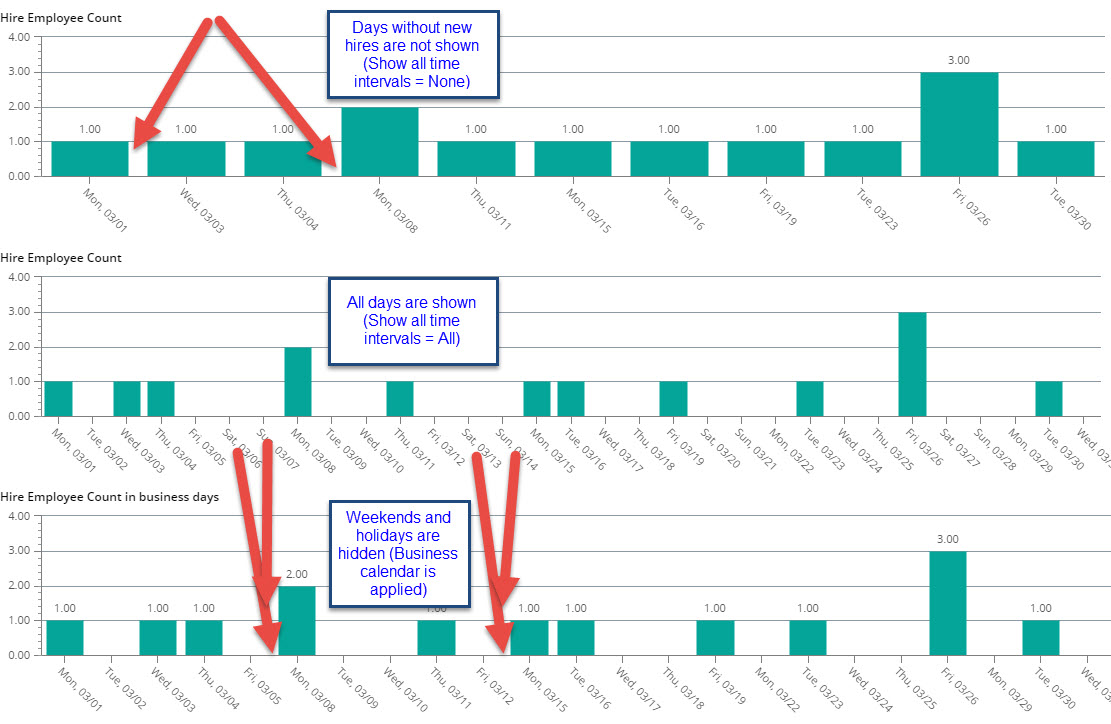
However, you can notice the difference only on the charts where the data is broken down by days. If for example, it is broken by weeks, no effect applies.
Use business calendar to calculate only business time intervals
Another case of using business calendars in Insight provides for calculating data based on the business intervals. To complete the exercise, do the following:
Prepare the record
-
In Studio, on the
Documents Tree,
under
Records, copy the
Sales Order Extended
Stored record by using the right-click context option
Copy. To paste the
record, highlight the required menu item (or folder) and select
Paste from the
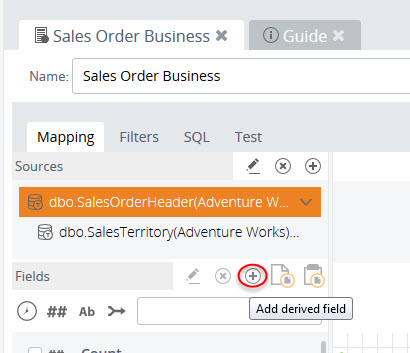
right-click menu. Change the record name to
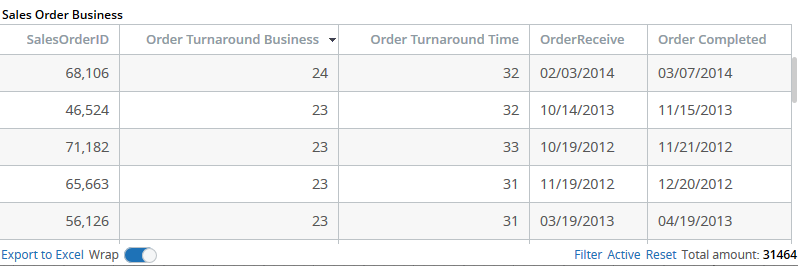
Sales Order Business
and create a new derived field for the business calendar.
-
Click the plus sign in the
Fields section
(Add derived field). The Expression editor window appears.
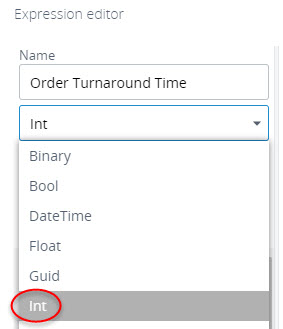
- Name the new field Order Turnaround Business.
-
Change the field type to
Int.
-
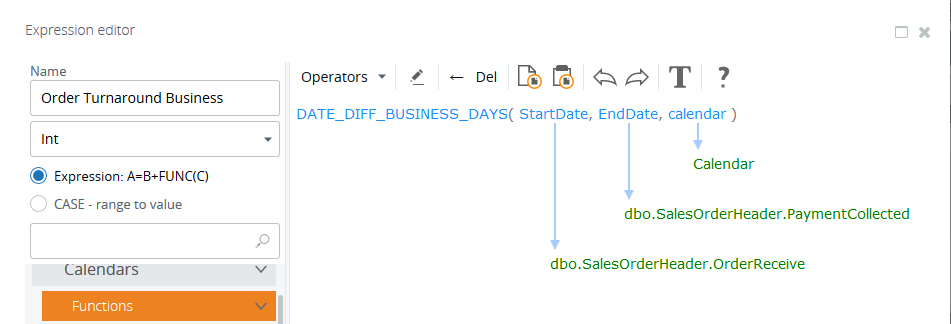
Create the expression to calculate business days: from the
Calendars menu
drag the DATE_DIFF_BUSINESS_DAYS function and select the required record
fields. For StartDate select
dbo.SalesOrderHeader.OrderReceive, for EndDate
select
dbo.SalesOrderHeader.PaymentCollected, and
Calendar. In this
case, these are the time stamps that indicate when the order was received and
it was paid.
Tip This input field supports the IntelliSense technology and will help you to find the right field or expression.Click OK.
-
Click the plus sign in the
Fields section
(Add derived field). The Expression editor window appears.
-
Map the
Order Turnaround
Business field by dragging it from left to right.

-
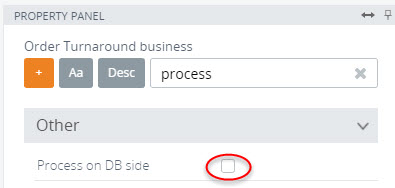
Select
Order Turnaround
Business on the left, and for this field in the
Property Panel,
find the
Process on DB side
property. Clear the check box because this function cannot be calculated in the
SQL request. By default it is enabled for all fields.
Note This record must have the Precalculated overwrite type of storage. -
Create another derived field to use it for the comparison
purposes.
- Click the plus sign in the Fields section (Add derived field). The Expression editor window appears.
- Name the new field Order Turnaround Time.
- Change the field type to Int.
-
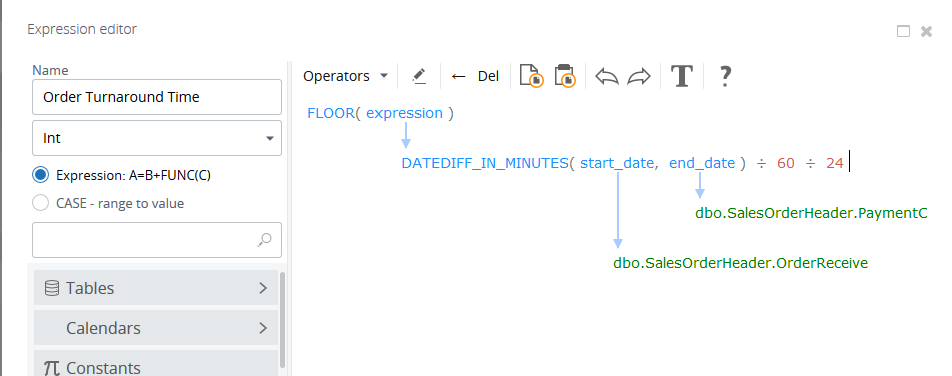
Create the expression to calculate days. Use the FLOOR
function to round the values so that they are the same in all databases. Drag
the DATE_DIFF_IN_MINUTES function and select the same record fields as for the
previous derived field. For StartDate select
dbo.SalesOrderHeader.OrderReceive, for EndDate
select
dbo.SalesOrderHeader.PaymentCollected. To
convert minutes to days, divide by 60 and then by 24. Click
OK.
- Map the Order Turnaround Time field by dragging it from left to right.
Load data
- Click Load data. Select Beginning of times (1/1/1900 12:00 AM) and Future (1/1/3000 12:00 AM).
- Click Load data again. Wait until the process completes.
Create a View
Now the record is updated with the two new derived fields, you can use it for the components.
- On the Documents Tree under Views, open the Calendar View.
- Drag a record grid to the canvas.
-
Configure the wizard.
-
On the
Data tab, select
the
Sales Order
Business record from the
Documents Tree
by clicking the ellipsis icon. Remove all the fields and add only the required
fields as shown in the screen shot.

- On the Time tab, select Fixed time window from 1/1/1900 12:00 AM to 1/1/3000 12:00 AM.
- On the Display tab, set the sorting order by Order Turnaround Business in the descending order.
- Click OK.
-
On the
Data tab, select
the
Sales Order
Business record from the
Documents Tree
by clicking the ellipsis icon. Remove all the fields and add only the required
fields as shown in the screen shot.
-
Save
and open the View in the
Preview/Viewer.
Now in the grid you can see that the order 68,106 was received on 02/03/2014, paid on 03/07/2014 and it took 32 days to complete it, which corresponds to 24 business days according to the business calendar.