Get Started with Attended Automation
With Kofax RPA, you can build robots that can automate work processes involving Windows and Java applications on your networked computers to have automated control of these applications.
Attended Automation is a way to automate your remote computers by creating a trigger robot that reacts to an event on a remote device. The following steps help you set up your development and production environments to use robots with triggers.
To use robots with triggers, select Lock package on the Windows tab of the Desktop Automation Service configuration window. See Configure Desktop Automation Service for more information.
Developing a robot with a trigger
-
Open an existing Basic Engine Robot or create a new one by clicking .
-
Add a Call Robot Step and perform the following:
-
On the Action pane in the robot properties, select Create New in the Robot list. Specify a name for the robot and click Finish.
-
Under Required Devices, add a trigger device. The device you select must be a device mapping, not a Management Console based mapping.
For more information, see Get Started.
-
-
Open the Desktop Automation Service setup window on the automated computer, select Single User and specify a token.
For more information, see Configure Desktop Automation Service.
-
Open the created Robot by right-clicking the Call Robot Step and selecting Open the Robot '<robot name>' in a Tab.
The Robot opens in a new tab.
-
Switch to the opened Robot and perform the following:
-
Add a Trigger Choice step.
-
Select the Trigger Type (Application Opened, Hotkey, and so forth) and give it a name.
-
Specify an application or a hotkey in the step.
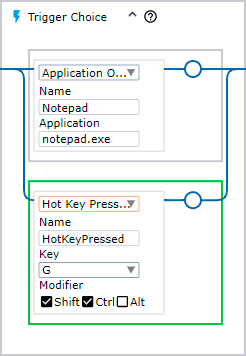
You can have more than one type of trigger in a Trigger Choice step. As defined in the following image, the workflow only progresses once the user has either opened notepad.exe or they press the Shift+Ctrl+G key combination.

-
During design it is important to note that the workflow only progresses when the trigger is initiated. The trigger choice step waits until the user has performed the specified trigger on the computer running the Desktop Automation Service. To see the progress of the Trigger Choice step while designing your robot, run the robot, switch to the desktop that runs the DAS and initiate the selected trigger, such as open an application or press the hot key. Switch back the Robot in the Design Studio and see that the flow point passed the Trigger Choice step. We recommend creating all the necessary parts of the workflow first and add the trigger choice at the end of the robot build to avoid having to switch backwards and forward initiating the trigger.
Once the trigger event is intercepted, the user’s desktop is locked for the remainder of the Robot workflow and control is handed back only after all steps have been executed. In case of multiple triggers within a single Robot workflow, the workflow waits at a second trigger choice, but while it is waiting, the robot is blocking access to the desktop, so do not let it wait for more than a few seconds. You can also surround any of the attended automation actions with Notify steps to provide information to the user that control is taken and the robot performs some tasks on the desktop.
Deploying the robot
-
Once you finish designing the robot workflow, upload both robots to the Management Console by right-clicking the robot in the Projects view and clicking Upload.
-
Open the Management Console and go to . You should now see the uploaded robots in the repository with the corresponding triggers.

-
Go to and click Create a device mapping (the plus sign at the top left corner). Specify the same device mapping name that you used while building your robot.
For more information, see Device mappings.
-
Go to and either select the Users tab if you want to create a trigger-user mapping or the Labels tab if you want to create a trigger-label mapping. After that click the plus sign at the top left corner to create a new trigger mapping. In this guide we create a trigger-user mapping.
For more information, see Trigger mappings.
-
Select the Attended Automation robot and a user to tie the trigger to an individual user account on a desktop running DAS.
Once trigger mappings are created, the running Desktop Automation Services start monitoring for any triggers executed by the mapped users and initiate the relevant robots when intercepted.
Before running your robot on the Management Console, switch off the Single User Mode in the Desktop Automation Service configuration and restart for the changes to take effect. This allows the Desktop Automation Service to communicate with the Management Console and monitor for triggers on the desktop.