Use TLS Communication
Kofax RPA provides a means for setting up TLS communication between Automation Device and RoboServer or Design Studio. The communication uses certificates for encrypting the communication. The encryption uses a public-private key structure for securing the connection.
The key files must be in the "pem" format, which is the most common format for openSSL.
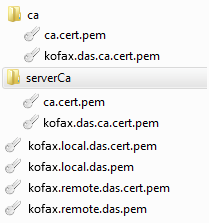
The installation package for Desktop Automation Service includes six files and two folders.

The ca.cert.pem is a public key file signed by a private key created by Kofax RPA. It acts as the root certificate for this trust chain of keys. The kofax.das.ca.cert.pem is another signed certificate that is signed by the root private key. These two files exist in both the ca and the serverCa folder. If you do not have any specific security requirements, these files can be used out of the box.
The kofax.local.das.pem is the private key file used by the local hub that exists on the RoboServer and Design Studio. The kofax.local.das.cert.pem is the public key signed by the underlying private key for kofax.das.ca.cert.pem.
The kofax.remote.das.pem is the private key file used by the Desktop Automation Service. The kofax.remote.das.cert.pem is the public key signed by the underlying private key for kofax.das.ca.cert.pem.
The files have the same code for Automation Device and RoboServer or Design Studio.
The Automation Device must have the kofax.remote.* files along with the serverCa folder containing the ca.cert files.
The RoboServer or Design Studio must have kofax.local.* files and the ca folder containing the ca.cert files.
When using homemade certificates, the certificates (signed public key files) of trusted authorities must be in the ca folder (serverCa for Automation Device). Node.js checks the certificates from the Automation Device for trust (certificates are trusted if there is a chain of signed certificates to a certificate in the ca/serverCa folder). If the certificate from the Automation Device is trusted, the Desktop Automation Service verifies the certificates from the RoboServer or Design Studio in the same manner.
The RoboServer or Design Studio requires just the certificates to be trusted. The same certificate is used from multiple Automation Devices, so the Automation Device name does not have to match the "common name" in the certificate.
If you want to change the certificates to your own validated or homemade certificates, you can do it in two ways.
- Recommended
- Get new server certificates and install them on the Automation Device by copying the private key and the public key to a folder on the device. Use the Certificates tab in the Desktop Automation Service configuration window to change the path of the certificates to the new ones.
- Get the new client certificates for Design Studio and install them on a computer running Design Studio. Open the Desktop Automation tab in Design Studio Settings window and specify the paths to the client certificates.
- Get the new client certificates for the RoboServer and install them. On the Security tab of the RoboServer dialog box, specify the path to the new certificates.
- Alternative
- Rename custom certificates to appropriate Kofax RPA names, such as kofax.local.das.pem, kofax.local.das.cert.pem, and so on. Overwrite the supplied certificates with the new ones.