Custom Export plugin
This topic describes the concepts, configuration, and additional information about using the Custom Export plugin with Transact. This plugin can be used with other export module plugins to maximize the desired outcome.
Benefits of the Custom Export plugin
The Custom Export plugin includes significant flexibility for data and metadata output from the workflow. Benefits of this plugin include the following features:
- Customizing the output filenames for metadata and documents
- Enabling a variety of output formats
- Customizing the path and folders for output
- Choosing specific data for output to reduce the export footprint
- Using numerous additional options to configure metadata and document export
Primary functions of the Custom Export plugin
The Custom Export plugin is designed for the administrator responsible for configuring the batch class. This plugin provides two major output functions as follows:
-
Exporting the data/metadata file:
-
Users can select the document type to be exported.
-
Users have an option to export the desired metadata in the selected schema format (based on document type).
-
Users can export metadata with the following file extensions:
-
CSV: Comma-separated value
-
HL7: Health Level 7
-
HTML: Hypertext Markup Language
-
JSON: JavaScript Object Notation
-
TXT: Text-only files
-
XML: eXtensible Markup Language
-
-
Users can configure dynamic file names and folder paths using a set of dynamic placeholders (replacement variables and XPath).
-
Users can download and upload schema files to be used with the Custom Export plugin. This allows the administrator to edit the schema file and leverage existing schema files to create new schema files.
-
-
Exporting the image files with the ability to name the output files and target folders:
-
Users can specify the file type or extension.
-
Users can customize the filename and folder path with dynamic placeholders.
-
Limitations for Custom Export plugin
The Custom Export plugin in Transact has the following limitations:
- The Custom Export plugin currently does not support exporting data in a tabular format. It can only export data extracted for configured Index fields.
- The schema file must be created and edited outside of Transact and uploaded into the Custom Export plugin.
Configure the Custom Export plugin
Perform the following steps to enable and configure the Custom Export plugin for the batch class:
-
Log in to
Transact
as an administrator.
Navigate to the Batch Class Management screen.
-
Open the batch class that will use the Custom Export plugin.
The components and settings for this batch class display.
-
Expand the
Export module.
The plugins that are configured for this module display in the left-hand navigation panel.
-
Add the Custom Export plugin to the
Export module:
- On the right side of the screen, locate the CUSTOM_EXPORT plugin in the Associated Plugins field.
-
Select it and move it to
Selected Plugins field on the right.
The CLEANUP plugin should always be the last plugin to run in the Export module. If the CLEANUP plugin is not last in the workflow, move it below the CUSTOM_EXPORT plugin.
-
Click
Deploy.
The CUSTOM_EXPORT plugin appears in the Export module for this batch class.
-
Enable the Custom Export plugin:
- Select CUSTOM_EXPORT in the left-hand navigation pane.
- In the Plugin Configuration section on the right, set the Custom Export Plugin Switch to ON and click Apply.
-
Configure the Custom Export plugin:
-
Select
Configure under the
CUSTOM_EXPORT plugin on the left navigation pane. The current configurations for this plugin
appear.
This screen contains the following columns and information:
-
Document Type: Document type for which this export configuration is applicable.
-
Export Schema Name: Name of the schema file for the metadata export. This file tells Ephesoft Transact which metadata fields (such as index fields, batch class fields, batch instance information) must be exported and in which format.
-
Export Metadata Location: Location of the metadata file.
-
Export Metadata File: Name of the metadata file. The name can also have dynamic placeholders to generate dynamic file names.
-
Export Image File: Name of the exported image file.
-
-
Click
Add to create new configurations, or click
Edit to display and adjust the existing configurations.
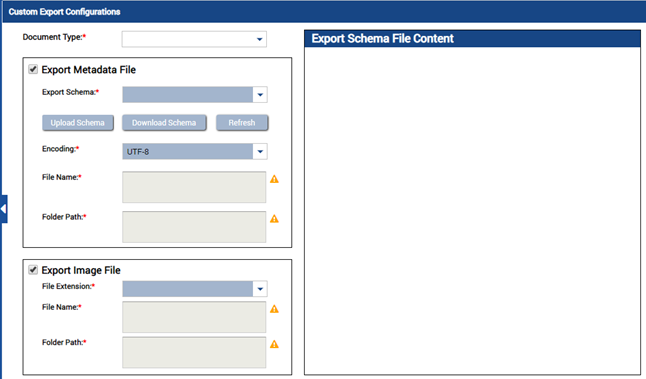
The Custom Export Configurations screen appears.
-
Select
Configure under the
CUSTOM_EXPORT plugin on the left navigation pane. The current configurations for this plugin
appear.
-
Configure the settings for this plugin to include the output format and folder structure.
-
Document Type: This drop-down list is used to select the document type that exists within the batch class.
-
The Export Metadata File section: This section contains the following fields and commands:
-
Export Schema: This drop-down list is used with the three buttons immediately beneath it. Select an existing schema, upload a schema, or download the schema and edit it locally. The buttons are defined in the table.
Button
Description
Upload Schema
Uploads the new schema file onto the server within the Batch Class Document Type location.
Download Schema
Downloads the selected schema file to the client workstation.
Refresh
Refreshes the values in the Export Schema drop-down list. If a new schema file was added directly into the file system folder, click Refresh so that the file displays in the Export Schema drop-down list.
-
Encoding: This drop-down list is used to select the encoding format for a schema file. Ensure that you provide the correct encoding for the schema file. The output metadata file uses the same encoding as that of the export schema file. The following encoding formats are available in this drop-down list:
ASCII, UTF-7, UTF-8, UTF-16, UTF-32, ISO-8859-1
-
File Name: Field where you define the format of the file name and have ability to customize it.
-
Folder Path: Field where you define the desired folder path for the metadata file. This is the output path for the exported metadata file using optional replaceable variables for desired customization.
-
-
The Export Image File section:
This section contains the following fields.
-
File Extension: Select from the following supported output formats:
PDF, TIF, PDF + TIFF
-
File Name: Field where you define the format of the file name and have ability to customize it.
-
Folder Path: Field where you define the folder path to be used. This path can be customized using the variables under Using dynamic placeholders.
There are several limitations related to folder paths and file names. A combined folder path and file name must not exceed 255 characters. File names cannot contain /*:<>|,? characters (if any of these characters appear in a file name at export time, they are removed).
-
-
-
The
Export Schema File Content section: This section displays a customer generated file containing
placeholders and XPath expressions configured within it.
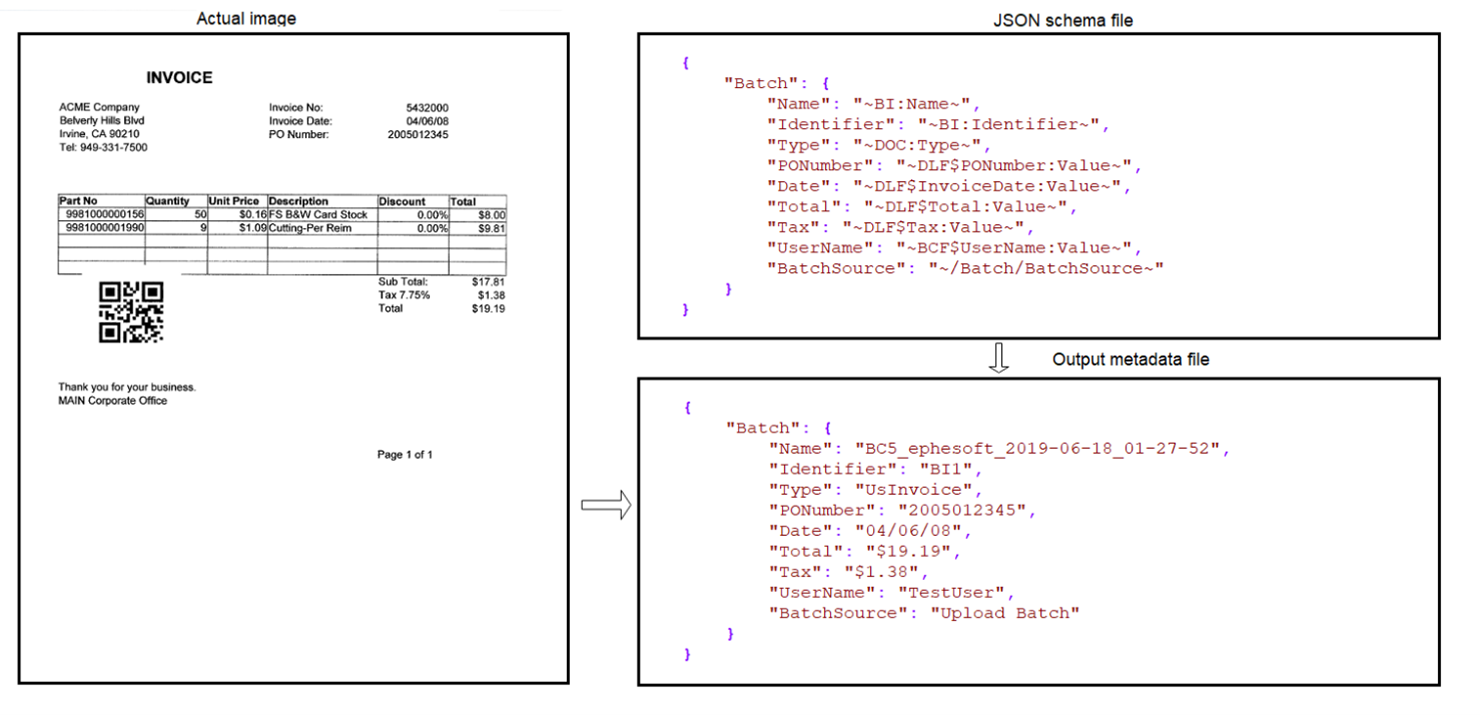
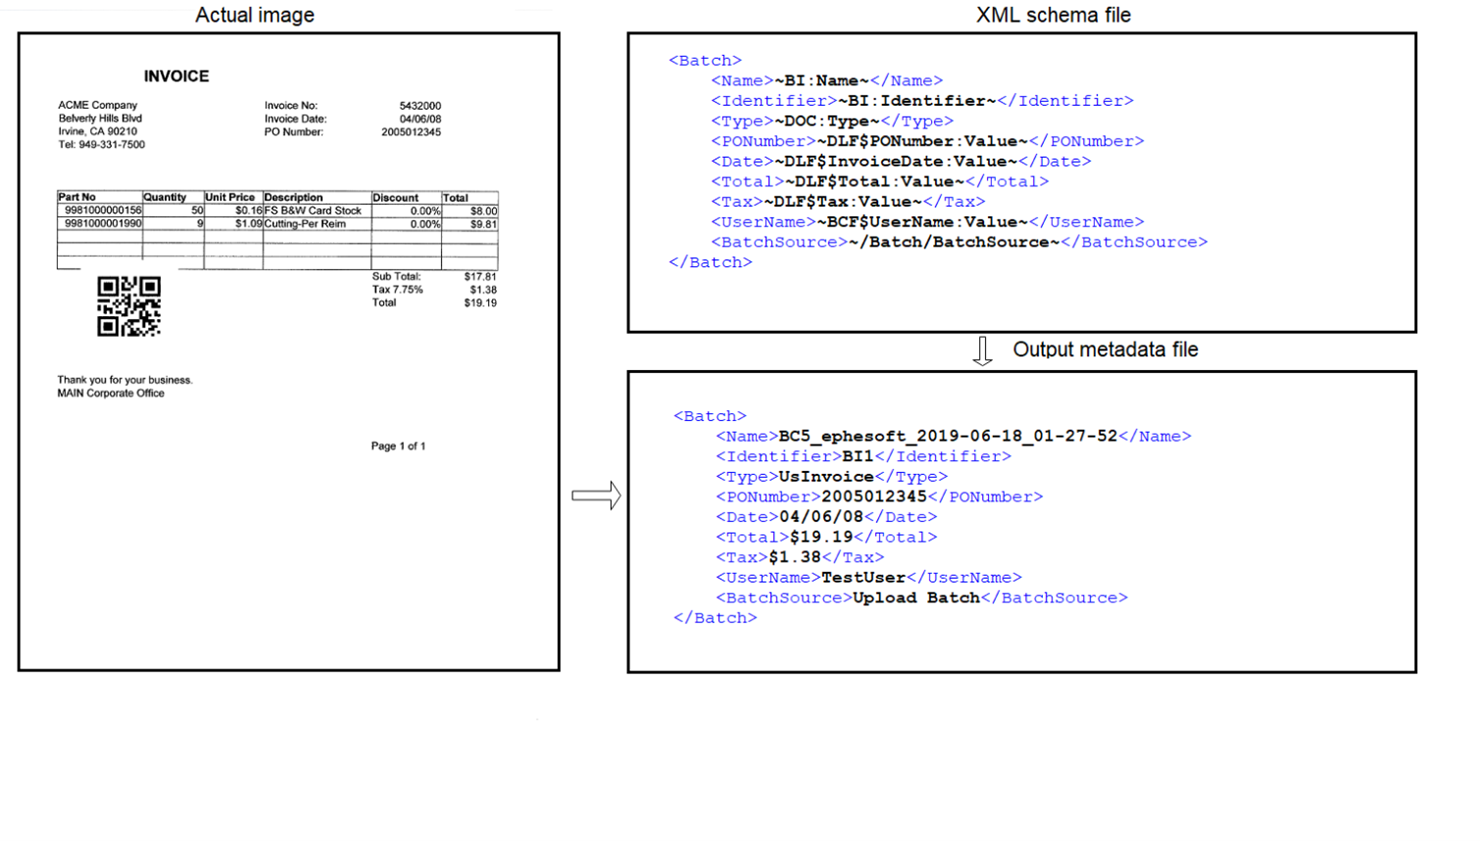
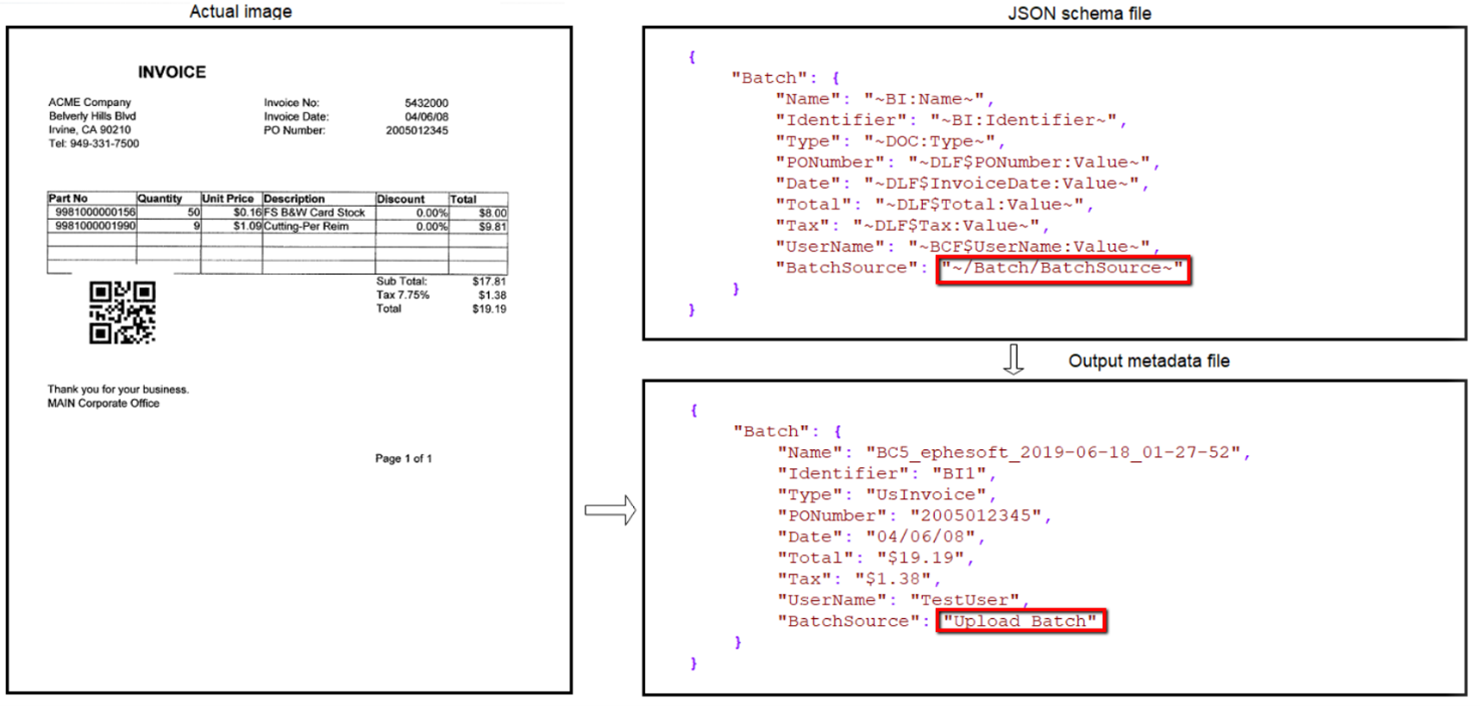
For example, if you want to export metadata from Transact into a JSON file format, you must create a JSON schema file. The JSON schema file is a JSON file with placeholders for Transact values. When a batch instance is exported, Transact replaces those placeholders with their actual values and export the resultant file at the location provided in the Folder Path field. See the following examples for sample JSON and XML schema and output files.
Using dynamic placeholders
Replacement variables and XPath syntax can be used as dynamic placeholders to provide custom names for folders and files, and to export specific metadata from your documents and batches.
Replacement variables
Placeholder variables are available for several common elements within a batch.
The following table shows the variables and the syntax used to generate dynamic metadata file names, document file names, file locations, and metadata content. Refer to the sample invoice given before and the samples in the following table to see how placeholder variables in the table can be used.
-
Sample file system locations:
-
C:\Ephesoft\SharedFolders\final-drop-folder\CustomExport\~BI:Identifier~\~DOC:Type~ creates a folder named C:\Ephesoft\SharedFolders\final-drop-folder\CustomExport\BI1\UsInvoice
-
C:\Ephesoft\SharedFolders\final-drop-folder\CustomExport\~BCF$UserName:Value~ creates a folder named C:\Ephesoft\SharedFolders\final-drop-folder\CustomExport\TestUser
-
-
Sample file names:
-
Invoice_~DLF$PONumber:Value~ creates a file named Invoice_2005012345
-
Invoice_~DLF$PONumber:Value~_~BCF$UserName:Value~ creates a file named Invoice_2005012345_TestUser
Transact appends the appropriate file extension (PDF or TIFF) to the exported files.
-
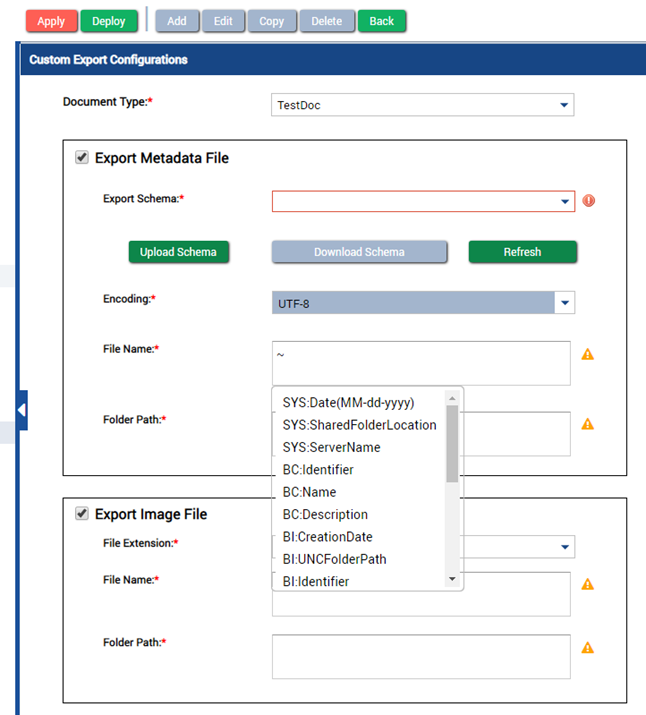
To enter a replacement variable in any of the File Name or Folder Path fields, perform the following:
-
Click in the text box (such as for the
File Name field), and enter a tilde (~).
A drop-down list with all available variables displays.
- Enter the variable values or select variables from the drop-down list.
-
Separate the values by entering the desired separators (such as dashes (-) or underscores (_)).
Variable Relates to
XML Field Name
Placeholder
Batch class
BatchClassIdentifier
~BC:Identifier~
Batch class
BatchClassName
~BC:Name~
Batch class
BatchClassDescription
~BC:Description~
Batch instance
ReviewedBy
~BI:ReviewedBy~
Batch instance
UUID (Unique identifier for the batch)
~BI:UUID~
Batch instance
BatchCreationDate
~BI:CreationDate~
Batch instance
UNCFolderPath
~BI:UNCFolderPath~
Batch instance
BatchInstanceIdentifier
~BI:Identifier~
Batch instance
BatchInstanceName
~BI:Name~
Batch instance
BatchInstanceDescription
~BI:Description~
Batch instance
ValidatedBy
~BI:ValidatedBy~
Batch class field
<Specified batch class field value>
~BCF$<name of batch class field>:Value~ The placeholder above must be replaced with the name of the batch class field.
Example: ~BCF$User_Name:Value~
Document level field
<Specified document level field value>
~DLF$<name of index field>:<name of index field>~ The placeholder above must be replaced with the name of the index field. Example: ~DLF$FED_TAX_FORM_1040:SSN~
Document
UUID (Unique identifier for the document)
~DOC:UUID~
Document
Type
~DOC:Type~
Document
Identifier
~DOC:Identifier~
Document
Description
~DOC:Description~
Document
Page count in the current document
~DOC:PageCount~
System
SharedFolders location
~SYS:SharedFolderLocation~
System
Date with specified format
~SYS:Date(MM-dd-yyyy)~
System
Server name
~SYS:ServerName~
XPath syntax
Using XPath syntax provides a simple way of locating data in an XML file when nested XML header tags are separated by slashes.
For example, the XPath expression ~/Batch/BatchSource~ in the following image can be used to extract any information from your batch.XML file to the exported metadata file.
Also, see the following image that shows a portion of an XML file for a batch.
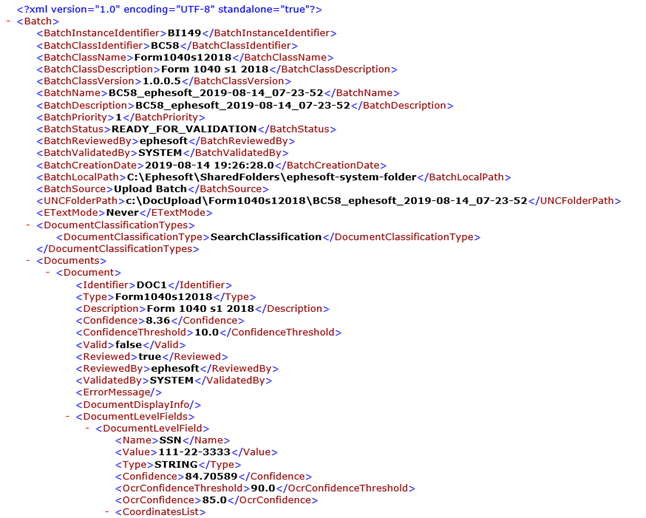
See the following examples of retrieving XML values using XPath:
- ~Batch/BatchSource~ returns the BatchSource value of Upload Batch
- ~Batch/BatchPriority~ returns a value of 1
- ~Batch/Documents/Document[1]/Confidence~ returns a value of 8.36
- ~Batch/Documents/Document[2]/Confidence~ returns the confidence value from the second document in the batch
