Key-Value Extraction plugin
In this topic, you will learn how to configure and perform key-value (KV) extraction in Ephesoft Transact. With key-value extraction, Transact searches for user-defined keys that are static text on forms and then identify the associated values that are considered the dynamic portions of the document.
Intelligent Character Recognition (ICR) and Optical Mark Recognition (OMR) type KV rules use an algorithm that relies on a snippet of the value area from a document and sends that through a second ICR/OMR operation. These ICR/OMR type KV rules allow for quicker configuration than Fixed Form Extraction and is an alternative method of ICR/OMR configuration for certain use cases.
Prerequisites
- You need a batch class with a document type configured. For detailed steps, see Add new document type.
- You need to add the KEY_VALUE_EXTRACTION plugin to the Extraction module for the batch class. For more information on managing plugins, see Configure plugins.
Configure KV Extraction plugin
Configure the KEY_VALUE_EXTRACTION plugin once per batch class. To navigate to the plugin:
- Open Batch Class Management.
- Select your batch class and click Open.
- Go to .
View the following configurable properties for this plugin.
| Configurable property | Options | Description |
|---|---|---|
|
Enable ICR/OMR Extraction* |
|
This switch enables hand print extraction, check box detection, and signature detection. This switch must be set to ON for the above ICR/OMR type extractions to occur. |
|
ICR/OMR Engine* |
|
This drop-down list defines the ICR/OMR engine that is used for hand print extraction, check box detection, and signature detection. The default engine is RecoStar. |
|
KV Extraction Switch |
|
This switch enables key-value extraction. This switch must be set to ON for key-value extraction to occur. |
Create index fields
Create index fields for your document type. See Add index field.
Create an extraction rule
Follow the steps in the topic to create an extraction rule. Extraction rules are set at the index field level for a document type. KV extraction uses regular expressions to define the patterns used to find index field keys and their associated values in a document.
-
From the
Index Fields folder, select your index field.
This will open the KV Extraction Rule page by default.
- Click Add to define a new key-value pair.
Upload files
- In the KV Extraction rule builder, expand the Advance KV Test panel by clicking the arrow at the bottom of the page.
-
Click
Select Files or drag and drop files into the box to upload a file.
Supported file formats are PDF and TIFF.
Determine your extraction method
Determine the extraction method that applies to the field you are extracting:
- Machine Print: This is an OCR-based extraction method and has the quickest performance of the available Extraction Methods. This is the standard KV extraction option which can extract machine-printed text but cannot extract hand-printed text.
- Hand/Machine Print: This is an ICR-based extraction method. Select this method to extract hand-printed text.
- Signature detection: This is an OMR-based extraction method. Select this method to configure an extraction rule to determine if a signature is present or not. This returns a "true "or "false" value.
- Check box detection: This is an OMR-based extraction method. Select this method to configure an extraction rule to determine if a check box or mark is selected or not. This returns a "true "or "false" value.
Machine Print
- From the Extraction Method drop-down list, select Machine Print.
-
Do the following to edit KV Overlays.
Use the overlays to define the key-value pair. The overlays are color-coded boxes that are superimposed on the uploaded files. These overlays are resizable and can be dragged across the image to select the portions of the file to extract.
-
Drag and resize the key overlay (green) to the text or label that will serve as the key. In the following
example, the key is the label
"Landlord/Lessor:"

-
Click the key overlay to open the
Suggest Regex window.
This will display the text captured inside the overlay.
-
Select your chosen regex and click
OK.
This regex will be added to the Key field in the left column.
If a key includes special characters that already hold meaning in a regex, such as slashes ( / \ ) or parentheses ( ), you need to replace these characters with a backslash. For example, if the value regex is "Invoice Amount (USD)", such a replacement looks like "Invoice Amount \(USD\)". -
Drag and resize the value (red) overlay to the text area that corresponds to the key. In the following
example, the value field contains the text
"Dedham Mall, Pad".

-
Click the value overlay to open the
Suggest Regex pop-up window.
The system analyzes the selected text and provides a recommended regex.
-
Select your chosen regex and click
OK. This regex is added to the Value field in the left column.
For more information about using the regex builder, see Automatic Regex suggestion and creation.
-
Drag and resize the key overlay (green) to the text or label that will serve as the key. In the following
example, the key is the label
"Landlord/Lessor:"
-
Use the left panel to continue building the extraction rule.
Configurable property
Options
Description
Use Existing Field for Key
N/A
When selected, this check box allows for a previously extracted value to be the key of another field. If this is not selected, the key is the anchor point to base the value location.
Fuzzy %
- None
- 10%
- 20%
- 30%
This parameter specifies if the key will still be identified even if there is not an exact match to the key regex pattern.
- None- the key must be an exact match to the key regex pattern.
- 10%- allows for 10% of the characters to be inaccurate.
- 20%- allows for 20% of the characters to be inaccurate.
- 30%- allows for 30% of the characters to be inaccurate.
If you select a fuzzy percentage, you will not be able to use a regex for the Key pattern. If you select both a fuzzy percentage and key regex, you will not receive any results during extraction.Fetch
- ALL
- FIRST
- LAST
This parameter specifies how many instances of the value should be extracted from the value zone. For example, if ALL is selected, all characters from the value zone will be extracted. If FIRST is selected, only the first matching pattern from the value zone will be extracted.
The recommended option when configuring a regex to extract U.S. currency is FIRSTPage
- ALL
- FIRST
- LAST
This parameter specifies on which page of the document to perform key-value extraction. For example, if ALL is selected, key-value extraction will be performed on all pages in the document. If FIRST is selected, it will only be performed on the first page in the document.
Zone
- ALL
- TOP
- RIGHT
- LEFT
- MIDDLE
- BOTTOM
This parameter specifies on which section of the document to perform key-value extraction. For example, if ALL is selected, key-value extraction will be performed on the entire page. If TOP is selected, it will only be performed on the top section of the page.
Weight
0-1
This parameter is a configurable value (0-1) that is multiplied by the confidence score to calculate a new confidence score. This is to allow an extraction rule to be prioritized over another within the same index field.
X Offset
N/A
The application will set this value based on the placement and size of the key and value overlays.
Y Offset
N/A
The application will set this value based on the placement and size of the key and value overlays.
Is Wrapped
N/A
When selected, this check box allows for values to be extracted that may be wrapped to another line in the document.
- Click Validate Regex to confirm the value regex is a usable regular expression.
-
Click
Test KV to perform a test extraction.
If you receive unexpected results or want to make any changes, click Back to return to the editor and adjust the extraction rule.
-
Click
Apply KV.
This will return you to the KV Extraction Rule page.
- Click Apply to save this key-value rule to the index field.
Hand/Machine Print
- From the Extraction Method drop-down list, select Hand/Machine Print.
-
Edit KV Overlays.
Use the overlays to define the key-value pair. The overlays are color-coded boxes that are superimposed on the uploaded files. These overlays are resizable and can be dragged across the image to select the portions of the file to extract.
-
Drag and resize the key overlay (green) to the text or label that serves as the key.
In the following example, the key is the label "2. VETERAN'S SOCIAL SECURITY NUMBER (SSN)".

-
Click the key overlay to open the
Suggest Regex pop-up window.
This will display the text captured inside the overlay.
If a key includes special characters that already hold meaning in a regex, such as slashes ( / \ ) or parentheses ( ), you need to replace these characters with a backslash.
For example, this value regex is "SOCIAL SECURITY NUMBER (SSN)", the replacement of the special characters (parentheses) looks like "SOCIAL SECURITY NUMBER \(SSN\)".
-
Select your chosen regex and click
OK.
This regex is added to the Key field in the left column.
The key regex must be unique. In the given example, avoid using the key "VETERAN", as the word "VETERAN" appears multiple times across the page.
-
Drag and resize the value (red) overlay to the text area that corresponds to the value.
In the example above, the value field contains the text "123-45-6789".
To allow for variations in possible value length, the overlay should stretch the full length of the field.
-
Drag and resize the key overlay (green) to the text or label that serves as the key.
-
To configure the extraction rule, use the left panel.
-
Select
Extraction Type.
Extraction Type Description KV + Hand/Machine Print
Use this option when you are extracting data from documents that may be filled out in either hand print or machine print. This extraction type first performs key-value (KV) extraction. If the set minimum KV confidence is not met, it then performs hand/machine print extraction and chooses the best result.
Hand/Machine Print
Use this option when you are extracting data from documents that you expect to always be in hand print. This extraction type only performs hand/machine print extraction.
-
Define the value regex. The need for this regex depends on the
Extraction Type that you select.
-
For KV + Hand/Machine Print, use a regex specific to the selected value text.
-
Click the value overlay to open the Suggest Regex pop-up window. The system examines the selected text and provides a recommended regex.
-
Select your chosen regex and click OK. This regex will be added to the Value field in the left column.
-
-
For Hand/Machine Print, use the generic regex (.+), because it catches any value any number of times.
-
In Value, enter these symbols: .+
-
Click Validate Regex.
-
-
-
Select
Value Type.
Value Type Description Alphanumeric
Returned characters are from an alphanumeric character set. This can be used when you are extracting:
- Names
- Addresses
- Email addresses
- Full dates
-
May 11, 2020
-
11 May 2020
-
Numeric
Returned characters are from a numeric character set. This can be used when you are extracting:
- Phone numbers
- Social Security Numbers
- Amount totals
- All numeric dates
-
5/11/2020
-
2020-5-11
-
-
Only for
KV + Hand/Machine Print as the extraction type, set the Minimum KV Confidence. This is a
configurable number (1-100) which acts as a threshold to help
Transact
determine if a second pass using ICR extraction is needed.
To determine this number, we recommend testing this across multiple real-world documents with various levels of quality. This gives you a more accurate idea of where the threshold should be. Follow these steps for each document:
-
Enter any number in this field and press Test KV.
-
Go to .
-
Locate and open the HOCR.xml file for the document you just tested.
-
Locate the field you are configuring for extraction. Each word will be listed as a separate value.
-
Locate the tag <OcrConfidence>.
-
Using multiple real-world documents, determine the threshold for when values are extracted properly. See the following sample results for documents of various quality.
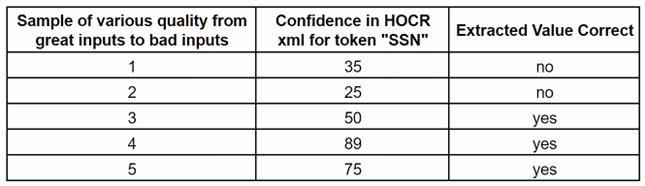
From these samples, we can see accurate results when the OcrConfidence is above 50.
If your documents are of good OCR quality, you may want to keep this number higher. If your documents are of poor OCR quality, you may want to keep this number lower. -
Set your Minimum KV Confidence to the number determined in the previous step.
-
-
Verify that you select
Remove Lines.
This removes any straight horizontal and vertical lines, such as the boundaries around a text box.
-
Clear
Auto-Resize K/V Areas.
This option is in beta and is not currently recommended for normal, unskewed samples.
When this option is selected, Transact automatically detects sand adjusts for changes in image content size by adjusting the size and position of the key and value search areas. To use this option, draw the green overlay precisely over the key.
Any additional configurable options on this page are not applicable to Hand/Machine Print extraction. If you make any changes (Fuzzy, Fetch, Page, Zone, Weight, Is Wrapped) they will not affect the extraction rule. -
Select
Extraction Type.
- Click Validate Regex to confirm the value regex is a usable regular expression.
-
Click
Test KV to perform a test extraction.
If you receive unexpected results or want to make any changes, click Back to return to the editor and adjust the extraction rule. See Troubleshooting.
-
Click
Apply KV.
This returns you to the KV Extraction Rule page.
- Click Apply to save this key-value rule to the index field.
Signature detection
- From the Extraction Method drop-down list, select Signature Detection.
-
Edit KV Overlays.
Use the overlays to define the key-value pair. The overlays are color-coded boxes that are superimposed on the uploaded files. These overlays are resizable and can be dragged across the image to select the portions of the file to extract.
-
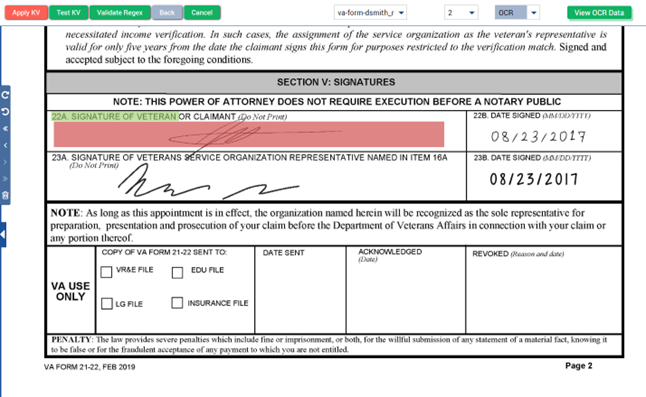
Drag and resize the key overlay (green) to the text or label that will serve as the key. In the following
example, the key is the label
"22A. SIGNATURE OF VETERAN".
-
Click the key overlay to open the
Suggest Regex pop-up window.
This displays the text captured inside the overlay.
-
Click
OK to use the suggested regex.
This regex is added to the Key field in the left column.
If a key includes special characters that already hold meaning in a regex, such as slashes ( / \ ) or parentheses ( ), you need to replace these characters with a backslash. For example, if a value regex is "SOCIAL SECURITY NUMBER (SSN)", the replacement of the special characters (parentheses) is "SOCIAL SECURITY NUMBER \(SSN\)". -
Drag and resize the value (red) overlay to the text area that corresponds to the value.
In the previous example, the value field is the signature box.
- In the left column, set the Value field to the generic regex (.+)
- Click Validate Regex.
-
Drag and resize the key overlay (green) to the text or label that will serve as the key. In the following
example, the key is the label
"22A. SIGNATURE OF VETERAN".
-
Use the left panel to configure the extraction rule.
-
Verify that you select Remove Lines.
This option is recommended, as it removes any straight horizontal and vertical lines (such as the boundary around a signature) during the extraction process.
-
Clear
Auto-Resize K/V Areas.
This option is in beta and is not currently recommended for normal samples.
When this option is selected, Transact automatically detects and adjusts for changes in image content size by adjusting the size and position of the key and value search areas. To use this option, draw the green overlay precisely over the key.
Any additional configurable options on this page are not applicable to Signature Detection. If you make any changes (Fuzzy, Fetch, Page, Zone, Weight, Is Wrapped), they do not affect the extraction rule. -
Verify that you select Remove Lines.
-
Click
Test KV to perform a test extraction.
If you receive unexpected results or want to make any changes, click Back to return to the editor and adjust the extraction rule. See Troubleshooting.
-
Click
Apply KV.
This will return you to the KV Extraction Rule page.
- Click Apply to save this key-value rule to the index field.
Check box detection
- From the Extraction Method drop-down list, select Checkbox Detection.
- Click the arrow at the bottom of the screen to expand the Advance KV Test area.
-
Upload a blank version of the document you are configuring.
You may also be able to configure the rule using a filled document. To do so, you need an empty check box somewhere on the form that is of the same size and shape of the check box you are configuring for extraction. Follow the same steps below, but use the empty check box to determine the Pixel Density %.
-
Edit KV overlays.
Use the overlays to define the key-value pair. The overlays are color-coded boxes which are superimposed on the uploaded files. These overlays are resizable and can be dragged across the image to select the portions of the file to extract.
-
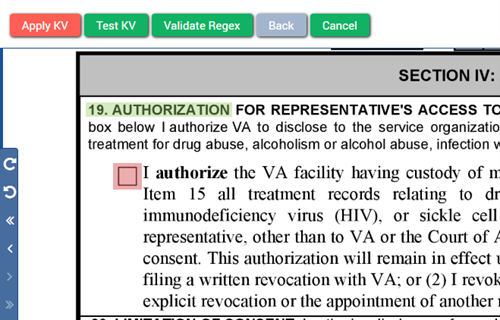
On the blank document, drag and resize the key overlay (green) to the text or label that will serve as the
key. In the following example, the key is
"19. AUTHORIZATION".
-
Click the key overlay to open the
Suggest Regex pop-up window.
This will display the text captured inside the overlay.
-
Click
OK to use the suggested regex.
This regex will be added to the Key field in the left column.
If a key includes special characters that already hold meaning in a regex, such as slashes ( / \ ) or parentheses ( ), you need to replace these characters with a backslash. For example, if a value regex is "SOCIAL SECURITY NUMBER (SSN)", the replacement is "SOCIAL SECURITY NUMBER \(SSN\)". -
Drag and resize the value (red) overlay to the text area that corresponds to the key.
In the example above, the value field is the empty check box.
If your check boxes vary in size or location, you may need to increase the overlay size after testing.
-
On the blank document, drag and resize the key overlay (green) to the text or label that will serve as the
key. In the following example, the key is
"19. AUTHORIZATION".
-
Configure the extraction rule.
- In the left column, set the Value field to the generic regex (.+)
- Click Validate Regex to confirm the value regex is a usable regular expression.
-
Configure
Pixel Density %.
The Pixel Density % is a configurable number (0-100) that determines the threshold for what percentage of the area within the value overlay must be filled for the check box to be considered selected. If this percentage is met, the check box detection returns as "True".
This number varies depending on the location and size of the check box, as well as the size of the mark within the check box. To determine this number, we first need to test on a blank check box.
- On the blank document, set the Pixel Density % to 0.
-
Select
Test KV.
Any additional configurable options on this page are not applicable to check box detection. If you make any changes (Fuzzy, Fetch, Page, Zone, Weight), they do not affect the extraction rule.
-
In the
Advance KV Test panel, locate the column labeled
Confidence %.
This is the pixel density percentage of your empty check box.
- Click Back to return to the editor.
-
Set the
Pixel Density % to a number slightly higher than your blank check box pixel density.
For example, if the blank check box is about 20, set Pixel Density % to 25.
-
Optional: Test extraction on a filled document.
-
Return to your completed document by clicking the drop-down list at the top of the page and selecting the appropriate document. If you are working with a multi-page document, ensure you are viewing the relevant page.
-
Without making any changes, click Test KV.
-
Verify that your filled check box is extracted properly. In the Advance KV Test panel, the Value column should return as "true". Also, the Confidence % column should have a number higher than your defined Pixel Density %.
If you receive unexpected results or want to make any changes, click Back to return to the editor and adjust the extraction rule. See Troubleshooting.
-
-
Click
Apply KV.
This returns you to the KV Extraction Rule page.
- Click Apply to save this key-value rule to the index field.
Rule ID
Transact displays the Rule ID column, which is a unique number for each extraction rule. This allows you to locate the specific rule within the batch.xml file.
Troubleshooting
This section includes common troubleshooting tactics for ICR and OMR-type extraction. This is limited to the following extraction methods:
-
Hand/Machine Print
-
Signature Detection
-
Checkbox Detection
| Issue | Troubleshooting |
|---|---|
|
Inaccurate results when testing extraction. |
Refer to and analyze the snippet and RSP file for potential insights. These files are located in the snippets folder for your batch class. Go to |
|
Inaccurate results when testing extraction with the following configuration:
|
You may need to increase the Minimum KV Confidence If this number is lower than the OcrConfidence listed in the HOCR.xml file, only OCR extraction occurs, which may give inaccurate results with hand-printed text. If this number is higher than your OcrConfidence, a second pass using ICR extraction occurs. See the Configure Extraction Rule step on how to find the OcrConfidence. |
|
When testing extraction, the wrong value is pulled from the page. |
Make sure your Key regex is unique. |
|
When testing extraction, my value overlay is largely offset from its original location. |
Clear Auto-Resize KV Areas. This beta algorithm may help to normalize skewed or rotated images but may cause an offset with documents of normal quality. |