
How to create a tenant (Tungsten Automation)
This section is relevant for Tungsten Automation employees and Tungsten Automation resellers.
-
Select
Create tenant
 to create a new tenant.
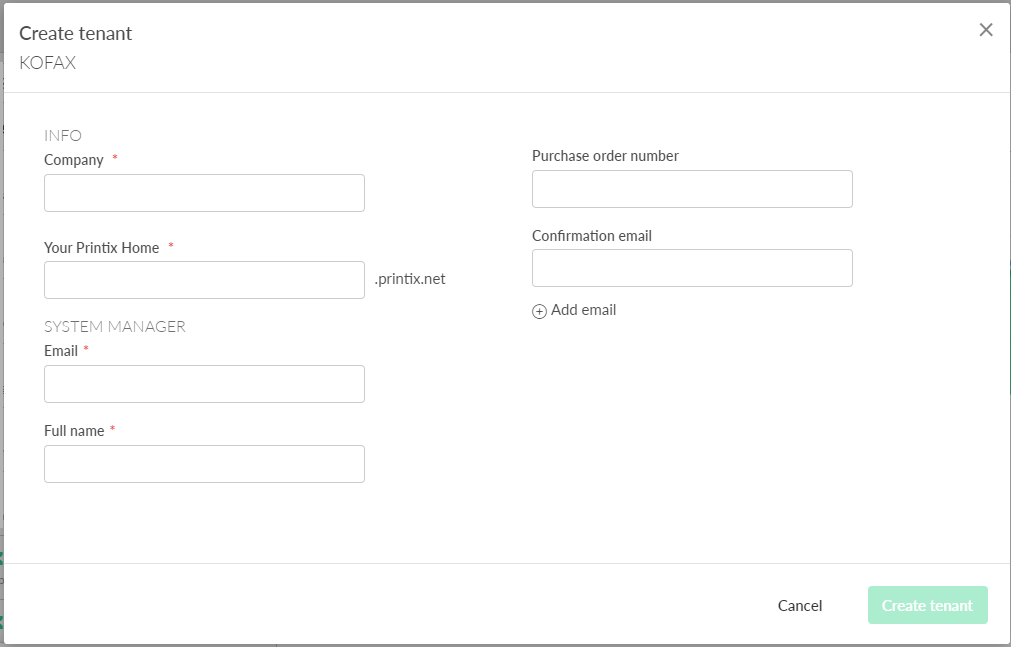
The Create tenant dialog box appears.
- In the Info section, enter your Company.
-
Enter
Your
Printix Home.
It does not need to be the same as the email domain (acme). However, because the text is used in your Printix web address, you can use only: A-z, 0-9, -.
-
In the
System Manager section:
-
Enter your Email.
-
Enter your Full name.
-
No email is sent to the added system manager.
-
The added system manager must select Forgot password? the first time, and then read the email with the subject Reset password instructions and select Reset password.
-
If the email does not appear within a few minutes, check the spam/junk mail folder.
-
Subsequently, the system manager can sign in with email.
-
If the system manager already has a Printix account, the password does not need to be reset.
-
-
-
-
Enter your
Purchase order number.
The content of the purchase order defines the subscription plan (Business or Education, Monthly or Annual), and this is subsequently set up by the Tungsten Automation order and fulfillment team.
-
Enter an email address where the
Confirmation email should arrive.
Optionally, select Add email
 to send the confirmation email to additional addresses.
- Select Create tenant to create the Printix Home for the new tenant.
Start the subscription
- Find the tenant you just created.
- Open the Tenant properties.
-
Select the
Subscription
 tab.
tab.
-
Enter your
Purchase order number (it may have been entered earlier in step
5).
Change of subscription (Business or Education, Monthly or Annual) is done by the Tungsten Automation order and fulfillment team according to the content of the purchase order referenced through the Purchase order number.
-
Select
Save.
If you do not select Save, the tenant is deactivated after the trial.
Extend the trial
-
Open the
Subscription
tab.
- Optionally, select Extend trial to extend the trial with one month.
Issue a "not for resale" license
-
Open the
Subscription
tab.
-
Optionally, select
Not for resale.
Only select this if the tenant is used internally by you as a Printix partner or by a reseller to train and educate employees on Printix.
If you subsequently clear Not for resale, the tenant enters the trial.
Configure a tenant
What Printix functionality does the customer want to use? You can use our checklist to record this.
Open Printix Administrator for the new tenant to proceed with the configuration as described in the Printix Implementation Help.
You who created the tenant is listed as the subscription email receiver. We recommend that you configure the following in Printix Administrator:
-
Email message signature
On the Settings
 page, you can change the signature to include contact
details for your Help Desk. By default, this is populated with the name and email address of the user (you) who created the tenant.
You can replace this text with something else.
page, you can change the signature to include contact
details for your Help Desk. By default, this is populated with the name and email address of the user (you) who created the tenant.
You can replace this text with something else.
-
Accept Printix for all users
If you enable Microsoft Entra authentication to allow signing in with Microsoft, ensure that Printix is accepted for all users, so the automatic sign-in to Printix Client works on Microsoft Entra joined Windows 10 and 11 computers. You must have the global administrator role in Microsoft Entra ID to do this. You can enable groups. Subsequent deletion or modification of the used global administrator Microsoft Entra ID account does not affect the already consented application privileges.