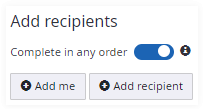
Add recipients to signing package
Click Add recipient to add a recipient to the signing package. To add yourself as recipient to the signing package click Add me.
The important difference between using Add recipient and Add me is that if you click the Add me button, then you can use a signature image for signing. The application can store the image and let you re-use that in a convenient way.
Role
After adding a recipient select the role for the recipient. A recipient may act as signer or as reviewer.

- Signer
Select this option if you would like the recipient to sign one or more of the documents in the signing package. Signers can be requested to enter information into text fields and check boxes that have been added to the documents. - Reviewer
Select this option of you would like the recipient to review the documents of the signing package. A reviewer can open the documents for reading only.
Enter recipient’s name and email
- Enter the recipient’s name and email address.
If an email address is provided an invitation will be sent when the signing package is started. 
- Select a known contact.
Typing text into the field creates a drop down populated with contact(s) that match entered text. Selecting the contact from the drop down can be done by clicking the corresponding entry. 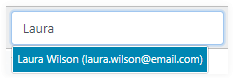
Delete recipient
A recipient can be deleted from the signing package using the delete icon
![]() . Deleting a signer will also delete fields
assigned to this signer from the document(s) in the signing package.
. Deleting a signer will also delete fields
assigned to this signer from the document(s) in the signing package.
Advanced recipient settings
Clicking the settings icon
![]() will open the advanced recipient settings for authentication,
certificates, supplemental documents and miscellaneous settings.
will open the advanced recipient settings for authentication,
certificates, supplemental documents and miscellaneous settings.
Authentication
You can configure the package so that recipients must authenticate before opening the signing package. This option limits access to the signing package to authenticated persons only.
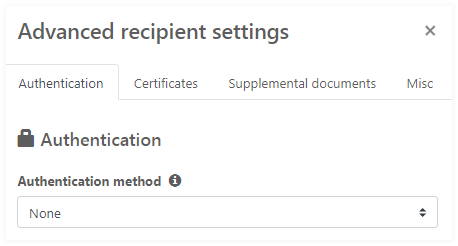
Authentication methods
- None (default)
Authentication is based only on email address
- Access Code
An access code is required to open the package. The access code field is prefilled with random characters and numbers that can be changed. The recipient must enter this access code to open the signing package.
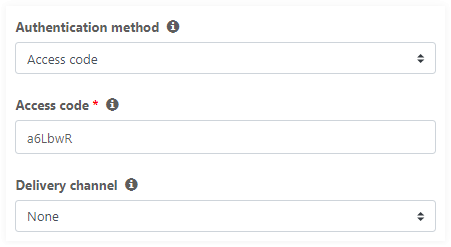
- Delivery channel
Specifies the way the access code is delivered to the recipient.None (default): The access code has to be delivered manually to the recipient.
SMS: Only available if configured for your account. The SMS delivery channel option requires the recipient’s phone number. SignDoc Standard will send an SMS with the access code to the phone number when the signing session is started.
- External
Authentication is based on an external authentication provider. This feature is only available if configured for your account. When using external authentication the recipient’s first and last name is required.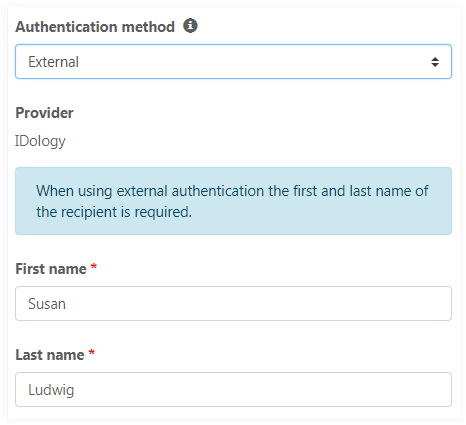
Certificates
- Signer certificate
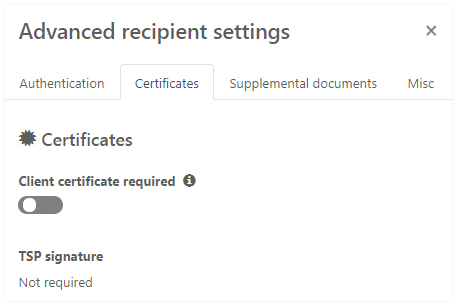
When Client certificate required is not selected the installed certificate is used. See information about signing certificate in Signing settings.
When Client certificate required is selected a signer certificate is necessary. A client certificate can only be used with the Internet Explorer, Chrome and Firefox browsers on Windows operating system. The SignDoc Device Support setup and the appropriate Browser Extension or Add-On must be installed on the client computer.
Note Client certificates are not supported on Edge browser. - TSP signature
This label informs if and what type of TSP signature the recipient has to provide for at least one of the documents in the package. See TSP signature.
Supplemental documents
Use the Supplemental documents tab to configure documents required during signing sessions for the selected signer.
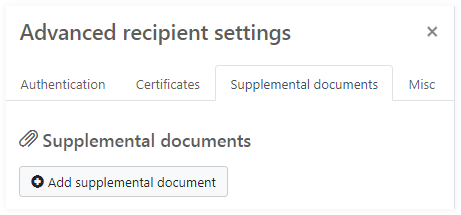
You can add, delete or change supplemental document information. To add a supplemental document click Add supplemental document. The following form appears:
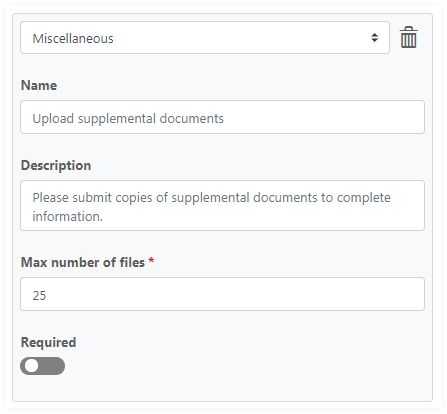
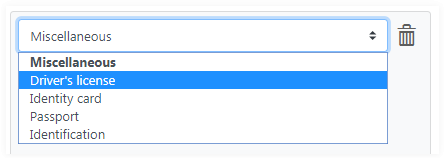
Choose a document type using dropdown at the top of the form. The list in the dropdown contains all document types even if they were defined for different languages. Note that you can select supplemental documents configured in administration. See Supplemental documents.
Change name and description of the document in corresponding fields. To limit maximum number of files attached use Max number of files field. All of these fields should be filled with values (notice that they are marked with red stars).
Name and Description fields are empty by default and a user can see the default values in the field placeholders. These default values can be configured in the administration section and depend on the current language of the Manage client. If you do not change name and description, they will be displayed in the signer's language during the signing session.
If you want to 'pin' the name and description just put appropriate values in the fields. In this case both of them are required and they not be translated during the signing session.
Use Required option to require a user to upload the supplemental documents during the signing session.
To remove previously added supplemental document use the delete icon
![]() located to the right of the document type
drop-down box.
located to the right of the document type
drop-down box.
Each time when you perform changes in the Supplemental documents section these new changes are not saved automatically. Click Save button in the package wizard to store the document changes.
Per-signer consent settings
Use the Misc tab to configure consent requirements for specific signer or all signers in the package.
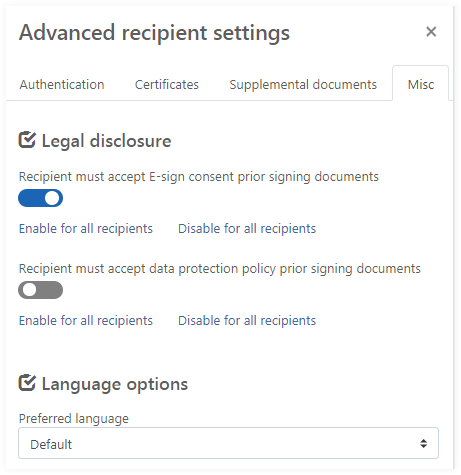
Changing flag for E-sign consent and data protection policy consent will change setting for the selected signer. That means that you can enable or disable consent requirement for one or more signers. Or use action links Enable for all recipients, Disable for all recipients for e-sign and data protection policy to enable or disable the requirement for all recipients defined in the package. If you do not change these settings, the application will require consent according to settings in account configuration.
Language options
When you add recipients to a signing package they have a default preferred language which is configured for the account. The preferred language of a recipient affects the content language of emails sent to recipients.
It also affects the user interface language during the signing session.
- When using Default as preferred recipient language the user interface language during the signing session is read from the language setting of the recipient's browser.
- When using an explicit recipient language this language is used in user interface during signing session.
In both cases English is used as fallback language.
Routing order
The routing order sets the order in which recipients receive and can work on the document(s). The routing order of the recipient can be determined:
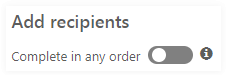
- Parallel signing (default)
Invitations are sent to all recipients at the same time based on the send date.
To use parallel signing the Complete in any order switch has to be enabled.
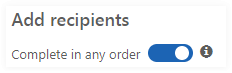
- Series signing
Each recipient is invited (via email) in order. The next recipient is invited only after the previous recipient ‘completes’ his/her part. Use the up/down arrows to reorder the recipients.
To use series signing the Complete in any order switch has to be disabled.