Access local files/network share via SMB
Use this procedure to configure folder import settings to access files from a local computer or network shared location using the Server Message Block (SMB) protocol.
-
Start
KC Plug-In
configuration. Do
one of the following:
-
On a Kofax Capture Network Server remote site, start KC Plug-In from the KIC - Electronic Documents group in the Windows Start menu.
-
On other Kofax Capture installations, start Kofax Capture Administration and select .
-
- Connect KC Plug-In to a Message Connector or edit one of the existing connections. See Add a connection.
- In the Connection configuration window, click Add and select Folder import.
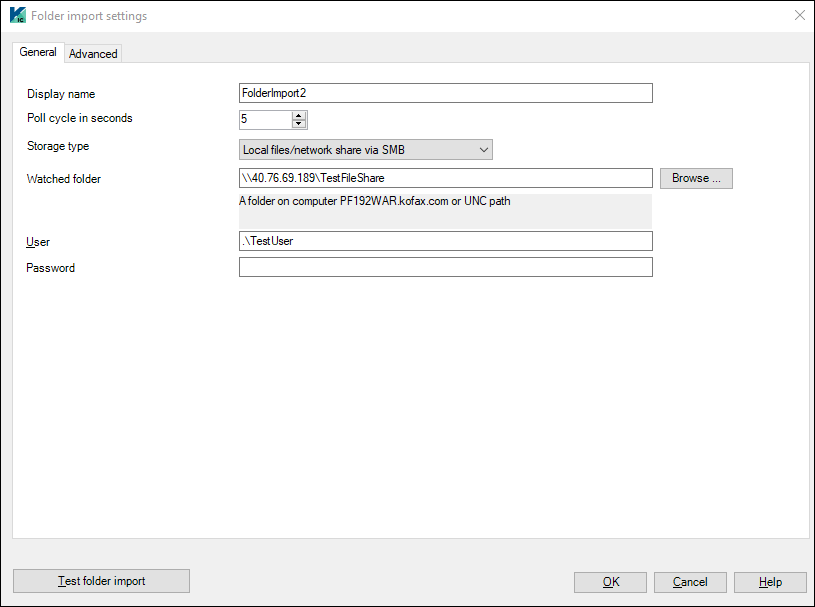
- Enter a descriptive Display name.
- In the Poll cycle in seconds field, specify how often the folder is checked for new documents. The maximum value is 86400 seconds, that is, 24 hours.
- Select Storage type as Local files/network share via SMB to access folder location on the local computer or shared network.
-
Enter the
Watched folder, either by typing the path or selecting the folder via the
Browse button. Use UNC syntax for network paths.
- To poll documents from a folder, you can use more than one Message Connector. To avoid the import of duplicate documents when using multiple Message Connectors, see Prevent duplicate message import.
-
To avoid security vulnerabilities, access to the local watch folder is denied by default. To know how to enable access, see Folder input base directory in Security options tab in Tungsten Message Connector Help.
-
Enter
User and
Password. The user accessing the watched folder requires modify or full control rights.
-
From one computer, only a single Windows user may access a network folder simultaneously. If you have another connection active (such as a Windows Explorer window displaying the folder) with a different user, Message Connector might have trouble accessing the folder, especially if the active user does not have sufficient rights.
-
By default, the "Password" field is always displayed as blank.
When editing the folder settings, provide the password only if it is changed. Once you enter the new password and save the folder settings, the password provided here will override the stored password.
-
-
Click
Test folder import to verify that
Kofax Import Connector
can connect to the specified folder.
If you are testing a network folder, having a Windows Explorer window open displaying the content of the folder might occasionally prevent the test button to connect.
- Optional. Go to the Advanced tab to configure additional parameters. Otherwise, continue with step 15.
-
Select
Process subfolders to monitor the immediate subfolders of the watched folder.
Select
Include watched folder to monitor the watched folder itself. In
Maximum subfolder level, configure the level of nested subfolders to process.
In the Windows operating system, the maximum path length is 260 characters. If the number of characters in the path exceeds this limit, the path is considered invalid and the files are not imported.
- To delete the empty subfolders after importing the files, select Delete empty folder structures.
- In the File mask field, enter a comma separated list of files that should be imported from the folder. You can use wildcards: The asterisk character ("*") substitutes for any zero or more characters, and the question mark ("?") substitutes for any one character. If you are using trigger files, this field is disabled (see below).
-
Select
File Detection Mode to make sure that files are completely copied to the
watched folder before importing. Select
one of the options:
-
File not modified since: To force Kofax Import Connector to wait for the specified number of seconds after the file was last accessed.
-
Use trigger: First copy a document (or a folder containing documents) to the watched folder and then create a trigger file to indicate that the document (or folder) is ready for importing.
- In the Trigger file mask field, enter a trigger file, such as "*.trg" (or a comma separated list of trigger files). You can use wildcards: The asterisk character ("*") substitutes for any zero or more characters, and the question mark ("?") substitutes for any one character.
-
Select one of the following options to specify whether the trigger refers to documents or folders:
-
Files in the same directory with the same base name: Kofax Import Connector cuts the extension from the trigger file name and searches for documents with the same base name in the same folder. For example, with trigger file mask "*.trg" and trigger file "001.trg", all documents matching "001.*" (except the trigger file) are imported.
-
All files in the same directory: Imports all documents from the same folder (except the trigger file). For example, when the trigger file "ready-to-be-imported.trg" appears in a watched folder; all other documents in the folder are imported.
-
All files in the subfolder with the same base name: Kofax Import Connector cuts the extension from the trigger file name and searches for a subfolder with the same name. All documents from the subfolder are imported.
The trigger file must have an extension.
-
Import all files in a folder matching file mask: Kofax Import Connector looks for a folder with a name that matches the trigger file mask. All documents from the folder are imported.
-
-
Select one of the options to specify what to do with the trigger files after import:
-
Delete: Deletes the file.
-
Rename extension to: Specify an extension to rename it.
-
- Select Import trigger file to import the content of the trigger file. If clear, the content of the trigger file is not relevant and is deleted/renamed after the other documents are imported.
-
-
Select
File Import Mode to determine how XML documents should be handled.
-
Automatic to parse the XML documents. If an XML document is identified as one of the configured XML types, it is handled accordingly. If the document structure does not match any of the configured XML types, it is considered a binary document.
-
Custom to restrict what type of XML is accepted. For example, if you select only "Kofax Capture XML", all incoming XML files are treated as XML Import Connector compatible files.
-
Binary to import XML documents as binary files.
-
- Click OK to close the connection configuration window. Restart the KC Plug-In service.
Additional configuration options related to folder import are available in the Message Connector configuration in the Security Options tab:
-
Disable Folder Import: Disables the feature completely.
-
Folder Input Base Directory: Restricts the folder which can be configured as the watched folder.
Kofax Import Connector cannot import documents if the combined number of characters in file path and file name exceeds 211. Also, the documents cannot have the read-only attribute enabled.
Access shared folder on Azure VM
Setting required on Azure VM
Configure Azure VM to respond ping or ICMP echo requests and SMB file sharing
- Navigate to .
-
Click
Advanced settings on the left pane.
The Windows Defender Firewall with Advanced Security on Local Computer window is displayed.
- Enable File and Printer Sharing (SMB-in) and File and Printer Sharing (Echo Request - ICMPv4-In).
Configure shared folder on Azure VM
-
Right-click the folder you want to share and select
Properties.
The folder properties popup window is displayed.
-
Select the
Sharing tab and then click
Share.
The Network access popup window is displayed.
-
In the
Choose people to share with text box, enter the users or groups who can
access the folder.
You can enter Everyone to provide external access to the folder.
-
Click
Share, and then click
Done.
The shared folder can be accessed externally using the public IP of the VM from the Azure portal.
For example: \\[VM_Public_IP]\[shared_folder_name
Configure Azure VM's shared folder in Folder import settings
-
In the
text box, enter the shared
path of the
Watched folder on Azure VM.
Ensure you enter the Azure VM's public IP address instead of the hostname in the above watched folder path.
- Enter username and password.
- Click Test folder import to verify if Kofax Import Connector can connect to the folder specified.
- Click Ok.