Training set Classes
| Icon | Name | Description |
|---|---|---|
| Add training documents | Launch the Open and Save As Dialog Box for adding further supported file types. | |
| Remove training documents | Delete selected document. | |
| View test set of this class | Jump to the corresponding Test set class in
Project Explorer. |
|
| View phrases of this class | Jump to the corresponding Phrases class in
Project Explorer. |
|
| Hide/unhide documents | Excludes the selected document from training phase, and mark it with
the hide/unhide icon in both Project Explorer and
Main panel.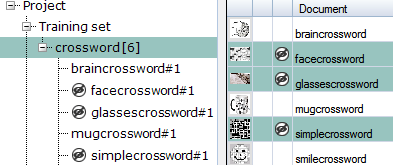 |
| Icon | Name | Description |
|---|---|---|
| Small images | Change the size of the displayed image thumbnails to small images. | |
| Medium images | Change the size of the displayed image thumbnails to medium images. | |
| Large images | Change the size of the displayed image thumbnails to large images. |
Various error types are also displayed in the second Warnings column of
the Training set class, marked by a yellow triangle with an
exclamation mark in it.
The following error types can be displayed in a tooltip:
- misclassified: displays matched class and confidence level
- 0/1 length wordlist: document does not contain enough info to distinguish classes
When a class item is selected in the section of the Project, the Main panel displays the class item specific content which is also signaled above the Main panel:
Image: if the class item is an image file, the image is shown in the Main panel and the Image tab is active above the Main panel:
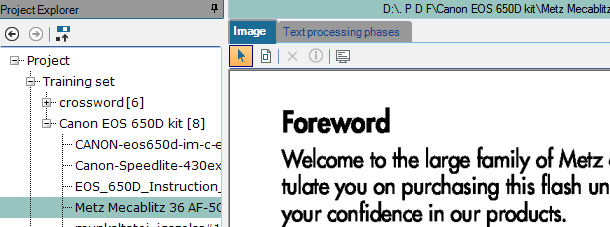
The following toolbar options are available if an image file is selected:
- Select: if selected, the previously drawn positional phrase can be moved with it.
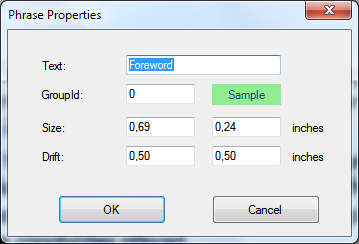
Draw positional phrase: if selected, you can draw an positional phrase on the image; before this is completed, you also need to specify its settings in the Phrase Properties dialog box:

- Delete phrase
- Properties: brings about the Phrase Properties dialog box; active only if the positional phrase is selected.
- Go to phrases: jumps to the corresponding, identically named Phrases class in Project Explorer.
You can also select Text processing phases and view the OCR process result of the selected image. Similarly to a text document, it is possible to select any of the five text processing phases from the dropdown list.
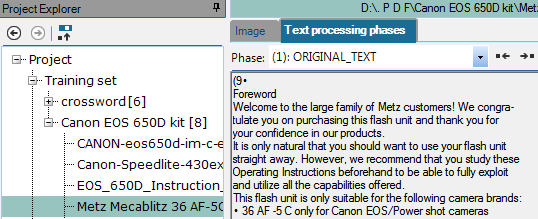
Text: if the class item is a text file, the text content is shown in the Main panel and the Text tab is active above the Main panel:

Click Text processing phases to see a five-item dropdown list with the following options:
- (1): ORIGINAL_TEXT: In case of an OCR input, roughly the OCR process result, in case of a txt input, it is the original content. The word wrap of the displayed text tries to retain the original word wrap of the input; this is not possible with tables.
- (2): METAWORD_SEARCH: Regex-based metawords are identified in the text and if found, then the #...# marked instances are appended to the end of the text
- (3): PHRASE_SEARCH: Fix (even several word long) string occurrences are identified via fuzzy search method, tolerating some character mistakes. If found, then the ^…^ marked instances are inserted after the place of the found one.
- (4): WORD_FILTERING: Content deemed unimportant is removed from the start and end of the words. In default state, everything not alphanumeric according to the locale belonging to the given language is removed, except for the ^ and # special characters and those exceptions that are defined by the certain hidden settings. After cleaning, very short words (less than three characters) are removed.
(5): STOPWORD_FILTERING: From the remaining wordlist, the ones that would be considered as too general occurrences based on the stopword list defined for the given language, are removed.
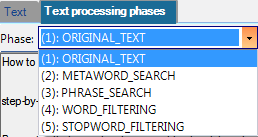
You can also navigate among the various phases with the Previous phase and Next phase buttons next to the dropdown options:

The Text processing phases section is only for viewing the OCR process of the five different stages, you cannot perform any operation with the listed words or strings. Except for the ORIGINAL_TEXT, a one word / one line display mode is activated.
If a class is selected, the Main panel displays a table of the class items contained in the selected class. The following table headers are visible:
- Document: the name of the class item
- Path: local path of the selected class item
- #: page index number

The display order can be changed by clicking the table headers and the Project Explorer dynamically adjusts its own display order to the one specified in the Main panel table.
The page index number (#) identifies individual pages after adding several or all pages of multipage documents and enables sorting based on the index number (for example, you reorder pages to show only those under 100 at the beginning of the table).

Multiple selection of class items is not supported in Project Explorer. You can, however, select multiple items in the Main panel view of the class items.
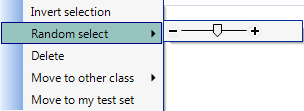
Right-click a class item in the table when class name is selected to reach the following options:
- Invert selection: inverts the current selection.
- Delete: deletes selected items.
- Random select: makes a random selection with the help of a -/+ slider on a percentage basis.
- Move to other class: the selected item can be moved to other existing classes.
- Move to my test set: the selected item is moved to the corresponding test set (that has the same name as the current class).
Adding multipage documents
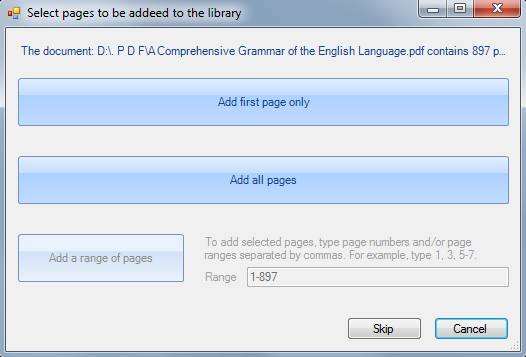
If you select a multipage PDF file after clicking the Add training documents button, the Select pages to be added to the library dialog pops up and you need to specify which pages you want to include in the project.
Select from the following options:
- Add first page only
- Add all pages
- Add a range of pages: specify a page range in the Range field.
- Skip
