
How to add Azure Blob Storage
Enable storage of pending documents in your secure cloud storage. That way, the user's computer does not need to be online to release Print Later and Print Anywhere documents. However, a Printix Client still needs to be online on the printer's network to release the documents.
Create storage account
- Open a new browser window and sign in to Microsoft Azure (portal.azure.com) using your work account credentials.
- In the portal menu, select All Services.
- In the Storage category, select Storage accounts.
- Select Create.
-
On the
Basics tab:
-
In the Project details section:
-
In Subscription, select the type of subscription.
-
In Resource group, select a resource group or select Create new.
-
-
In the Instance details section:
-
In Storage account name, enter the name of the storage account.
Example: printixcloudstorage
-
In Region, select the data center closest to you.
Example: (US) East US
-
In Performance, leave it at Standard (default).
-
In Redundancy, select Locally-redudant storage (LRS) to get the lowest-cost option.
-
-
- Select the Advanced tab or select Next: Advanced.
-
On the
Advanced tab:
-
In the Security section:
-
Leave Require secure transfer for REST API operations selected.
-
Clear Allow enabling anonymous access on individual containers.
-
Leave Enable storage account key access selected.
-
Leave Default to Azure Active Directory authorization in the Azure portal cleared.
-
In Minimum TLS version, leave it on Version 1.2.
-
In Permitted scope for copy operations, select the scope or leave it on the default From any storage account.
-
-
In the Hierarchical Namespace section:
-
Leave Enable hierarchical namespace cleared.
-
-
In the Access protocols section:
-
Leave Enable SFTP cleared.
-
Leave Enable network file system v3 cleared.
-
-
In the Blob storage section:
-
Leave Allow cross-tenant replication cleared.
-
In Access tier, select Hot.
-
-
In the Azure Files section:
-
Leave Enable large file shares cleared.
-
-
- Select the Networking tab or select Next: Networking.
-
On the
Networking tab:
-
In the Network connectivity section:
-
In Network access, select Enable public access from all networks or Enable public access from selected virtual networks and IP addresses. Both the Printix Cloud and computers with Printix Client (even when on a public network) must be allowed to access the blob storage.
-
-
In the Network routing section:
-
In Routing preference, select Microsoft network routing.
-
-
- Select the Data protection tab or select Next: Data protection.
-
On the
Data protection tab:
-
In the Recovery section:
-
Leave Enable point-in-time restore for containers cleared.
-
Clear Enable soft delete for blobs.
-
Clear Enable soft delete for containers.
-
Clear Enable soft delete for file shares.
-
-
In the Tracking section:
-
Leave Enable versioning for blobs cleared.
-
Leave Enable blob change feed cleared.
-
-
In the Access control section:
-
Leave Enable version-level immutability support cleared.
-
-
- Select the Encryption tab or select Next: Encryption.
-
On the
Encryption tab:
-
In Encryption type, select Microsoft-managed keys (MMK).
-
In Enable support for customer-managed keys, leave the selection on All service types (blobs, files, tables, and queues).
-
Leave Enable infrastructure encryption cleared.
-
- Select the Tags tab or select Next: Tags.
-
On the
Tags tab:
-
Optionally, create tags for the resource.
-
- Select the Review tab or select Next: Review.
-
On the
Review tab:
-
Review the settings.
-
-
Select
Create.
It may take a couple of minutes to create the account.
Configure access to cloud storage
If you selected Enable public access from selected virtual networks and IP addresses in step 9 of creating the storage account, perform the following steps to configure Printix to access your cloud storage.
The Azure Blob Storage can not be in the same Microsoft Azure data center as your Printix Home. The reason is that Microsoft does not use the public IP addresses for communication between Printix and the Azure Blob Storage when they are in the same data center.
- In the Microsoft Azure portal menu, select All Services.
- In the Storage category, select Storage accounts.
-
Select the storage account you created.
Example: printixcloudstorage
-
In the
Firewall section, in
Address range:
-
Enter the following IP addresses according to your data center where your Printix Home resides:
-
Printix in EU Data Center, Netherlands (West Europe):
-
51.124.91.26
-
4.231.78.53
-
108.141.108.82
-
172.211.154.155
-
51.138.117.189
-
4.245.85.136
-
51.105.161.29
-
-
Printix in US Data Center (Central US):
-
52.185.109.30
-
40.122.197.215
-
40.77.18.128
-
-
-
Enter the static outbound IP of those networks where Printix Client, Printix App for iOS/iPadOS, Printix App for Android, and Printix Chromebook reside.
When a user prints or runs a capture workflow (using the Printix Client, the Printix App, or Printix Chromebook) from an unknown network (at home or while traveling), and if documents go via the user's own cloud storage:
-
The user must connect via VPN to the Corporate network, and the own cloud storage must be reached via this VPN connection.
-
The static outbound IP of this network must be allowed on the firewall of the own cloud storage.
Otherwise, the printing or the capture workflow fails.
-
-
- Select Save to save your modifications.
Get the key
- In the Microsoft Azure portal menu, select All Services.
- In the Storage category, select Storage accounts.
-
Select the storage account you created.
Example: printixcloudstorage
-
In the left pane, select
Access keys to see the access keys for the selected storage account.
You can use the search bar to quickly find this option.
-
Select
Show next to the
Key value of
key1, then select
Copy to clipboard.
You need to paste this value in step 7 when adding the Azure Blob Storage.
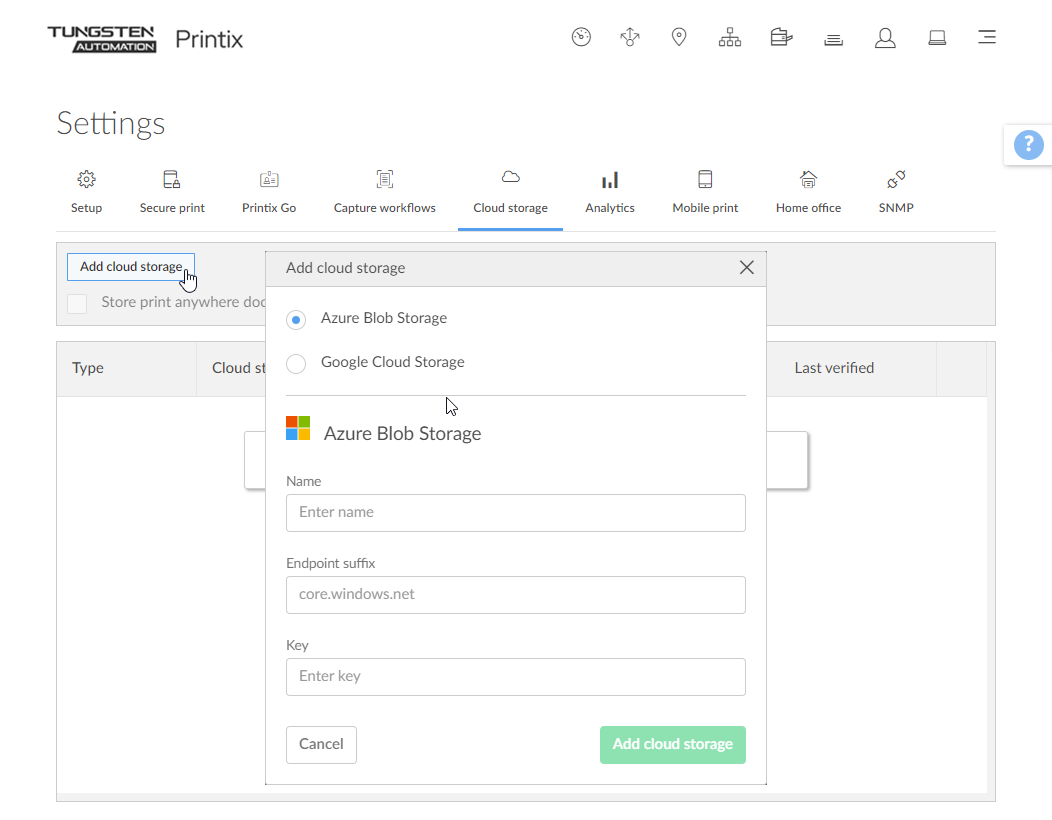
- In Endpoint suffix, specify the storage account endpoint suffix or leave it blank if you use the default core.windows.net value.
Add Azure Blob Storage
-
Select
Menu
 > Settings
 .
.
-
Select the
Cloud storage
 tab.
tab.
- Select Add cloud storage.
- Select Azure Blob Storage.
-
In
Name, enter the storage account name you entered in step
5
of creating the storage account.
Example: printixcloudstorage
- In Endpoint suffix, specify the same endpoint suffix you used in step 6 of getting the key.
- In Key, paste the key1 value you copied in step 5 of getting the key.
- If you do not want the cloud storage to be immediately usable, clear the Active check box, which is selected by default.
-
Optionally, modify the
Document sources field, which lists the sources where documents can come from.
The following document sources are available: Print Anywhere, Print Later, Via the cloud, Chrome print, Mobile print, Printer capture, Mobile capture.
Mobile capture requires an Azure Blob Storage that has CORS (Cross-origin Resource Sharing) enabled.
-
To modify the listed sources:
-
Select Select under the field.
The Select document sources dialog box appears.
The Available column lists the sources that are not used. The Selected column lists the sources that are used.
-
Select document sources in the Available column that you want to add.
-
Select document sources in the Selected column that you want to remove.
-
When you are satisfied with the selection, select Done.
-
-
To only remove a document source, you can also hover the cursor over it, then select the X that appears next to it.
-
-
Under
Available for sites, select the sites where the cloud storage should be available.
-
By default, the cloud storage is available on all sites.
-
If the cloud storage should only be available on specific sites:
-
Select All sites (or n site(s) if you want to change already selected sites).
The Select sites dialog box appears.
The Available column lists the sites that can be selected. The Selected column lists the selected sites.
-
Find and select the sites in the Available column that you want to add.
-
Select sites in the Selected column that you want to remove.
-
When you are satisfied with the selection, select Done.
-
-
If the cloud storage is only available on selected sites but you want it to be available on all sites, select n site(s), then remove all sites from the Selected column. After that, select Done.
-
- Select Add cloud storage.
-
Optionally, check the type of pending documents you want to store.
If you use a web proxy and/or SSL inspection, you must unblock the URL referencing the storage account:
https://{storage_account_name}.blob.{endpoint suffix}
Example: https://printixcloudstorage.blob.core.windows.net
Permissions needed to access Azure Blob Storage
Printix uses access keys for Azure Blob Storage to generate Shared Access Signatures (SAS) signed read, write, and delete links for the Azure Blob Storage. At regular intervals, Printix Cloud uploads a 4-byte file to test connection to the Azure Blob Storage (links for write, read, delete). If the test fails, it is displayed in Printix Administrator.
-
Allowed services
Checked Blob, Checked File, Checked Queue, Checked Table.
-
Allowed resource types
Unchecked Service, Unchecked Container, Unchecked Object.
-
Allowed permissions
Checked Read, Checked Write, Checked Delete, Checked List, Checked Add, Checked Create, Checked Update, Checked Process, Checked Immutable storage, Checked Permanent delete.
-
Blob versioning permissions
Checked Enable deletion of versions.
-
Allowed blob index permissions
Checked Read/write, Checked Filter.