
Printer properties
On the Setup tab, you can modify the properties of the printer.
Additional tabs:
Modify printer name
-
In
Printer name, select the
Modify
 icon.
icon.
- In the Modify printer name dialog box, edit the Printer name or select one from the Printer name suggestions list.
- Select Save.
Modify properties for multiple printers
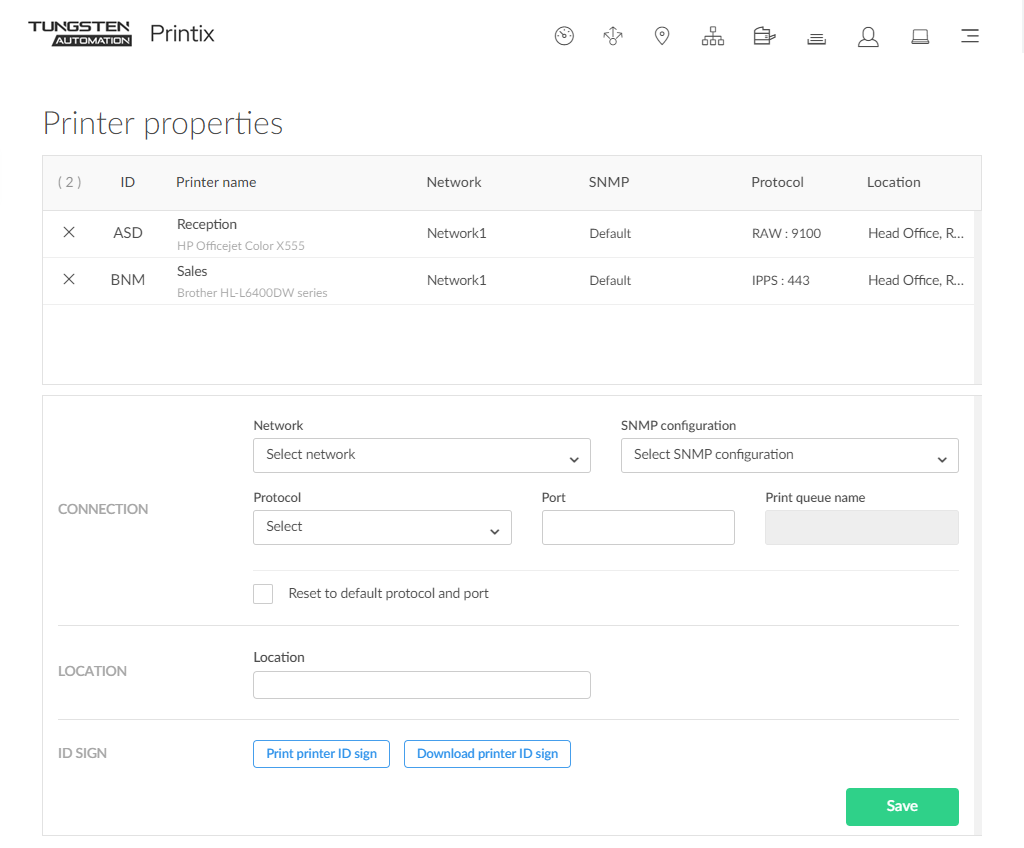
- On the Printers page, select the check boxes of multiple printers and select Modify.
-
Optionally, select
Select network under
Network if you want to change this.
If you do not select a network, the printers remain on their current network.
Site managers can only select networks belonging to managed sites.
-
Optionally, select
Select SNMP configuration under
SNMP
configuration if you want to change this.
If you do not select an SNMP configuration, the printers continue to use their current SNMP configuration.
You can only select global SNMP configurations and SNMP configurations assigned to the selected network. If you select a network that does not contain all SNMP profiles of the selected SNMP configuration, the SNMP configuration field is set to the default SNMP configuration.
-
Optionally, select
Select under
Protocol if you want to change this.
If you do not select a protocol, the printers continue to use their current protocol and port.
-
Select IPP, and if required, change the Port to a different value than the default port number 80.
-
Select IPPS, and if required, change the Port to a different value than the default port number 443.
-
For both IPP and IPPS, select Path to modify this if required. If you open the printer's web page, you may find information about Port and Path.
-
-
Select LPR and, if required, change the Port to a different value than the default port number 515. Optionally, enter a Print queue name.
-
Select RAW and, if required, change the Port to a different value than the default port number 9100.
-
- Enter a Location if you want to modify this.
-
Select
Save.
The entered location is saved for the selected printers.
When you change Network, Protocol, or SNMP configuration, it is recommended to verify that printing and printer status still works.
Printer
-
Printer name
By default, the printer name is set to the model name of the printer. The printer name appears on the printer ID sign and in the Printix App. However, users will see the Print queue name on their computer and in the Printix Client. If, for example, two active print queues exist, you should name them so users will both know the physical printer and be able to determine the difference in purpose of the print queues.
Example:
-
Printer name Reception has two queues with the print queue names Reception and Reception Staple.
-
Reception is the general purpose and the one most frequently used of the two print queues.
-
Reception Staple has a print driver configuration that staples together sheets by default.
Instead of using the printer model as the default value for the printer name, the software can use alternatives. For example, the printer's hostname (works for HP) or the printer's device name (works for Lexmark). Contact Product Support if you are interested in this. Printix Support must enable populatePrinterName for you.
-
-
Model
The model name of the printer.
-
Serial number
The serial number of the printer. Select the Modify
icon if you want to add it, change it, and/or copy it to the
clipboard.
-
Printix ID
The unique ID (UUID) of the printer. Select the Copy
 icon to copy it to the clipboard.
Location
-
Location
Description of the printer's location.
Example: Head Office, Reception
Connection
-
MAC address
The hardware address of the printer.
-
Printer address
The printer's hostname or IP address. By default, print data is sent as RAW print through TCP port 9100.
To use a different protocol, port, or path, append one or more of the following special keywords to the printer address. You must include a space between the IP address and the first keyword. You can combine keywords.
- $$ipp:
-
Forces the IPP protocol, using the default TCP port 80.
- $$ipps:
-
Forces the IPPS protocol, using the default TCP port 443.
- $$lpr::
-
Forces the LPR (Line Printer Remote) protocol, using the default TCP port 515. Append the print queue name after the colon.
- $$port::
-
Forces a specific TCP port. Append the port number after the colon.
- $$path::
-
Forces a specific path in the IPP or IPPS URL, instead of the vendor-specific default path. Append the path after the colon. This keyword applies to the IPP and IPPS protocols only.
Examples:
-
RAW mode via TCP port 9100 (default)
Example: 192.168.1.94
-
RAW mode via another TCP port
Example: 192.168.1.94 $$port:9101
-
IPPS via TCP port 443
Example: 192.168.1.94 $$ipps
-
IPPS via another TCP port
Example: 192.168.1.94 $$ipps$$port:621
-
IPP via TCP port 80
Example: 192.168.1.94 $$ipp
-
IPP or IPPS with a specific path
Example: 192.168.1.94 $$ipps$$path:/ipp/print
-
LPR via TCP port 515
Example: 192.168.1.94 $$lpr:myqueue
-
LPR via another TCP port
Example: 192.168.1.94 $$lpr:myqueue$$port:712
-
Windows print queue via Printix Redirector (Printix Hybrid Cloud Print Enabler)
Example: \\computername\printqueuename
Appending, for example, $$ipps to the Printer address to manually configure protocol, port, and path overrides the selection of Protocol, Port, and Path.
-
Network
The name of the network the printer is on.
Site managers can only select networks belonging to managed sites.
-
SNMP configuration
The SNMP configuration. It is blank if the default SNMP configuration is used.
You can only select global SNMP configurations and SNMP configurations assigned to the selected network. If you select a network that does not contain all SNMP profiles of the selected SNMP configuration, the SNMP configuration field is set to the default SNMP configuration and becomes blank.
-
Protocol
The protocol (IPP, IPPS, LPR, RAW) used to send print data to the printer. Select the Modify
icon if you want to change it.
For printers registered before April 2021, you should select Contact printer to obtain and update the list of protocols supported by the printer. Prior to this, you should ensure the protocols are also enabled on the printer.
Registration
-
Features
Select Features to view the printer features.
Compare and adjust the following settings to match the printer capabilities:
-
Page description language
You can select or clear languages in the list, but the printer may still use a language that it supports even if it is cleared.
-
Color supported
-
2-sided supported
Select Save.
-
-
Contact printer
Select Contact printer if you need to replace a printer or just want to redo the registration of the printer in regards to:
-
MAC address: The hardware address obtained from the printer.
-
Model: The model name obtained from the printer.
-
Serial number: The serial number obtained from the printer.
-
Protocol: The protocols (IPP, IPPS, LPR, RAW) supported by the printer. Ensure the protocols are also enabled on the printer.
-
Features:
-
Page description language (PCL5, POSTSCRIPT, PCLXL, PDF, …)
-
Color supported
-
2-sided supported
-
If your Ricoh printer was installed without the Printix Client, you must obtain the registration parameters from this topic and manually enter them before the registration.
-
Card reader
-
Card reader information is only available if Printix Go is installed and a card reader is connected to the printer.
NFC tag
-
Select
Delete NFC tag to unregister the NFC tag.
Only available if the printer has been registered with an NFC tag.
- Select Yes.
ID sign
- Select Print printer ID sign.
- Use the browser to print the page with the printer ID signs.
- Mount the printer ID sign with QR code at the printer.
Report
- Select Download CSV report.
-
The downloaded file can be opened in a text editor.
The file name is: printername.csv.
The first row contains the column headings and the subsequent lines (one per day) contains the date and meter readings. If no readings have changed on a particular day, no line is written for that day.
-
Date: year, month, day
-
Toner levels: colorBlack, colorMagenta, colorCyan, colorYellow
-
Sheets: sheetsSimplex, sheetsDuplex, sheetsTotal
-
Impressions: impressionsMono, impressionsColor, impressionsTotal
-
Debug printer
Useful to collect events related to the printer, such as configuration modifications and user activity.
-
Select
Debug printer.
The Debug log dialog box appears.
- Select New debug session.
-
Select a duration for the session, then select
Begin debug session.
The new session appears in the debug log.
The program starts collecting events related to the printer, such as configuration modifications and user activity. The program keeps collecting events until someone cancels the session or the duration expires.
-
Optionally, you can cancel the session before the configured duration by selecting it in the debug log and selecting
End debug session.
Selecting Close closes the dialog box but it does not stop the session. After closing the dialog box, you can return at any time by selecting the session in the debug log.
-
Select
Download debug log to download the collected logs as a CSV file.
You can download the logs of any session, regardless whether it is ongoing or expired.
In the downloaded CSV file, error messages are written in English, and special characters in card names may be encoded with base 64.