
How to work with print driver configurations
Instead of using the print driver's factory default settings, you can add your own print driver configuration. When the printer is added on the user's computer, the configuration is added as well. That way, the user does not have to make these configuration changes. If you are satisfied with the print driver's factory defaults, you do not need to make a print driver configuration.
Watch this video: Printix Tutorial Series Part 5 - Working with print driver configurations.
The print driver configuration stores the Printing Defaults. It does NOT store Printing Preferences.
Print driver configuration consists of:
-
Device Settings
Specifies the availability of Installable Options (such as Paper trays, Duplexer, Staple, Hole punch, and Output bins), and for example, Form to tray Assignment. If the print driver is a Universal print driver, you may have to select a Configuration tab and perhaps also set the Printer model.
-
Printing Defaults
Open the Advanced tab and select Printing Defaults to configure per-printer defaults. Printing defaults include Advanced Document Settings (such as Print 2-sided and Print in black), and for example, Finishing Options.
See also:
How to add a new print driver configuration
Windows
![]()
Print driver configurations can be made using these methods:
-
Configure on computer: The print driver configuration is interactively configured on a computer in the Windows "Printer properties" dialog box of a temporarily added Windows printer.
-
The computer must be online and must be on the same network as the printer.
-
Print driver configurations are not applied if Windows protected print mode is enabled.
-
The print driver configuration is made interactively in the Windows "Printer properties" dialog box.
-
You and only you (same user as in Printix Administrator) must be signed in to Printix Client on the computer.
-
-
Upload from computer: The print driver configuration is uploaded from the selected Windows computer.
-
The computer must be online and the print queue must be installed on the computer already.
-
Print driver configurations are not applied if Windows protected print mode is enabled.
-
The print driver configuration is made in advance in the Windows "Printer properties" dialog box.
-
-
If you use Windows protected print mode, only the built-in Microsoft IPP Class Driver can be used regardless of the configured driver.
-
We do not recommend the use of Windows class drivers. Class drivers are not uploaded to the Printix driver store, because they are supposedly distributed with Windows, but availability may vary depending on the version of Windows. We recommend the use of the printer vendor supplied print drivers and universal print drivers, because these offer advanced features and better control compared to class drivers.
-
Use the Upload from computer method if you want to configure print driver provided document release (aka. Private print, Hold print, PIN print, …) or other account based features. The print drivers encrypt these sensitive settings based on the print queue name. Encryption is used with universal print drivers from: Konica Minolta and Toshiba.
Mac
![]()
-
Upload from computer: Print driver configuration is uploaded from the selected macOS computer.
-
The computer must be online and the print queue MUST be installed on the computer already.
-
The print driver configuration is made in advance with CUPS.
-
How to configure print driver configuration on a Windows computer
-
Open the
Print queue
properties
 page.
page.
-
Select the
Drivers
 tab.
tab.
-
Identify the
System.
Example: Windows 11 ×64
-
Select
Add a new configuration
 .
.
For best user experience, open Printix Administrator on the same computer you want to make the print driver configuration on.

-
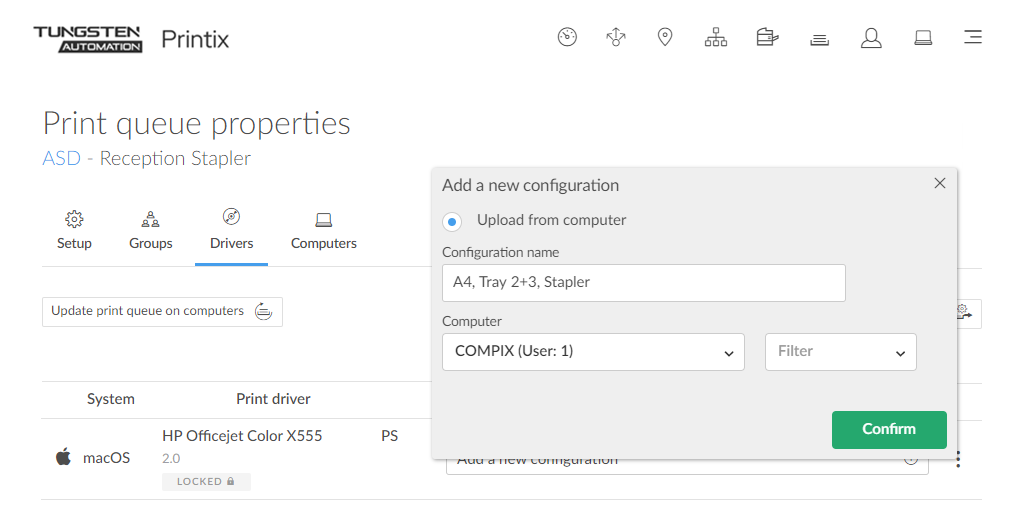
In the
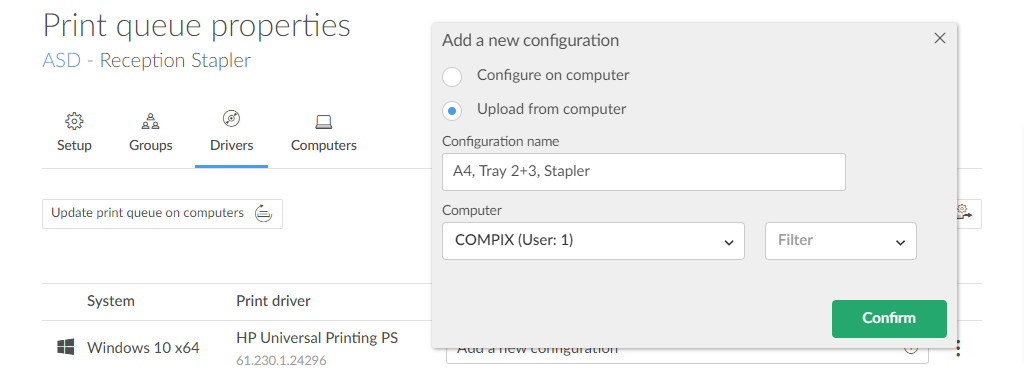
Add a new print driver configuration dialog box:
-
Select Configure on computer to make the configuration in a temporary printer's properties dialog.
-
Enter Configuration name.
Example: A4, Tray 2+3, Stapler
-
Select the Computer you want to use to make the configuration.
-
You and only you must be signed in to the computer.
-
You cannot select computers where other users are also signed in.
Example: COMPIX (Users: 2)
-
Only those computers are listed where the status of Protected print is Disabled or Unknown.
-
If the list of computers is empty, it is because you are not signed in to the Printix Client on a computer that matches the System (Windows 11 ×64), or Windows protected print mode is enabled on all computers where you are signed in.
-
For best user experience, open Printix Administrator on the same computer you want to modify the print driver configuration on.
If you are remotely signing in to the computer, we recommend that you also open Printix Administrator on the computer.
-
- Select Confirm.
-
On the computer
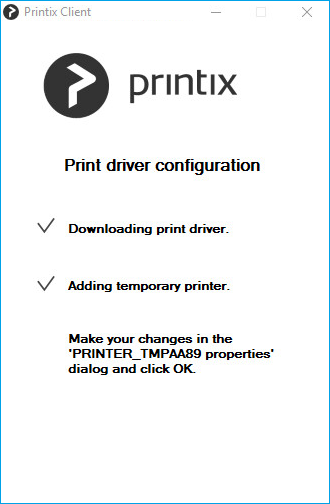
Printix Client, open the
Print driver configuration dialog box to show the progress:
-
Downloading print driver
This may take several minutes depending on the size of the print driver and the speed of your Internet connection.
-
Adding temporary printer
If the Print driver configuration dialog box closes unexpectedly, it could be because the print driver did not install in a timely manner. Wait a few minutes to allow the print driver to be installed and then try again. Inform Product Support if it still fails.
-
-
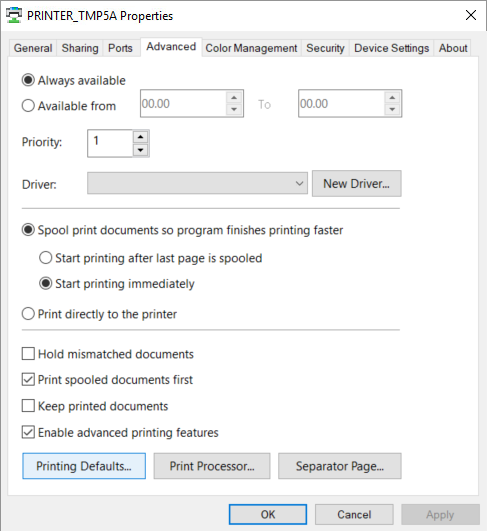
Make your changes in the
PRINTER_TMPxxxx properties dialog box.
Make sure to make your changes within 10 minutes, because the dialog box is closed automatically.
-
Your view of the dialog box may be blocked by other windows. Press Alt+Tab to switch between windows.
-
-
Open the
Device Settings tab to configure
Installable Options and
Form to Tray Assignment.
-
See Print drivers for detailed instructions.
-
-
Open the
Advanced tab and select
Printing Defaults to configure per-printer defaults.
-
See Print drivers for detailed instructions.
The print driver configuration stores the Printing Defaults. It does NOT store Printing Preferences.
-
-
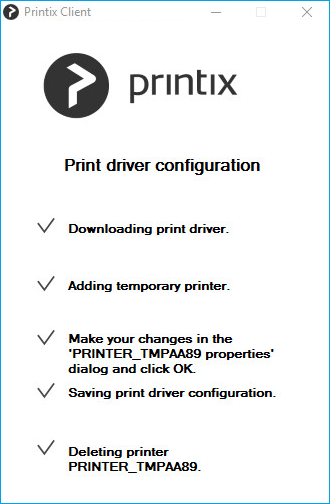
Select
OK.
-
Saving print driver configuration
The print driver configuration is uploaded to the Printix Cloud.
-
Deleting printer PRINTER_TMPxxxx
The temporary printer is removed from the computer.
-
-
In
Printix Administrator:
-
The print driver configuration is selected.
-
The print driver selection is locked
 .
.
-
- Use Update print queues to make the changes take effect on computers where the print queue is already installed.
How to upload print driver configuration from a Windows computer
The print driver configuration stores the Printing Defaults. It does NOT store Printing Preferences.
-
Open the
Print queue
properties
page.
-
Select the
Drivers
tab.
-
Identify the
System.
Example: Windows 11 ×64
-
Select
Add a new configuration
.
-
In the
Add a new print driver configuration dialog box:
-
Select Upload from computer.
-
Enter Configuration name.
Example: A4, Tray 2+3, Stapler
-
Select an online Computer you want to upload the configuration from.
-
The print queue must be installed on the computer already.
-
Only those computers are listed where the status of Protected print is Disabled or Unknown.
-
If the list of computers is empty, it is because Windows protected print mode is enabled on all computers where you are signed in.
-
-
Optionally, select Filter to filter on the type of computer (Desktop, Laptop, or Server).
-
-
Select
Confirm.
The print driver configuration is uploaded to the Printix Cloud.
-
In
Printix Administrator:
-
The print driver configuration is selected.
-
The print driver selection is locked
.
-
- Use Update print queues to make the changes take effect on computers where the print queue is already installed.
How to rename a print driver configuration
-
On the
Print queue properties page, select the
Drivers
tab.
-
Identify the
System.
Example: Windows 11 ×64
-
Select the
Modify
 icon.
icon.
- Edit the Configuration name.
- Select Save.
How to modify a print driver configuration
-
On the
Print queue properties page, select the
Drivers
tab.
-
Identify the
System.
Example: Windows 11 ×64
-
Select the
Setup
 icon.
icon.
-
In the
Modify print driver configuration dialog box, follow the same steps as in
How to add a new print driver configuration.
The print driver configuration stores the Printing Defaults. It does NOT store Printing Preferences.
How to delete a print driver configuration
-
On the
Print queue properties page, select the
Drivers
tab.
-
Identify the
System.
Example: Windows 11 ×64
-
Select the
Delete
 icon.
icon.
- Select Yes to delete the configuration.