How to create a workflow for email
- Select Menu .
-
Select the
Capture
workflows
 tab.
tab.
- Select Create workflow.
-
In the
Settings section:
-
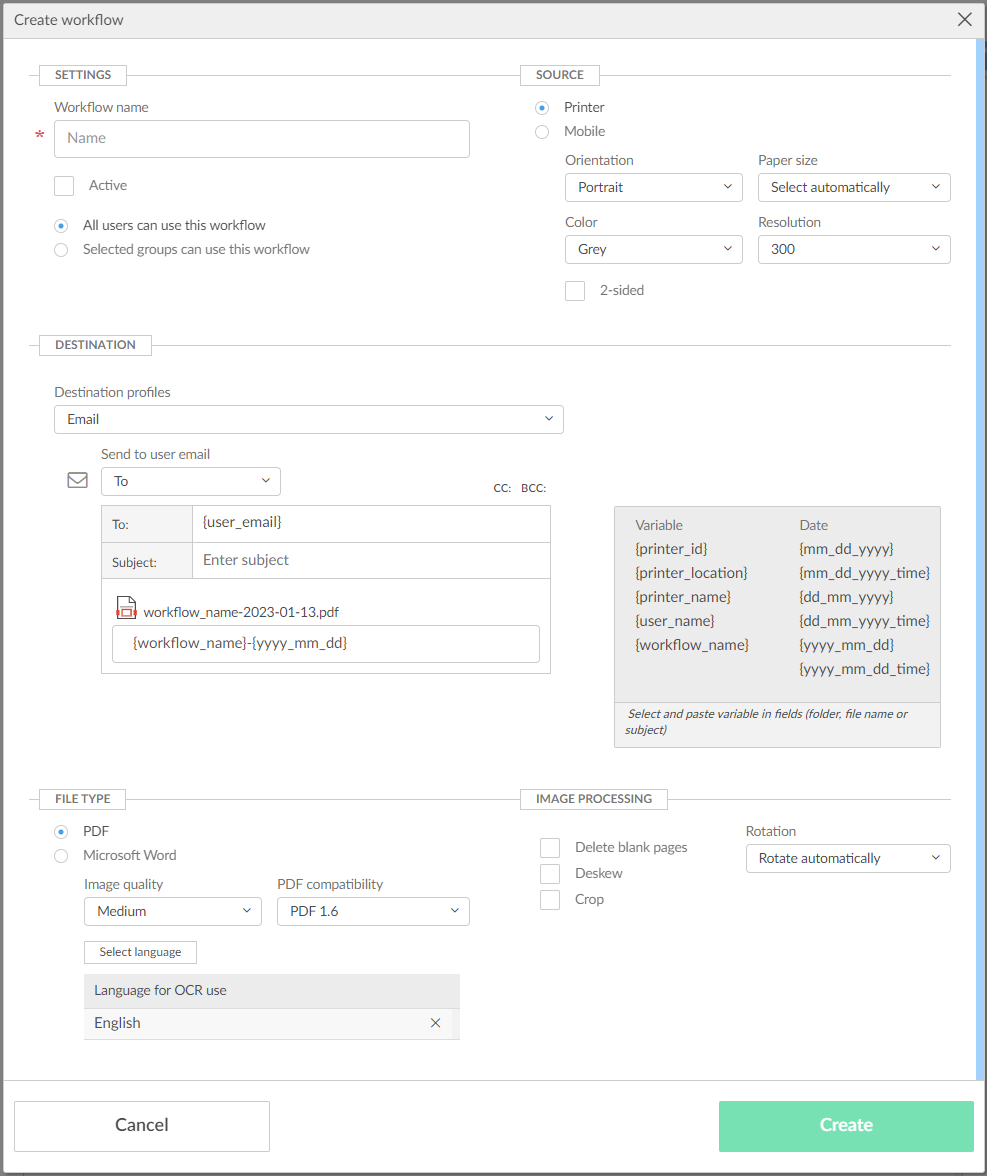
In Workflow name, enter the name of the workflow.
-
In Active, leave this cleared for now.
-
Leave All users can use this workflow selected for now.
-
When you have verified that the workflow works as expected, you can:
-
-
In the
Source section:
-
Select Printer for scanning of pages on printers with Printix Go and Printix Capture.
-
Make your selection for the printer scan settings: Orientation, Paper size, Color, Resolution, and 2-sided.
-
-
Select Mobile for a phone or tablet with the Printix App version 3.0.1 or higher installed.
-
-
In the
Destination section:
-
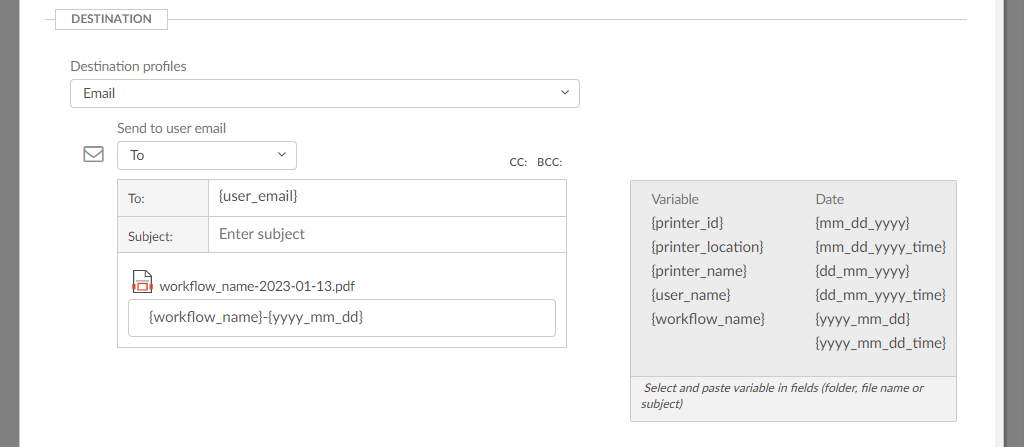
Leave Destination profiles on Email.
-
In Send to user email, leave it on To if the user is to receive the email, as represented by the variable {user_email}. Select CC or BCC if you would rather have the user be on copy or blind copy.
-
In To, there must be at least one email recipient. Use comma to separate multiple remail recipients.
-
Optionally, select CC. Leave it empty or enter one or more email recipients.
-
Optionally, select BCC. Leave it empty or enter one or more email recipients.
-
In Subject, enter an optional subject. It is possible to select and paste variables, such as {workflow_name}.
-
In File name, enter the file name. It is possible to select and paste variables, such as {workflow_name}.
-
Date and time are in UTC (Coordinated Universal Time).
-
To make sure that people outside your organization do not receive unwanted emails, email recipients must either be registered users in your Printix Home, or have an enabled authentication method (such as Microsoft Entra ID, Google, OIDC) and an email address with the domain of your organization (such as @acme.com). Self-registered users do not count as having an enabled authentication method.
If the same email recipient is listed multiple times, the user receives multiple emails.
-
-
In the
Output document section, select a
File type:
-
Select PDF - Searchable to generate the output document in a searchable PDF format.
-
In Image quality, select the image quality.
-
In PDF compatibility, select the PDF compatibility.
-
In Optimize OCR process for, select your preference for accuracy and speed.
-
In Language for OCR use, select Select language, then select the languages for OCR use.
-
-
Select PDF - Image only to generate the output document in an image-only PDF format.
-
In Image quality, select the image quality.
-
In PDF compatibility, select the PDF compatibility.
-
-
Select Microsoft Word to generate the output document in DOCX format.
-
In Image quality, select the image quality.
-
In Optimize OCR process for, select your preference for accuracy and speed.
-
In Language for OCR use, select one or more languages.
-
-
-
In the
Image processing section:
If Source is Mobile, image processing is controlled on the mobile.
-
In Delete blank pages, optionally, select this to have blank pages deleted.
-
In Rotation, select a rotation. The rotation is performed before any OCR.
-
In Deskew, optionally, select this to have captured images deskewed automatically.
-
In Crop, optionally, to have captured images cropped automatically.
-
- Select Create.
- Verify that the workflow works as expected.
- Activate the workflow.
- Optionally, make the workflow available to selected groups.


