
How to get started with Capture Connector API
The Printix Capture Connector API allows integration of third-party systems with Printix Capture by delegating the responsibility of document processing and delivery to custom systems.
For this, the Connector destination profile has been introduced. Using this, Printix can send an HTTP request to notify a custom service that new document should be processed and delivered. This notification contains information about the file to process.
The following figure shows how Printix and the connector communicate with each other to deliver documents to custom systems.
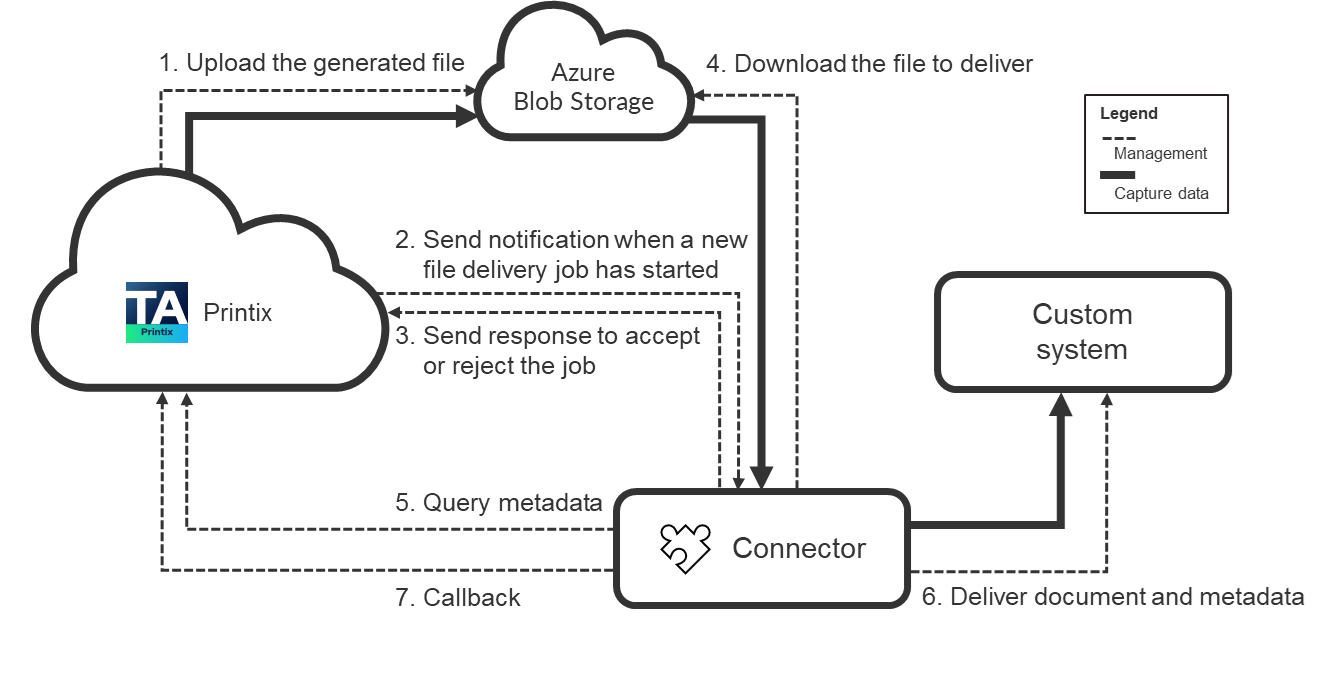
When a connector destination profile is assigned to a capture workflow, Printix first generates the output document with the desired file format (such as pdf or docx), then uploads this new file to the configured Azure Blob Storage and sends an HTTP POST notification to the connector indicating that a new file needs to be processed.
If Bypass output document generation is selected in the Workflow properties, the captured images are delivered to the configured Azure Blob Storage without modification and a notification is sent to the connector to process the new file.
The captured images are delivered in TIFF format, except in the following cases:
-
The file format is PDF if the Source setting is set to Printer and a Canon, Ricoh, or Brother printer is used.
-
The file format is JPG if the Source setting is set to Mobile.
At this point, the connector must respond to Printix with an HTTP 2xx status code if it is willing to process the file delivery job. If the connector returns this status code, Printix acknowledges that the connector took over the file delivery job and waits for a callback request of the file delivery (see FileDeliveryJobReady event).
In the meantime, the connector can optionally query capture workflow metadata from Printix (see Querying metadata).
After the processing is completed, the connector must send a callback request to Printix (see Callback after processing). In this request, the connector can indicate whether the processing was completed successfully or with errors. Based on this callback, Printix can release all resources related to the file delivery. If the connector does not send the callback request, Printix automatically closes the capture workflow with Timeout error and releases the resources associated with the file delivery job. The timeout period can be configured for the capture workflows which have assigned connector destination profile. The timeout value is 10 minutes by default and can be increased up to two hours.
Connector prerequisites
Two-way communication happens between Printix and the connector through HTTPS/HTTP.
Because of this, the connector must be hosted on a web server so that it can receive notification requests from Printix. The actual URL where the notification requests are sent can be configured in the Printix Administrator through the Connector URL parameter of connector destination profiles.
If the connector hosting web server is publicly available, Printix can send this notification request without any problems.
However, if the web server is available only in a specific private network, further configuration needs to be made:
-
At least one computer that is connected to the private network must run the Printix Client desktop application. This functions as a gateway between the Printix Cloud and the connector hosted on the private network.
-
Additionally, the proper network must be selected for the connector destination profile in Printix Administrator.
To ensure the authenticity of incoming requests, the Connector API relies on one of the following things, depending on the shared secret type of the related destination connector profile:
-
HMAC signatures based on the shared secret key
For this to work, both Printix and the connectors must implement the same signature calculation algorithm. Currently, two algorithms are supported: HMAC SHA-256 and HMAC SHA-512. The actual algorithm used for the signature calculation depends on the shared secret type of the related destination connector profile (HMAC SHA-256 or HMAC SHA-512). Connectors need to implement only one of the supported signature calculation algorithms.
-
The shared secret key itself without any signatures
For this to work, both Printix and the connectors must send the shared secret key in the requests, and the shared secret type must be configured as Connector Token in the related destination connector profile at Printix side.
The shared secret keys with the correct type can be generated as part of the connector destination profile configuration. The generated secrets must be copied to the connector's configuration by an administrator.
The connector's developer and administrators must ensure that the shared secret keys are always kept secure.
Request verification using shared secret based HMAC signatures
An HTTP message is considered signed if it contains ALL the following custom HTTP headers:
-
X-Printix-Request-Id
-
X-Printix-Timestamp
-
X-Printix-Signature
When a request arrives to the connector, the X-Printix-Signature custom HTTP header contains the signature. This signature value is calculated using the previously exchanged shared secret key and some details of the HTTP request. If the signature calculated by the connector for the incoming HTTP request matches the signature in the X-Printix-Signature header, the request is considered valid, and must be processed. Otherwise, the HTTP request is invalid, and the connector must not process it.
Signatures are calculated from the following input:
-
SecretKey: This is a Base-64 encoded random byte array. For the HMAC SHA-256 algorithm, the array contains 32 bytes (256 bit). For the HMAC SHA-512 algorithm, the array contains 64 bytes (512 bit). The connector must use the same Base-64 encoded value that is specified for the connector destination profile with HMAC SHA-256 or HMAC SHA-512 shared secret type in Printix Administrator. The secret key value must be managed and stored securely, should not be written to the log without redacting.
-
Request ID: The request sender must generate a new UUID for every request. This can be used for logging and to find the related activity on both the connector and the Printix side.
-
Timestamp: The request sender must get the current time in Unix Epoch format. This value represents the number of seconds passed since January 1st, 1970, at 00:00:00 UTC.
-
The HTTP method verb and the request URI path without the host name, port, and schema.
-
The full request body.
In case of the HMAC SHA-256 algorithm, the signature can be calculated like this:
StringToSign = RequestId + "." + Timestamp + "." + Method + "." + RequestPath + "." + RequestBody
Signature = Base64 ( HMAC SHA-256( SecretKey, UTF-8-Encoding-Of( StringToSign ) ) )
In case of the HMAC SHA-512 algorithm, the signature can be calculated like this:
StringToSign = RequestId + "." + Timestamp + "." + Method + "." + RequestPath + "." + RequestBody
Signature = Base64 ( HMAC SHA-512( SecretKey, UTF-8-Encoding-Of( StringToSign ) ) )-
RequestId is the value of the X-Printix-Request-Id HTTP header.
Example: b09a9408-90fd-4eb0-b7d8-e88f3ec53e73
-
Timestamp is the value of the X-Printix-Timestamp HTTP header.
Example: 1700257249
-
Method is the lowercase HTTP verb of the request.
Example: post
-
RequestPath is the path and query parameters of the request URI. To get this value, the request schema (https), the hostname, and the port must be removed from the request URI.
Example: If the request URI is https://host.domain.com:5001/networkshare?profile=a&options=1, the related RequestPath value is this:
/networkshare?profile=a&options=1
-
RequestBody is the raw request body as string.
-
SecretKey is the shared secret key copied from Printix Administrator and stored in the connector's configuration securely.
Request senders must:
-
Set the X-Printix-Request-Id header to the generated RequestId value that was used during the signature calculation.
-
Set the X-Printix- Timestamp header to the Timestamp value that was used during the signature calculation.
-
Set the X-Printix-Signature header from the calculated Signature.
Request verifiers must:
-
Calculate the signature using the above-described algorithm.
-
If the calculated signature matches with the value received in the X-Printix-Signature header, the message can be considered valid.
-
Otherwise, the message must be rejected.
On some platforms, querying the URI of the currently received request is not possible. To allow integration with such platforms, Printix additionally sends the RequestPath value used for signature calculation in the X-Printix-Request-Path header. Using the value of this header for signature calculation should be avoided if the current request URI can be queried from the connector hosting platform.
When the connector sends a request to Printix, it must not add the X-Printix-Request-Path header in the request. This header is sent only by Printix for connectors that have no access to the current request URI.
Example for HMAC SHA-256
Input
| Parameter | Value |
|---|---|
| Secret | PMB3y4so+7XCXC4CavP+WjUhBAjQl+f5T2o4Ma1vRc4= |
| RequestId | 0c442a21-4cc9-4516-90a1-c94218111db9 |
| Timestamp | 1707229621 |
| Method | POST |
| RequestPath | /destination-connector/tenants/ef3aa41d-ab85-44e6-bf83-fbfbb527a0bb/fileDeliveries/c23e3a87-6897-468f-82b7-88fef0a07e5e/finish-dispatch |
| RequestBody | {} |
| StringToSign | 0c442a21-4cc9-4516-90a1-c94218111db9.1707229621.post./destination-connector/tenants/ef3aa41d-ab85-44e6-bf83-fbfbb527a0bb/fileDeliveries/c23e3a87-6897-468f-82b7-88fef0a07e5e/finish-dispatch.{} |
Result
| Header name | Value |
|---|---|
| X-Printix-Request-ID | 0c442a21-4cc9-4516-90a1-c94218111db9 |
| X-Printix-Timestamp | 1707229621 |
| X-Printix-Signature | 52dY+cmDL2qEcRwbEK96oOVxPfs6dnym5Zq3+8OAOkA= |
Example for HMAC SHA-512
Input
| Parameter | Value |
|---|---|
| Secret | ulZYM3hEopynzCPrNBkCsHTPC116+dRaL+6QczTzam/UNX8Ojd8Sk0E/BtcyartTvft7FFMCK11Rf5Q0Q99sng== |
| RequestId | 13044d14-6eb2-4d74-80ce-451faef78708 |
| Timestamp | 1707229979 |
| Method | POST |
| RequestPath | /destination-connector/tenants/ef3aa41d-ab85-44e6-bf83-fbfbb527a0bb/fileDeliveries/c23e3a87-6897-468f-82b7-88fef0a07e5e/finish-dispatch |
| RequestBody | {“errorMessage”:“File delivery error occurred.”} |
| StringToSign | 13044d14-6eb2-4d74-80ce-451faef78708.1707229979.post./destination-connector/tenants/ef3aa41d-ab85-44e6-bf83-fbfbb527a0bb/fileDeliveries/c23e3a87-6897-468f-82b7-88fef0a07e5e/finish-dispatch.{“errorMessage”:“File delivery error occurred.”} |
Result
| Header name | Value |
|---|---|
| X-Printix-Request-ID | 13044d14-6eb2-4d74-80ce-451faef78708 |
| X-Printix-Timestamp | 1707229979 |
| X-Printix-Signature | WofSX0Urk9×7KQVHdIsqCog6xojS+aOQ4QgTaaqZCUsqFXZJdfy0SFXyti6bAjUdDHLnWhESlC1/D7zMX+1pfw== |
Request verification using a shared secret with the Connector Token type
When a request arrives to the connector, the X-Printix-Token custom HTTP header contains the shared secret key. If the shared secret key stored by the connector matches the value in the X-Printix-Token header, the request is considered valid and must be processed. Otherwise, the HTTP request is invalid and the connector must not process it.
The shared secret key is a Base-64 encoded random byte array. The connector must use the same Base-64 encoded value that is specified for the connector destination profile with the Connector Token type in Printix Administrator. The secret key value must be managed and stored securely, should not be written to the log without redacting.
Request senders must:
-
Set the X-Printix-Token header to the Base-64 encoded shared secret key copied from Printix Administrator.
Request verifiers must:
-
Get the value received in the X-Printix-Token header of the request.
-
If the value matches with the shared secret key stored by the verifier, the message can be considered valid.
-
Otherwise, the message must be rejected.
Example
Printix request headers when using a shared secret with the Connector Token type
| Header name | Value |
|---|---|
| X-Printix-Request-ID | 0c442a21-4cc9-4516-90a1-c13428222ac7 |
| X-Printix-Timestamp | 1739923200 |
| X-Printix-Token | Abe6HO5Z/FaKfznisosnIJYCbQDMoSZsYGQ+LUL2jDe752rTKSfAR9Dn/CWe2d05PPn/yV7O53O0vJJHddTGgw== |
Zero-downtime key rotation
Shared secret keys can ensure the authenticity of HTTP requests. However, to keep this mechanism secure in the longer term, it is recommended to periodically replace the secret keys with new ones.
Ideally, the secret key change should be performed on both the Printix and the connector side at the same time. However, this task cannot be achieved simultaneously resulting in some system downtime. In this downtime period, the connector and Printix cannot communicate with each other, causing processing failure for the active FileDeliveryJobs.
In some systems, this downtime period may not be acceptable. Therefore, Printix supports a mechanism for zero-downtime key rotation. However, to take advantage of this feature, the connector must support this as well.
Zero-downtime key rotation when using shared secret based HMAC signatures
To support zero-downtime key rotation when using shared secret based HMAC signatures, both Printix and the connector must allow defining multiple secret keys for the connector profile. In this case, the sender must calculate the request's signature using ALL secret keys and then place the comma-separated list of calculated signatures to the X-Printix-Signature header. After this, the recipient must also calculate signatures for the incoming request using ALL configured secret keys. After this, the request should be considered valid if any of the calculated signatures is present in the list of signatures received in the X-Printix-Signature header.
To allow zero-downtime key rotation, the following steps must be performed:
-
Modify the connector destination profile in Printix Administrator and add a new secret key of type HMAC SHA-256 or HMAC SHA-512 to the profile.
-
Copy this new secret to the connector's configuration as well. Make sure that the old secret key is not yet removed.
-
Remove the old secret key from the connector destination profile.
-
Remove the old secret key from the connector's configuration.
To support zero-downtime key rotation:
-
The connector should be able to store multiple secret keys in its configuration.
-
The connector should always calculate the signatures using all secret keys. The calculated secret keys must be concatenated using comma characters, and this comma-separated list of signatures should be set to the X-Printix-Signature header as usual.
-
The signature verification must be modified a bit. The message should be considered valid if ANY of the comma-separated signatures received in the X-Printix-Signature header matches ANY of the calculated signatures.
What makes this algorithm functional is that at the time when the old secret key is removed from one side, both parties already have the new shared secret key that they can use for communication. So, from this point on, the old secret key can be removed from the other side as well.
Zero-downtime key rotation when using a shared secret with the Connector Token type
To support zero-downtime key rotation when using a shared secret with the Connector Token type, both Printix and the connector must allow defining multiple secret keys for the connector profile. In this case, the sender must place the comma-separated list of ALL secret keys to the X-Printix-Token header. After this, the recipient must verify the secret keys in the X-Printix-Token header of the incoming request. After this, the request should be considered valid if any of the shared secrets stored by the recipient is present in the list of shared secrets received in the X-Printix-Token header.
To allow zero-downtime key rotation, the following steps must be performed:
-
Modify the connector destination profile in Printix Administrator and add a new secret key with the Connector Token type to the profile.
-
Copy this new secret to the connector's configuration as well. Make sure that the old secret key is not yet removed.
-
Remove the old secret key from the connector destination profile.
-
Remove the old secret key from the connector's configuration.
To support zero-downtime key rotation:
-
The connector should be able to store multiple secret keys in its configuration.
-
The connector must concatenate all secret keys using comma characters, and this comma-separated list of secret keys should be set to the X-Printix-Token header as usual.
-
The verification must be modified a bit. The message should be considered valid if ANY of the comma-separated secret keys received in the X-Printix-Token header matches ANY of the secret keys stored in the configuration.
What makes this algorithm functional is that at the time when the old secret key is removed from one side, both parties already have the new shared secret key that they can use for communication. So, from this point on, the old secret key can be removed from the other side as well.
FileDeliveryJobReady event
After Printix generated a new document from the scanned pages, it notifies the connector that a new document is ready to be processed. For this, an HTTP POST request is sent to the URL configured for the connector destination profile.
In the request body of this HTTP POST request, Printix sends the following JSON object:
{
   "eventType": "string",
   "jobId": "string",
   "scanId": "string",
   "fileName": "string",
   "callbackUrl": "string",
   "documentUrl": "string",
   "metadataUrl": "string",
   "metadataNames": ["string"]
}-
eventType: This indicates the type of event about which Printix sent the notification. For now, this will always be FileDeliveryJobReady. However, in the future, Printix may send notifications about other events as well, that is why this property has been introduced.
-
jobId: A UUID representing the unique identifier of the file delivery job. This can be useful for logging.
-
scanId: A UUID representing the unique identifier of the capture workflow to which the file delivery job belongs. This can be useful for logging.
-
filename: The name of the file to be created at the connector's target including its extension.
If a file with this name already exists at the target, it is the connector's responsibility to manage this file name collision.
- callbackUrl: The URL where the connector should send an HTTP POST request once the processing of the FileDeliveryJob is done. For more details, see Callback after processing.
-
documentUrl: The URL from where the connector can download the binaries of the file to deliver. Currently, this is an Azure Blob Storage SAS token URL.
-
metadataUrl: The URL from where the connector can query metadata for the job. For more details, see Querying metadata.
-
metadataNames: A string array that contains the names of all available metadata that belong to the job.
If a custom metadata has the Lookup type, the Key and Value properties of the metadata value appear as metadata names in "<metadata name>_<key or value>" format.
Example: Project_key, Project_value
In the example, "Project" is the metadata field name, while "key" and "value" refer to the Key and Value properties of the metadata value.
When the connector receives this notification from Printix, it first needs to verify if the request is valid based on the request's signature or the shared secret, as described above.
If the request is invalid, an HTTP 401 (Unauthorized) response must be sent and the job must be rejected. If the request is valid, the connector can still decide based on custom business logic whether it accepts or rejects the job.
If the job is accepted, an HTTP 2xx response should be sent, and the job should be added to the connector's internal processing queue for later processing. This is needed because the actual processing can take several minutes but Printix expects the response for the notification message to arrive in a few seconds. If the job is rejected, an HTTP 4xx or 5xx error status code should be sent with some details about the reason for the rejection in the response body.
Example
Request (when using shared secret based HMAC signatures):
POST /networkshare/123e4567-e89b-42d3-a456-556642440000 HTTP/1.1
Host: connector.domain.com:5000
X-Printix-Request-Id: 18d7611c-1323-4197-9de4-7a599153d228
X-Printix-Timestamp: 1738762920
X-Printix-Signature: CU/U2Z0Ml+QjU7gQBn5NS8qszhJuH5PBhYjs4zEBThs=
Content-Type: application/json
Content-Length: 1147
{
  "eventType": "FileDeliveryJobReady",
  "jobId": "3db15c16-9165-4e86-bf00-daafadad05f8",
  "scanId": "f8071deb-ef5e-4c18-94ea-ced453e6dc76",
  "fileName": "Test Document.pdf",
  "callbackUrl": "https://api.printix.net/destination-connector/tenants/762c733c-ff00-49aa-b350-50b59cae9366/fileDeliveries/3db15c16-9165-4e86-bf00-daafadad05f8/finish-dispatch",
  "documentUrl": "https://ptx.blob.core.windows.net/00000000-0000-0000-0000-000000000000/scans/f8071deb-ef5e-4c18-94ea-ced453e6dc76/activities/7f1191d2-c59e-408d-ae0e-8a2ce4e97fea/ff17bdf9-4fbc-4eb6-86b9-455315143250?sig=a3bn77r0rqpHhneKhM%2BszZ7DP6ivbbl6dlQCkuZxi3Y%3D&st=2025-02-02T13%3A10%3A04Z&se=2025-02-02T14%3A25%3A04Z&sv=2019-02-02&rscd=attachment%3B%20filename%3D%22Test%20Document-Example.pdf%22&sp=r&sr=b",
  "metadataUrl": "https://api.printix.net/destination-connector/tenants/762c733c-ff00-49aa-b350-50b59cae9366/fileDeliveries/3db15c16-9165-4e86-bf00-daafadad05f8/metadata?query=",
  “metadataNames”: ["deviceId", "deviceLocation", "deviceModelName", "userName", "userEmail", "workflowName", "workflowStartTime", "ClientID", "MatterNumber", "Department", "Description", "Project_key", "Project_value"]
}
Request (when using a shared secret with the Connector Token type):
POST /networkshare/123e4567-e89b-42d3-a456-556642440000 HTTP/1.1
Host: connector.domain.com:5000
X-Printix-Token: Abe6HO5Z/FaKfznisosnIJYCbQDMoSZsYGQ+LUL2jDe752rTKSfAR9Dn/CWe2d05PPn/yV7O53O0vJJHddTGgw==
Content-Type: application/json
Content-Length: 1147
{
  "eventType": "FileDeliveryJobReady",
  "jobId": "3db15c16-9165-4e86-bf00-daafadad05f8",
  "scanId": "f8071deb-ef5e-4c18-94ea-ced453e6dc76",
  "fileName": "Test Document.pdf",
  "callbackUrl": "https://api.printix.net/destination-connector/tenants/762c733c-ff00-49aa-b350-50b59cae9366/fileDeliveries/3db15c16-9165-4e86-bf00-daafadad05f8/finish-dispatch",
  "documentUrl": "https://ptx.blob.core.windows.net/00000000-0000-0000-0000-000000000000/scans/f8071deb-ef5e-4c18-94ea-ced453e6dc76/activities/7f1191d2-c59e-408d-ae0e-8a2ce4e97fea/ff17bdf9-4fbc-4eb6-86b9-455315143250?sig=a3bn77r0rqpHhneKhM%2BszZ7DP6ivbbl6dlQCkuZxi3Y%3D&st=2025-02-02T13%3A10%3A04Z&se=2025-02-02T14%3A25%3A04Z&sv=2019-02-02&rscd=attachment%3B%20filename%3D%22Test%20Document-Example.pdf%22&sp=r&sr=b",
  "metadataUrl": "https://api.printix.net/destination-connector/tenants/762c733c-ff00-49aa-b350-50b59cae9366/fileDeliveries/3db15c16-9165-4e86-bf00-daafadad05f8/metadata?query=",
  “metadataNames”: ["deviceId", "deviceLocation", "deviceModelName", "userName", "userEmail", "workflowName", "workflowStartTime", "ClientID", "MatterNumber", "Department", "Description", "Project_key", "Project_value"]
}
Response:
HTTP/1.1 200 OK
Content-Length: 0
Querying metadata
Connectors can optionally query metadata related to the capture workflow of the file delivery job. For this, an HTTP GET request should be sent to the "metadataUrl" received in the request body of FileDeliveryJobEvent. You must add one of the following to the end of the string received in the "metadataUrl" property:
-
A comma-separated list of metadata names that the connector requires.
-
An asterisk (*) to query all custom metadata configured for the capture workflow of the file delivery job.
-
Two asterisks (**) to query all system and custom metadata configured for the capture workflow of the file delivery job.
When using shared secret based HMAC signatures, the request must include valid signatures, including the X-Printix-Request-Id, X-Printix-Timestamp, and X-Printix-Signature headers. Alternatively, when using a shared secret with the Connector Token type, the X-Printix-Token header of the request must contain valid shared secrets. By default, the response data is formatted as a JSON array (list). To receive the metadata in JSON object format, include the format request query parameter with the value object in the metadataURL (format=object).
The list of available system metadata names:
-
deviceId: This refers to the 3-letter unique identifier of the device.
-
deviceLocation: The name of the location where the device is.
-
deviceModelName: The full name of the device model.
-
username: The display name of the user who logged in at the device.
-
userEmail: The email address of the user who logged in at the device.
-
workflowName: The display name of the capture workflow to which the file delivery job belongs to.
-
workflowStartTime: The capture workflow's start date and time in UTC. The value is formatted according to ISO 8601.
Example 1: Using shared secret based HMAC signatures and getting metadata in JSON array (list) format when the required metadata names are specified
Request:
GET /destination-connector/tenants/762c733c-ff00-49aa-b350-50b59cae9366/fileDeliveries/3db15c16-9165-4e86-bf00-daafadad05f8/metadata?query=deviceModelName,userName,workflowName,ClientID,MatterNumber,Project_key HTTP/1.1
Host: api.printix.net
X-Printix-Timestamp: 1738762930
X-Printix-Request-Id: 79889b6e-0a94-4e3d-8582-003ed1ecf1b3
X-Printix-Signature: 2fRd5QgSDzznJ1MAsK99jhiPpzQPE2/nSVs9Oe7dAl4=
Response:
{
    "metadata": [
        {
            "name": "deviceModelName",
            "value": "HP Color LaserJet MFP E87740"
        },
        {
            "name": "userName",
            "value": "John Doe"
        },
        {
            "name": "workflowName",
            "value": "Send to Connector"
        },
        {
            "name": "ClientID",
            "value": "1456"
        },
        {
            "name": "MatterNumber",
            "value": "15"
        },
        {
            "name": "Project_key",
            "value": "P-2564"
        }
    ]
}
Example 2: Using shared secret based HMAC signatures and getting all system and custom metadata in JSON object format
Request:
GET /destination-connector/tenants/762c733c-ff00-49aa-b350-50b59cae9366/fileDeliveries/3db15c16-9165-4e86-bf00-daafadad05f8/metadata?query=**&format=object HTTP/1.1
Host: api.printix.net
X-Printix-Timestamp: 1738762930
X-Printix-Request-Id: 79889b6e-0a94-4e3d-8582-003ed1ecf1b3
X-Printix-Signature: 2fRd5QgSDzznJ1MAsK99jhiPpzQPE2/nSVs9Oe7dAl4=
Response:
{
    "deviceId": "ASD",
    "deviceLocation": "New York Office",
    "deviceModelName": "HP Color LaserJet MFP E87740",
    "userEmail": "john.doe@company.com",
    "userName": "John Doe",
    "workflowName": "Send to Connector",
    "workflowStartTime": "2025-02-05T13:41:30.818Z",
    "ClientID": "1456",
    "MatterNumber": "15",
    "Department": "Legal",
    "Description": "Revision to Agreement",
    "Project_key": " P-2564",
    "Project_value": "NexGen"
}
Example 3: Using a shared secret with the Connector Token type and getting all custom metadata in JSON array (list) format
Request:
GET /destination-connector/tenants/762c733c-ff00-49aa-b350-50b59cae9366/fileDeliveries/3db15c16-9165-4e86-bf00-daafadad05f8/metadata?query=* HTTP/1.1
Host: api.printix.net
X-Printix-Token: Abe6HO5Z/FaKfznisosnIJYCbQDMoSZsYGQ+LUL2jDe752rTKSfAR9Dn/CWe2d05PPn/yV7O53O0vJJHddTGgw==
Response:
{
    "metadata": [
        {
            "name": "ClientID",
            "value": "1456"
        },
        {
            "name": "MatterNumber",
            "value": "15"
        },
        {
            "name": "Department",
            "value": "Legal"
        },
        {
            "name": "Description",
            "value": "Revision to Agreement"
        },
        {
            "name": "Project_key",
            "value": "P-2564"
        },
        {
            "name": "Project_value",
            "value": "NexGen"
        }
    ]
}
Callback after processing
The actual processing of the FileDeliveryJob can mean anything from simply storing the file in an external system or even performing per page image processing, OCR, form recognition, and so on.
After the processing is done, the connector MUST send an HTTP POST request to the "callbackUrl" received in the request body of FileDeliveryJobReady event. When using shared secret based HMAC signatures, the request must have valid signatures, including the X-Printix-Request-Id, X-Printix-Timestamp, and X-Printix-Signature headers. Alternatively, when using a shared secret with the Connector Token type, the X-Printix-Token header of the request must contain valid shared secrets.
Additionally, connectors must send a JSON object in the request body with the following structure:
{
  "errorMessage": "string"
}-
errorMessage: A message that describes details about the error in case of failed processing. If this property is null, empty string or not present in the JSON, Printix assumes that the processing has been completed successfully.
The maximum length of the error message is 1000 characters.
Example
Request (when using shared secret based HMAC signatures):
POST /destination-connector/tenants/762c733c-ff00-49aa-b350-50b59cae9366/fileDeliveries/3db15c16-9165-4e86-bf00-daafadad05f8/finish-dispatch HTTP/1.1
Host: api.printix.net
X-Printix-Request-Id: b6e140de-99b0-4c29-8e17-68d6d15a0601
X-Printix-Timestamp: 1707147441
X-Printix-Signature: b373/37u+UWrW47VVCpYcRWnzzUIIn/sbquiMWGyUHc=
Content-Type: application/json
Content-Length: 28
{
  "errorMessage": null
}
Request (when using a shared secret with the Connector Token type):
POST /destination-connector/tenants/762c733c-ff00-49aa-b350-50b59cae9366/fileDeliveries/3db15c16-9165-4e86-bf00-daafadad05f8/finish-dispatch HTTP/1.1
Host: api.printix.net
X-Printix-Request-Id: b6e140de-99b0-4c29-8e17-68d6d15a0601
X-Printix-Timestamp: 1707147441
X-Printix-Token: Abe6HO5Z/FaKfznisosnIJYCbQDMoSZsYGQ+LUL2jDe752rTKSfAR9Dn/CWe2d05PPn/yV7O53O0vJJHddTGgw==
Content-Type: application/json
Content-Length: 28
{
  "errorMessage": null
}
Response:
HTTP/1.1 200 OK
X-Printix-Request-ID: b6035c41-928e-4a74-be94-732f88d1a623
Content-Length: 0