
Network ports

Secure communication
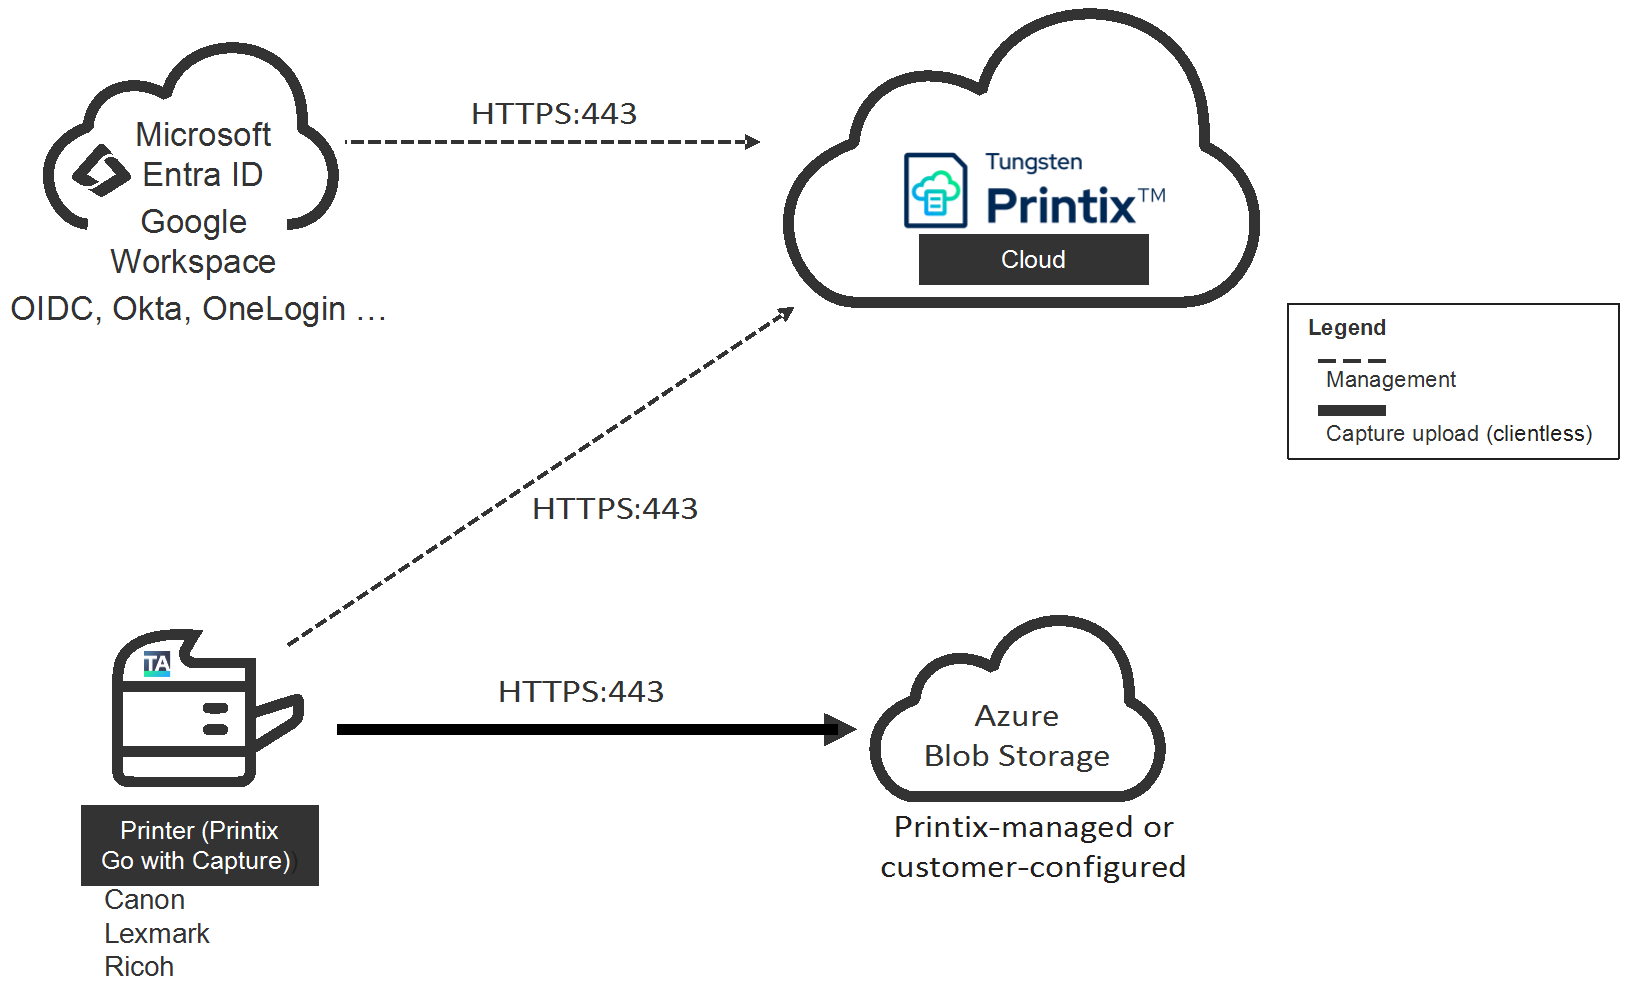
All Printix communication inside and outside the network is secured with encryption and the use of HTTPS (TLS). Documents are stored encrypted until they expire or get deleted. Documents do not need to leave your network.
-
HTTPS on TCP port 443
Secure browser communication between the components and identity providers, such as Microsoft Entra ID, Google Workspace, Okta, and OneLogin.
These ports must be open within the network:
-
SNMP on UDP port 161
Access and collect information from printers through SNMP. Both SNMPv1 and SNMPv3 are supported. ICMP message requests and replies must be allowed on the local network, because the ping command is used to discover printers.
-
RAW print on TCP port 9100
Transfer print data to the printers. Computers with Printix Client must be able to reach the printer on the network to allow printing. Print data can also be sent through:
-
UDP port 21337
Printix Discovery Protocol is used to find computers running Printix Client. Not encrypted.
-
UDP port 5353
If mobile print is enabled, and is to be used with iOS/iPadOS phones and tablets, then Printix Client will broadcast AirPrint printers with the Bonjour networking protocol (Multicast DNS).
The Printix Client requires these ports to be open on the local computer:
-
TCP port 21335
Secure communication with HTTPS to allow the PrintixService.exe to listen for print data from another Printix Client.
-
TCP port 21338
Secure communication locally on the computer between the PrintixClient.exe and PrintixService.exe processes.
-
TCP port 21339
Local communication with HTTP to allow the PrintixService.exe to listen for print data from the Windows Print Spooler (spoolsv.exe) and Mac CUPS (org.cups.cupsd).
By default, this port is not used. You can open this port with the EnableHTTPPrint Windows registry setting or Mac local setting.
-
TCP port 21343
Secure communication with HTTPS to allow the PrintixService.exe to listen for print data from the Windows Print Spooler (spoolsv.exe) and Mac CUPS (org.cups.cupsd), and listen for scanned documents from printers.

The Printix Redirector requires these ports to be open on the local computer:
-
TCP port 21336
Secure communication with HTTPS to allow the PrintixRedirector.exe to listen for print data from a Printix Client.
If Printix Go is in use, these ports must also be open within the network:
-
HTTP port 8091
Printix Client using HTTP to the Fujifilm printer to check the presence of the plug-in.
-
HTTPS port 58501
Printix Client using HTTPS to manage the plug-in configuration settings on Fujifilm printers.
-
TCP port 7627
SOAP communication from Printix Client to Printix Go on HP printers.
-
HTTPS on TCP port 443
Secure communication through HTTPS from Canon, Lexmark, and Ricoh printers with Capture directly to blob storage. The printers send scanned documents without Printix Client. Ricoh support applies only to Printix Go Ricoh 2025.4 or newer.
-
TCP port 21343
Secure communication through HTTPS from Printix Go printers with Capture to the Printix Client (see Capture and workflow in Features). Applies to Brother, HP, Konica Minolta, and Xerox printers. Does not apply to Canon, Lexmark, Ricoh, or Kyocera printers.
-
HTTPS on TCP port 8083
Secure communication through HTTPS from Printix Go printers with Capture on Kyocera printers to the Printix Client.
-
TCP port 50003
SOAP communication from Printix Client to Printix Go on Konica Minolta printers.
-
TCP port 51443
Secure communication through HTTPS from Printix Client for Windows to Printix Go on Ricoh printers. The communication happens during the installation, update, and uninstallation of Printix Go and is performed by the Printix Go Ricoh Installer (silently invoked by the Printix Client).
If Active Directory authentication is enabled, one of these ports must also be open within the network:
-
Secure LDAPS on TCP 636
Authentication of users with secure LDAPS.
-
LDAP on TCP port 389
Authentication of users with LDAP.
On Windows, the Printix Client automatically configures the required ports in the local Windows firewall. It does so by running the provided open_firewall.cmd file.
Internet endpoints that must be unblocked
Use of a web proxy and/or TLS inspection may prevent signing in to the Printix Client. Add the printix.net domain and its subdomains as exceptions to ensure traffic is not blocked.
The syntax for adding exceptions varies depending on the software you use. See your security software documentation to determine the syntax for specifying a domain and its subdomains. These are some common examples of the wildcard syntax:
-
*.printix.net
-
.printix.net
-
Unblocking (or whitelisting) must be based on URLs rather than IP address information, as the latter is subject to change.
-
If your Printix Home (example: ajax.us.printix.net) is hosted in the US data center, the required endpoints are different from what are listed here. See How to set up and use Printix from US data center.
The specific Internet endpoints that must be unblocked are as follows:
-
Required
These Internet endpoints must always be unblocked:
-
https://assets.printix.net
-
https://api.printix.net
-
https://auth.printix.net
-
https://sign-in.printix.net
-
https://drivers.printix.net
-
https://software.printix.net
-
wss://websocket.proxyendpoint.printix.net
-
-
Additionally required if documents go through the cloud
These Internet endpoints must also be unblocked if documents go through the cloud:
-
If you do not add your own cloud storage and just use the Printix-offered cloud storage:
-
https://prodenv2printjobs.blob.core.windows.net
-
If you add your own Azure Blob Storage, you need to include the URL referencing the account name (such as printixcloudstorage):
-
https://printixcloudstorage.blob.core.windows.net
-
-
If you add your own Google Cloud Storage, you need to include the URL referencing the bucket name (such as printix-cloud-storage):
-
https://storage.cloud.google.com/printix-cloud-storage
-
-
-
-
Additionally required if you use Printix Go
These Internet endpoints must also be unblocked if you use Printix Go:
-
https://device-api.printix.net
-
https://on-device-api.printix.net
-
https://on-device-printer-sign-in.printix.net
-
https://on-device-printer-release-documents.printix.net
These Internet endpoints must also be unblocked if you use Printix Go with Printix Capture:
-
https://on-device-capture.printix.net
-
https://mfp-device-capture.printix.net
-
-
Additionally required if you enable mobile print (Apple AirPrint)
These Internet endpoints must also be unblocked if you enable mobile print (Apple AirPrint):
-
https://airprint.printix.net
-
How does the Printix Client find the web proxy?
The Printix Client consists of two components:
-
The user interface of the Printix Client (PrintixClient.exe) which runs under the signed-in user's account.
-
The Printix Service (PrintixService.exe) which runs under the local system account, and handles the printing.
By default, the Printix Client uses the proxy settings of the signed-in user. To do that, it copies the proxy settings of the user to the LSA user (HKEY_USERS\S-1-5-18\Software\Microsoft\Windows\CurrentVersion\Internet Settings\Connections). That way, the Printix Service component can use the LSA user's proxy settings to communicate with the Printix Cloud even when no user is signed in.
You can use the "-p" command-line parameter to configure the Printix Service component to use a custom HTTP proxy setting for its communication. While the Printix Service component uses this custom proxy setting, the Printix Client stops copying the proxy settings of the signed-in user to the LSA user.
How to determine if TLS inspection is used
- Open a web browser and enter the URL.
-
Select the padlock icon to the left of the address.
If the certificate is intermediate, TLS inspection is used.
Troubleshooting
I have a web proxy and I cannot sign in to the Printix Client
When I sign in to the Printix Client with Microsoft, Google, or email, I return to the sign-in page.
Resolution: Add the required domains as exceptions so traffic is not blocked.
See also: Sign-in issues
I have a web proxy and I cannot sign in to Printix applications
I cannot sign in to Printix applications (such as the Printix Client) on a Windows computer, and Printix is seemingly offline.
Resolution: Ensure that communication through the web proxy is working correctly, including correct proxy authentication configuration.
Printix does not support NTLM authentication. Ensure that it is disabled.
I have a web proxy and I cannot install my printer
Print drivers cannot be downloaded from the Printix driver store.
Resolution: Unblock the Internet endpoint https://drivers.printix.net.
I do not recognize the used web proxy
In this case, the PrintixService.log file contains text such as "running with proxy1: http://172.23.100.13:8080/" and "Unable to connect to the remote server."
Resolution: Check if the web proxy is part of the PAC file and if it should be updated or deleted.
I have disabled the web proxy, but the computer still does not act as proxy
In this case, the PrintixService.log file may contain errors such as "Proxy: Error event" and "Exception: proxy error."
Resolution: Follow the steps below to delete settings from the Windows Registry.
-
Press
Windows+R.
The Run dialog box appears.
-
Type
regedit, then select
OK.
Select Yes if prompted.
The Registry Editor appears.
- Browse to HKEY_USERS\S-1-5-18\Software\Microsoft\Windows\CurrentVersion\Internet Settings\Connections.
- Delete the two entries called DefaultConnectionSettings and SavedLegacySettings.
- Restart the computer.
- Sign in to the Printix Client again.
I cannot print through the cloud
Use of a web proxy and/or TLS inspection may require additional Internet endpoints to be unblocked.
Resolution: Unblock the required Internet endpoints to print through the cloud.