
How to add Google Cloud Storage
Enable storage of pending documents in your secure cloud storage. That way, the user's computer does not need to be online to release Print Later and Print Anywhere documents. However, a Printix Client still needs to be online on the printer's network to release the documents.
Create a role
- Open a new browser window and sign in to Google Cloud Platform (console.cloud.google.com) using your work account credentials.
- In Google Cloud Platform, select the Navigation menu and select IAM & admin, and then Roles.
- On the Roles blade, select Create role.
-
In
Create role:
-
In Title, enter the name of the role.
Example: printix storage
-
In Role launch stage, select General availability.
-
-
Select
Add permissions.
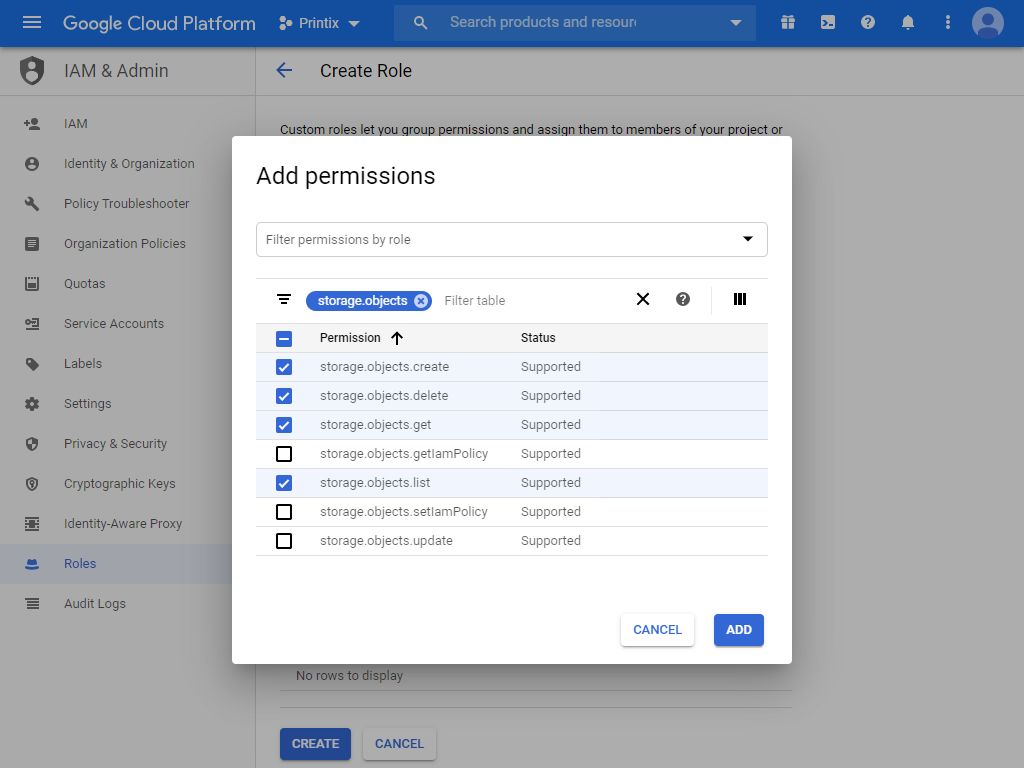
- In Filter, type storage.objects and press Enter.
-
Select the
Permissions:
-
storage.objects.create
-
storage.objects.delete
-
storage.objects.get
-
storage.objects.list
-
- Select Add.
- Select Create.
Create a service account
- In Google Cloud Platform, select the Navigation menu and select IAM & admin, and then Service accounts.
- On the Service accounts blade, select Create service account.
-
In
Service account details:
-
In Service account name, enter the name of the service account.
Example: printix
-
Optionally, in Service account description, enter a description for the service account.
Example: printix cloud storage service account
-
- Select Create and continue.
-
In
Grant this service account access to project:
-
In Role, select the role you created in step 4 of creating a role (printix storage).
-
- Select Continue.
-
In
Grant users access to this service account:
-
Enter Service account users role.
-
Enter Service account admins role.
-
- Select Done.
-
Create a key as follows:
- Click on the created service account.
- Select the Keys tab.
- Select Create new key in the Add key list.
- Select JSON.
- Select Create.
The private key is saved to your computer and you need to paste the content of it later in step 6 of adding the Google Cloud Storage.
- Select Done.
Create a storage bucket
- In Google Cloud Platform, in the Navigation menu, select Cloud Storage.
- On the Browser blade, select Buckets.
- Select Create.
-
Enter your bucket information and select
Continue to complete each step:
-
Specify a Name, subject to the bucket name requirements. Enter, for example: printix-cloud-storage. You need to enter the name in step 5 of adding the Google Cloud Storage.
-
As Default storage class for the bucket, select Standard. Next, select a Location where the bucket data will be permanently stored.
-
Leave Access control model at Set object-level and bucket-level permissions.
-
Optionally, in Advanced settings, you can add bucket labels, set a retention policy, and choose an encryption method. Leave Encryption at Google managed keys.
-
- Select Create.
- In the Bucket details pane, select Permissions.
-
Select
Add members.
-
In New members, add the service account you created in step 3 of creating a service account.
Example: printix
-
Select roles. Scroll to Storage and then select Storage Object Creator.
-
Select Add another role. Scroll to Storage and then select Storage Object Viewer.
-
Select Save.
-
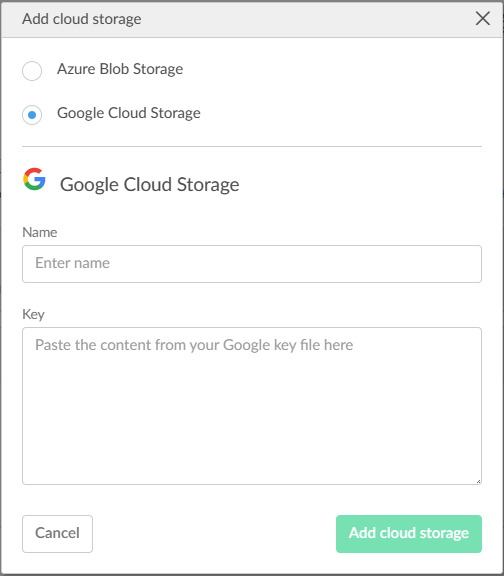
Add Google Cloud Storage
-
In
Printix Administrator, select
Menu
 > Settings
 .
.
-
Select the
Cloud storage
 tab.
tab.
- Select Add cloud storage.
- Select Google Cloud Storage.
-
In
Name, enter the bucket name you entered in step
4
of creating a storage bucket.
Example: printix-cloud-storage
- In Key, paste the content from your Google JSON Key File created in step 7 of creating a service account.
- If you do not want the cloud storage to be immediately usable, clear the Active check box, which is selected by default.
-
Optionally, modify the
Document sources field, which lists the sources where documents can come from.
The following document sources are available: Print Anywhere, Print Later, Via the cloud, Chrome print, Mobile print.
-
To modify the listed sources:
-
Select Select under the field.
The Select document sources dialog box appears.
The Available column lists the sources that are currently not active. The Selected column lists the sources that are active.
-
Select document sources in the Available column that you want to add.
-
Select document sources in the Selected column that you want to remove.
-
When you are satisfied with the selection, select Done.
-
-
To only remove a document source, you can also hover the cursor over it, then select the X that appears next to it.
-
-
Under
Available for sites, select the sites where the cloud storage should be available.
-
By default, the cloud storage is available on all sites.
-
If the cloud storage should only be available on specific sites:
-
Select All sites (or n site(s) if you want to change already selected sites).
The Select sites dialog box appears.
The Available column lists the sites that can be selected. The Selected column lists the selected sites.
-
Find and select the sites in the Available column that you want to add.
-
Select sites in the Selected column that you want to remove.
-
When you are satisfied with the selection, select Done.
-
-
If the cloud storage is only available on selected sites but you want it to be available on all sites, select n site(s), then remove all sites from the Selected column. After that, select Done.
-
- Select Add cloud storage.
-
Optionally, check type of pending documents you want to store.
If you use a web proxy and/or SSL inspection, you need to unblock the URL referencing the bucket name (For example: printix-cloud-storage): https://storage.cloud.google.com/printix-cloud-storage