
How to set up scan to email on Epson printers
After configured, you can sign in to the printer, select Scan and then the Email function.
Use the below steps to set up scan to email so users can scan and send emails to your company's Microsoft 365 or Office 365 mailboxes. The steps are in accordance with option 2, as described in Microsoft documentation: How to set up a multifunction device or application to send email using Microsoft 365 or Office 365.
- Open a new browser window and sign in to Microsoft 365 admin center (admin.microsoft.com).
- On the navigation menu, select Show all.
- Select Settings and then Domains.
-
On the
DNS records tab, select your domain.
Example: acme.com
-
Write down the MX record
POINTS TO ADDRESS value.
You need the MX record in step 9.
Example: acme-com.mail.protection.outlook.com - Open the printer's web page and select Administrator Login.
- Select the Network tab.
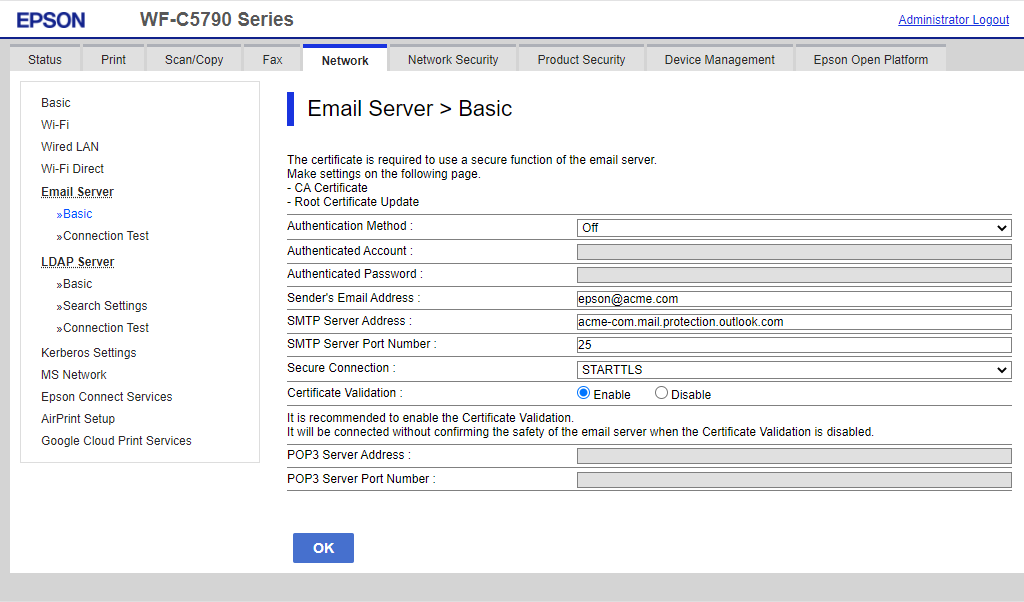
- In the menu under Email Server, select Basic.
-
On the
page:
-
In Authentication Method, select Off.
-
In Sender's Email Address, type a sender email address.
-
In SMTP Server Address, type the value you obtained in step 5.
Example: acme-com.mail.protection.outlook.com
-
In SMTP Server Port Number, leave the value at 25.
-
In Secure Connection, select STARTTLS.
-
In Certificate Validation, select Enable.
-
-
Select
OK.
After a few seconds, the message appears: Setup complete.
-
Select
Connection Test and then
Start to test the connection.
After a few seconds, the message appears: Connection test was successful.
- Remember to select Administrator Logout and then select OK to exit the printer's web pages.
-
Email might be sent to recipients' junk mail folders. To avoid this, go to your domain registrar's website to update your DNS records. Edit your sender policy framework (SPF) record to include your public IP address. See the Microsoft documentation: Step-by-step instructions for direct send.
-
If your email did not arrive, remember to check your spam/junk mail folder. See also: How to troubleshoot scan to email.
Email sender
When you are signed in with Printix, your email address is automatically prefilled in the From field. Some SMTP servers will reject sending the scanned documents if the email sender (From field) does not have a specific value. To work around this, you can specify the Email sender in the Go configuration.