
SNMP
On the SNMP tab, you can add, modify, and delete SNMP configurations. SNMP is only used to get/read information from printers. No set/write SNMP operations are performed.
To get here:
-
Select
Menu
 > Settings.
- Select the SNMP tab.
See also:
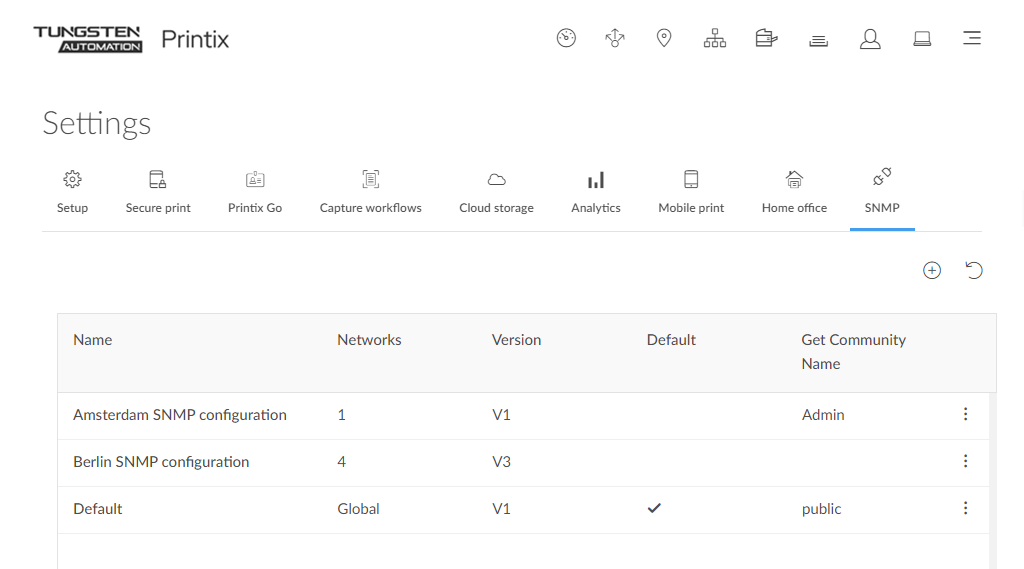
The list of SNMP configurations has the following columns:
-
Name: The configuration name.
-
Networks: Displays Global if the configuration is available to all networks. Otherwise, displays the number of assigned networks.
-
Printers: Displays the number of printers that use the configuration.
-
Version: Displays V1 or V3 depending on the configuration version.
-
Get Community Name: The community name of the printer.
The Default configuration is displayed with bold letters, and it has a bookmark icon next to its name.
The following functions are available:
-
Select the check boxes of multiple SNMP configurations to work with multiple SNMP configurations at the same time.
Select the check box in the header row to select all available check boxes. This option not available if none of the SNMP configurations have a check box.
The default SNMP configuration and configurations that cannot be deleted do not have a check box.
-
Select Plus
 to start adding a new SNMP configuration.
The Add SNMP configuration dialog box appears.
-
Select Refresh
 to reload the list of SNMP configurations.
The list is automatically refreshed after creating, updating, or deleting an SNMP configuration.
-
Select Search
 and enter the first few letters of an SNMP configuration to
search for it.
and enter the first few letters of an SNMP configuration to
search for it.
The search is not case-sensitive.
-
Select Filters, then select the appropriate option to apply filters.
-
Select Version, then select:
-
V1 to only display SNMPv1 configurations.
-
V3 to only display SNMPv3 configurations.
-
Clear filter to display both configurations.
-
-
Select Network, then select the appropriate networks.
-
If no network is selected, all configurations are displayed.
-
If at least one network is selected, those SNMP configurations are displayed that are available to at least one of the selected networks.
This includes configurations marked as Global, because they are available on all networks.
-
-
Select Globally available, then select:
-
Yes to only display SNMP configurations that are available to all networks.
-
No to only display SNMP configurations that are only available to specific networks.
-
Clear filter to display both configurations.
-
-
Select Clear all filters to display all configurations.
-
-
In the Networks column, select a number to display a dialog box with the list of assigned networks.
Each network is displayed together with its IP and MAC addresses.
You can select Networks
 to go to the
Networks page.
to go to the
Networks page.
-
Select a specific column title to sort by it:
-
Select Name to sort by name.
-
Select Version to sort by version. Items with the same version are automatically sorted by name.
-
Select Get Community Name to sort by community name. Items with the same community name are automatically sorted by name.
-
-
Select an SNMP configuration's Name or select More
 and
SNMP configuration to open the
SNMP configuration page.
and
SNMP configuration to open the
SNMP configuration page.
-
SNMP configurations can be deleted in multiple ways.
An SNMP configuration cannot be deleted if it is the default configuration or if it is used by at least one printer.
SNMP configurations that cannot be deleted do not have check boxes.
-
Select the check boxes of SNMP configurations and select Delete
 to delete SNMP configurations.
-
You can delete a single SNMP configuration by selecting More
and
Delete.
-
You can also delete a configuration after selecting More
and
SNMP configuration. See
SNMP configuration.
-
Site managers can add, modify, and delete SNMP configurations. However, it is limited what site managers can do.
-
Site managers can see the following SNMP configurations, which they can assign to printers:
-
SNMP configurations whose Network column displays Global
-
SNMP configurations that are available to at least one managed network
-
-
Site managers can add, select, modify, and delete the following SNMP configurations:
-
SNMP configurations that are only available to managed networks
-
Add SNMP configuration
When the Add SNMP configuration dialog box appears, select the version of the SNMP configuration to add:
-
Version 1
-
Version 3
Version 1
-
Configuration name
The name of the SNMP configuration.
-
Get Community Name
The default is public. On some printers, this may also be known as Community Name Read Only.
-
Set Community Name
On some printers, this may also be known as Community Name Read/Write.
-
Networks
-
If the configuration should be available to all networks, leave it as Global (default).
-
If the configuration should be available to specific networks only, select Select, then select the appropriate networks.
-
Version 3
-
Configuration name
The name of the SNMP configuration.
-
Username
The SNMP username can contain up to 31 characters in length and include any combination of alphanumeric characters (uppercase letters, lowercase letters, and digits). Space is not allowed.
-
Security level
Select one of the following security levels for communication:
-
No authentication and no privacy
-
Authentication and no privacy
-
Authentication and privacy
Depending on the selected security level, it is required to also configure Authentication and Privacy protocol.
-
-
Networks
-
If the configuration should be available to all networks, leave it as Global (default).
-
If the configuration should be available to specific networks only, select Select, then select the appropriate networks.
-
Authentication
-
Authentication protocol
Select one of the hashing algorithms:
-
SHA (Secure Hash Algorithm)
-
MD5 (Message-Digest algorithm 5)
-
-
Authentication key
The key used with the selected authentication protocol.
Privacy protocol
-
Privacy protocol
Select one of the encryption algorithms:
-
DES (Data Encryption Standard)
-
AES (Advanced Encryption Standard)
-
-
Privacy key
The key used with the selected privacy protocol.