
How to enable Microsoft Entra authentication
Enable this to allow users to sign in with their Microsoft work or school account and get single sign-on (SSO) to Printix. You just need a user account in Microsoft Entra ID to configure Microsoft Entra integration.
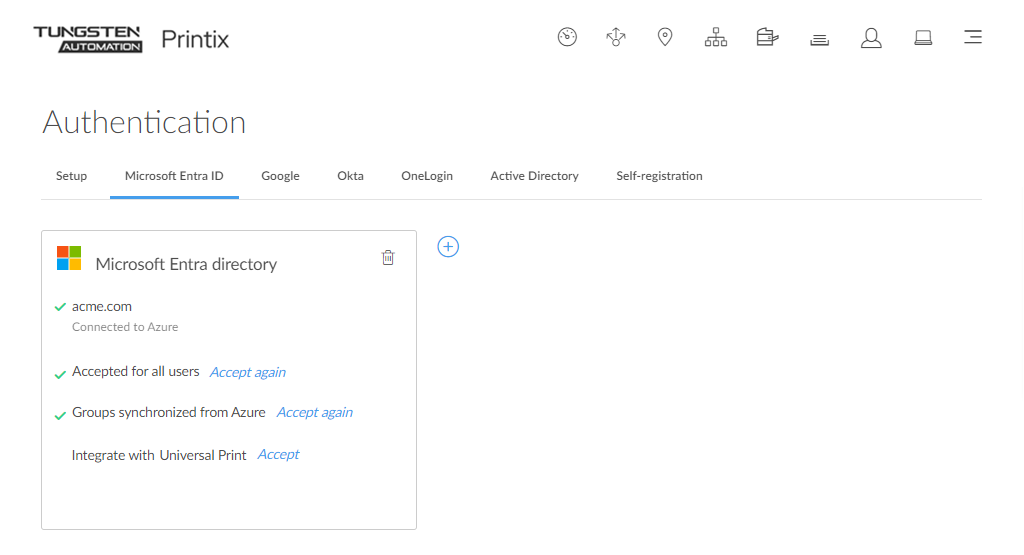
- On the Authentication page, select the Microsoft Entra ID tab.
- Select Connect.
-
On the Microsoft sign-in page:
-
Enter your work or school account.
-
Enter your password.
-
- Select Sign in.
-
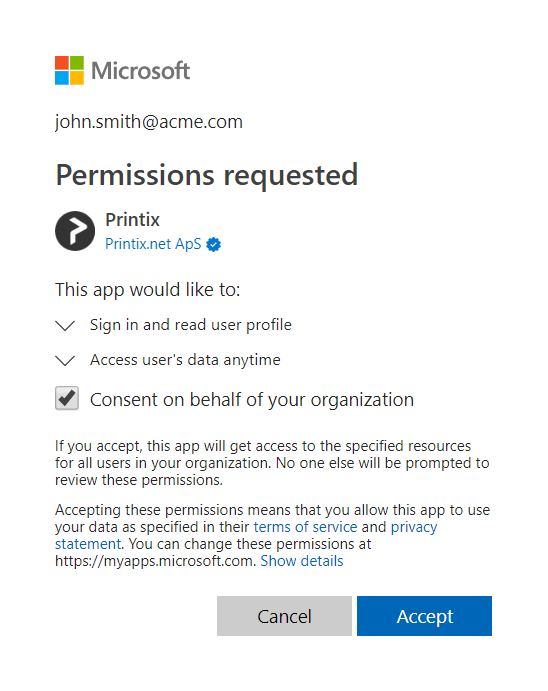
If prompted, select
Accept to grant permissions to Printix.
This is necessary for Printix to configure Microsoft Entra integration.
It is a known issue that Microsoft prompts you for permission to Maintain access to data you have given it access to even though Printix does not require offline access. You can read more about this issue here. For the sign-in process, Printix does not request (or get) a refresh token, only an access token, which is ignored. The only token actually used for signing in is the ID token, which contains user information (username and email). Printix stores this token, then checks the token signature to verify the token was granted by Microsoft Entra ID.
In Microsoft Azure, this adds the enterprise application Printix.
-
If you see the check box Consent on behalf of your organization, it is because you have the global administrator role in Microsoft Entra ID, and Printix has not yet been accepted for all users. Select Consent on behalf of your organization so Printix can have access to the specified resources for all users in your organization. Noone else is prompted.
-
-
Select
OK if the connection to Microsoft Entra ID was successful.
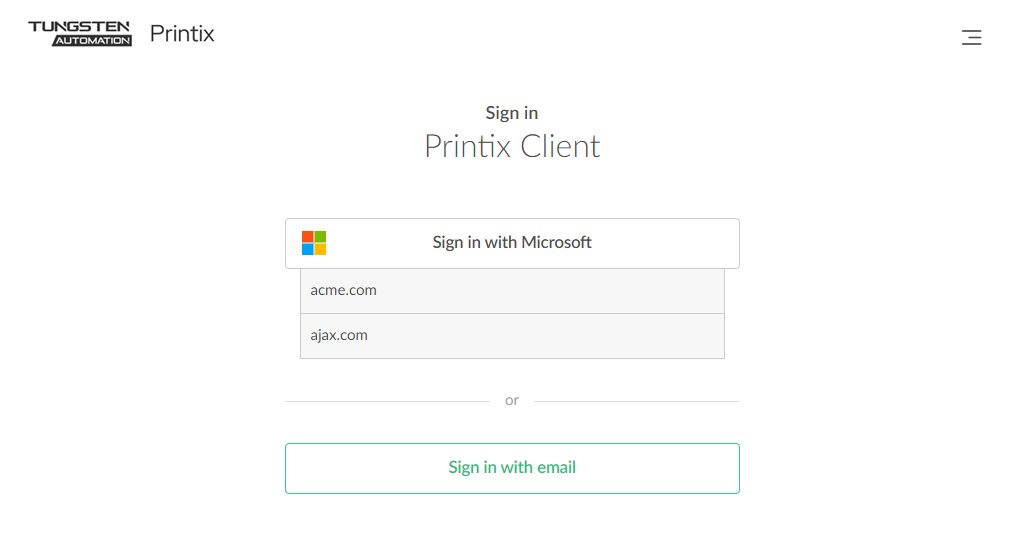
From now on, the sign-in page displays Sign in with Microsoft.
How to accept Printix for all users
-
Select
Accept next to
Accept for all users to grant permission to read users' profiles without prompting the
individual in your organization.
You must have the global administrator role in Microsoft Entra ID to do this.
-
On the Microsoft sign-in page:
-
Enter your work or school account. You must have the global administrator role in Microsoft Entra ID to grant permission to read users' profiles.
-
Enter your password.
-
- Select Sign in.
-
If prompted, select
Accept to grant permissions to Printix.
Noone else is prompted.
Subsequent deletion or modification of the used global administrator account in Microsoft Entra ID does not affect the already consented permissions.
If Printix is successfully accepted for all users, you see the message Accepted for all users.
- Optionally, remove the Sign in with email option.
How to revoke the acceptance of Printix
- Open a new browser window and sign in to Microsoft Azure (portal.azure.com) using your work account credentials.
- In the portal menu, select All Services.
- In the Identity category, select Microsoft Entra ID.
- In the left pane, select Enterprise applications.
-
Select the
Printix application.
You can use the search bar to quickly find this option.
- In the left pane, select Properties.
- Select Delete.
How to find out if the computer supports SSO
Open a command prompt as administrator and run the command: dsregcmd /status
- Select the Start icon and select in the Search box.
- Type cmd into the search box.
- Right-click Command Prompt in the search window and select Run as administrator.
- Type: dsregcmd /status
-
Scroll to the
SSO State section and look for:
-
AzureAdPrt: TRUE
If the AzureAdPrt value is FALSE, the computer is not Microsoft Entra joined and SSO (single sign-on) will not work.
-
If a group policy blocks Printix Client from running the dsregcmd command, you can modify Windows Registry to inform Printix Client that SSO is supported.
How to modify the Windows Registry to support SSO
-
Press
Windows+R.
The Run dialog box appears.
-
Type
regedit, then select
OK.
Select Yes if prompted.
The Registry Editor appears.
- Browse to HKEY_LOCAL_MACHINE\SOFTWARE\printix.net\Printix Client\.
-
Add the DWORD value named
ForceAzurePrt and give it the value 1 (0×00000001).
In the PrintixClient log file (PrintixClient- user . number .log), you can also search for the text:
-
Azure: Token available = True
SSO (single sign-on) will not work if you see:
-
Azure: Token available = False
-
How to add multiple directories
-
Select
Add
 to add another Microsoft Entra directory.
If more than one Microsoft Entra directories exist, sign-in to the Printix Client is no longer automatic the first time on Microsoft Entra joined Windows 10 and 11 computers. The user must select a directory (acme.com or ajax.com) and then sign in, but only the first time.
Troubleshooting sign-in
Sign-in page does not show: Sign in with Microsoft
Microsoft Entra authentication is not enabled.
Resolution: You may have forgotten to select Save after you connected to Microsoft Entra ID. If it still does not show, refresh the browser (Ctrl+F5).
Permission denied
After you select Accept for all users and Sign in, you get Permission denied.
Resolution: You must sign in with a global administrator role in Microsoft Entra ID after you select Accept for all users.
Not authorized. You do not have permission to use Printix Administrator
The first time you sign in with Microsoft, a new user is automatically created for you. This new user is not authorized to sign in to Printix Administrator.
Resolution: Sign in with email to Printix Administrator, and change the role of the newly created user to system manager. From now on, you can sign in with your work or school account.
Microsoft Entra authentication has been disabled and is now enabled again, and I want to accept Printix for all users again
If you disable Microsoft Entra authentication and want to withdraw the acceptance of Printix, you must do this from within Microsoft Entra ID. If you have withdrawn the acceptance of Printix and now want to accept Printix again, select Accept again.
You can’t access this application. Printix needs permission to access resources in your organization that only an admin can grant
After attempting to sign in with Microsoft, you are told you cannot access Printix.
Resolution: Follow the steps below to allow users to consent to apps accessing company data on their behalf. You must have the global administrator role in Microsoft Entra ID to make this change. Printix will read the users' basic profile (display name and email address).
- Sign in to portal.azure.com.
- In the portal menu, select All Services.
- In the Identity category, select Microsoft Entra ID.
- In the left pane, select Enterprise applications.
- In the left pane, select Consent and permissions.
- Set User consent for applications to Allow user consent for apps or Allow user consent for apps from verified publishers, for selected permissions (Recommended).
-
Select
Save.
It may take up to 15 minutes before the change takes effect.