
How to manually install Printix Go Lexmark
-
The printer must already be added to Printix. See How to add printers.
-
In the Printer properties, the printer's serial number must not be empty.
-
Ensure that the Lexmark printer is not in use while you perform any of these steps.
-
For bulk deployments, download the Lexmark Device Deployment Utility (DDU) tool.
The instructions for bulk deployments were tested with DDU version 2.14.1.
Manually register Printix Go Lexmark
The registration of Printix Go Lexmark has the following steps:
See also:
Download Printix Go Lexmark file
- Open the Software page.
-
Scroll to the
Printix Go section at the bottom and
select
Lexmark Go (FLS).
Download the file to a convenient location on your computer.
Create Sign in profile and Go configuration
- Open Printer properties and select the Printix Go tab.
-
Select
Sign in profile setup
 to open the
Sign in profile menu.
to open the
Sign in profile menu.
-
Select
Create sign in profile. If you have an existing sign in profile that can be used, select
Assign sign in profile instead.
-
In Name, type a descriptive name for the sign in profile.
-
In Username, type the username of an administrator account that can access the printer's web pages. The username cannot be blank.
-
In Password, type the password of an administrator account that can access the printer's web pages. The password cannot be blank.
-
In Description, type an optional description for the sign in profile.
-
- Select Save.
-
Select
Verify sign in profile.
The printer must be online.
-
Select
Go configuration setup
to open the
Go configuration menu.
-
Select
Create Go configuration. If you have an existing Go configuration that can be used, select
Assign Go configuration instead.
-
In Name, type a descriptive name for the Go configuration.
-
In Description, type an optional description for the Go configuration.
-
In Sign in method, optionally, change it from Select automatically to the method you want.
-
In Access control, optionally, check the printer functions that require sign-in.
-
In Email sender, optionally, type a default sender email address, and this will be used as the sender rather than the email address of the signed-in user doing a scan to email.
-
- Select Save.
Obtain Client ID, Client Secret, and Tenant ID
If you already have an application with Go registration as the application type, you can obtain the Client ID and Tenant ID from there. However, to use an existing application, you must remember its Client Secret that was only obtainable during creation.
- Open the Applications page.
-
Select
Create application.
The Create application dialog box appears.
- In Application name, enter the name of the application.
- For Type, select Go registration.
-
Select
I accept.
With this prompt, you accept that one application is billed as one user.
-
Select
Create.
The dialog box is not closed, and instead, further options appear in it.
-
Copy the
Client ID,
Client Secret, and
Tenant ID to a convenient location.
These values will be needed in Register the Print and Capture applications.
The client secret is only displayed here, and it cannot be retrieved later.
- Select Close.
Install the Print and Capture applications
- Sign in to the printer's web page as an administrator.
- On the menu, select Apps.
-
Under
Installed Apps, select
Install an app.
A dialog box appears.
- Select Browse.
- Select the Lexmark Go (FLS) file you downloaded in Download Printix Go Lexmark file.
-
Select
Install.
The Lexmark Print and Capture applications are installed.
- Manually restart the printer.
Register the Print and Capture applications
After the Lexmark Print and Capture applications are installed, they must be registered.
To perform these steps, start from the same page on the printer's web page where you finished the installation.
- Under Installed Apps, select Printix (Tungsten Printix Go).
- Select Configure.
-
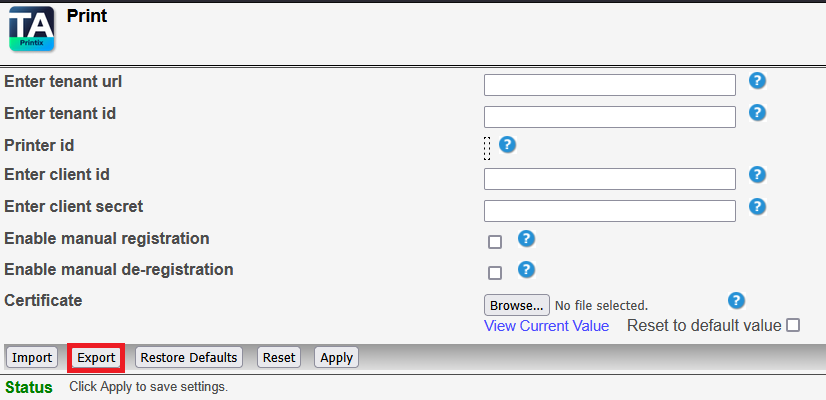
Enter the following details:
-
Enter tenant url: Enter your Printix Home URL.
Example: https://acme.printix.net
-
Enter tenant id: Paste the Tenant ID you copied in Obtain Client ID, Client Secret, and Tenant ID.
-
Enter client id: Paste the Client ID you copied in Obtain Client ID, Client Secret, and Tenant ID.
-
Enter client secret: Paste the Client Secret you copied in Obtain Client ID, Client Secret, and Tenant ID.
-
- Select Enable manual registration.
- Select Apply.
Change the security settings
To perform these steps, stay signed in to the printer's web page.
- On the menu, select .
- Under Login Methods, select Manage Permissions.
- Expand the Apps category by selecting the Plus mark next to it.
- Clear esf.PrintixGoLexmark.Printix.
- Select Save.
- Return to the page.
-
Under
Local Accounts, select
Change next to
Default Browser Login.
A dialog box appears.
- Set Control Panel to Printix.
-
Select
Save.
You are returned to the Security page.
- Under Public, select Manage Permissions.
- Expand Function Access.
-
Select or clear the check boxes to match the access control restrictions of the Go configuration. See the table
below for reference.
If a function is selected (locked) in the Go configuration, also select (lock) the corresponding Lexmark function. Functions that are not locked by the Go configuration should not be locked on the Lexmark printer.
The Everything else option does not have a corresponding function on the Lexmark printer, so it can be ignored.
Go configuration Lexmark Function Access Copy Copy Function Email Email Function Scan Network Folder - Scan Fax Fax Function Print from USB drive Flash Drive Print Scan to USB drive Flash Drive Scan Everything else - - Select Save.
Manually de-register Printix Go Lexmark
- Sign in to the printer's web page as an administrator.
- On the menu, select Apps.
- Under Installed Apps, select Printix (Tungsten Printix Go).
- Select Configure.
- Select Enable manual de-registration.
-
Select
Apply.
The Print and Capture applications are both de-registered.
Manually uninstall Printix Go Lexmark
The manual uninstallation does not de-register Printix Go Lexmark. De-registration is explained in more detail in Manually de-register Printix Go Lexmark.
- Sign in to the printer's web page as an administrator.
- On the menu, select Apps.
-
Select the
Printix
 application.
- Select Uninstall.
Manually update the configuration of a Lexmark printer
Manually register Printix Go Lexmark on multiple printers
The registration of Printix Go Lexmark has the following steps on multiple printers:
Export a configuration
- Download the Printix Go Lexmark file.
- Obtain Client ID, Client Secret, and Tenant ID.
- Sign in to the printer's web page as an administrator.
- On the menu, select Apps.
-
Register the Print and
Capture applications.
After selecting Apply, stay on the page.
-
Select
Export to download the settings as a UCF file.
If the printer is still handling the registration from the previous step, the export process takes longer.
- Open the downloaded UCF file in a text editor.
-
Add a new line to the end:
esf.PrintixGoLexmark.settings.clientSecret "{client secret}"
Replace the {client secret} variable with the Client Secret you obtained in step 2.
- Save and close the file.
- Change the security settings.
- Return to the page.
- Select .
-
Ensure that
Security Settings is selected.
Before exporting, confirm that the printer has no local accounts.
If local accounts exist, the exported security settings cannot be imported on other printers because the import process attempts to create the same accounts and fails.
Use a printer without local accounts when exporting security settings for batch deployment.
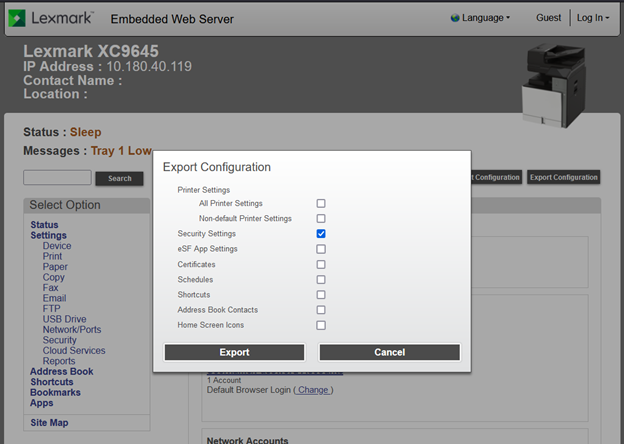
- Select Export.
Continue registration with the Lexmark DDU tool
-
Start the Lexmark DDU tool:
Open the folder where you downloaded the Lexmark DDU tool.
Read the instructions in the docs folder about how to start the Lexmark DDU tool.
- Select Add New.
-
Select
Add Firmware of Flash file(*.fls).
Read the instructions in the docs folder about what to do on the appearing dialog box.
Select OK when you are done.
-
Select
.
Read the instructions in the docs folder about what to do on the appearing dialog box.
Select OK when you are done.
-
Select
Add Configuration Files(.zip).
Read the instructions in the docs folder about what to do on the appearing dialog box.
Select OK when you are done.
-
Select
Edit Device List in the bottom left corner.
Read the instructions in the docs folder about what to do on the appearing dialog box. Ensure that Add a device is selected.
Select OK when you are done.
-
Select
Save.
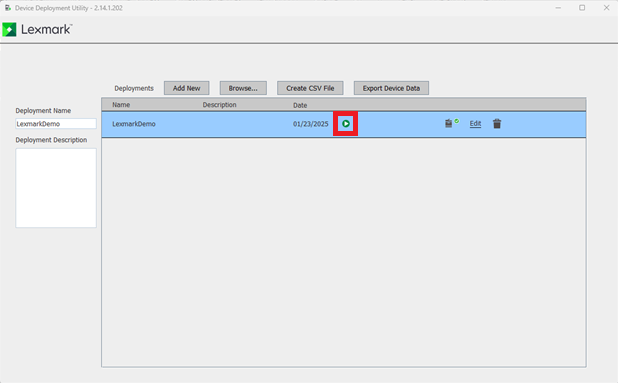
You return to the page with the list of deployments.
-
Select the
Play button next to a deployment's name to start the deployment.
Manually change the configuration on multiple Lexmark printers
- Export a configuration.
-
Start the Lexmark DDU tool:
Open the folder where you downloaded the Lexmark DDU tool.
Read the instructions in the docs folder about how to start the Lexmark DDU tool.
- Select Add New.
-
Select
.
The Provide application details dialog box appears.
- For Application Id/Name, type PrintixGoLexmark, then select OK.
-
Select
Add Firmware of Flash file(*.fls).
Read the instructions in the docs folder about what to do on the appearing dialog box.
Select OK when you are done.
-
Select
.
Read the instructions in the docs folder about what to do on the appearing dialog box.
Select OK when you are done.
-
Select
Add Configuration Files(.zip).
Read the instructions in the docs folder about what to do on the appearing dialog box.
Select OK when you are done.
-
Select
Edit Device List in the bottom left corner.
Read the instructions in the docs folder about what to do on the appearing dialog box. Ensure that Add a device is selected.
Select OK when you are done.
-
Select
Save.
You return to the page with the list of deployments.
- Select the Play button next to a deployment's name to start the deployment.
Manually de-register Printix Go Lexmark from multiple printers
The de-registration of Printix Go Lexmark has the following steps on multiple printers:
Export a configuration
-
Manually de-register Printix Go Lexmark
on a single printer.
After selecting Apply, stay on the page.
-
Select
Export to download the settings as a UCF file.
If the printer is still completing registration from the previous step, the export process may take longer.
- Open the downloaded UCF file in a text editor.
-
Add a new line to the end:
esf.PrintixGoLexmark.settings.clientSecret "{client secret}"
Replace the {client secret} variable with the Client Secret you obtained in Obtain Client ID, Client Secret, and Tenant ID.
- Save and close the file.
Continue de-registration with the Lexmark DDU tool
-
Start the Lexmark DDU tool:
Open the folder where you downloaded the Lexmark DDU tool.
Read the instructions in the docs folder about how to start the Lexmark DDU tool.
- Select Add New.
-
Select
.
Read the instructions in the docs folder about what to do on the appearing dialog box.
Select OK when you are done.
-
Select
Add Task, then select
Add Delay or
Reboot device.
If you select Add Delay, set the delay time to 5000 ms, then select OK.
You can set a custom delay time, but consider that the delay time should be enough for the printer to call the server and de-register Printix Go Lexmark.
-
Select
.
The Provide application details dialog box appears.
- For Application Id/Name, type PrintixGoLexmark, then select OK.
-
Select
Add Configuration Files(.zip).
Read the instructions in the docs folder about what to do on the appearing dialog box.
Select OK when you are done.
-
Select
Edit Device List in the bottom left corner.
Read the instructions in the docs folder about what to do on the appearing dialog box. Ensure that Add a device is selected.
Select OK when you are done.
-
Select
Save.
You return to the page with the list of deployments.
- Select the Play button next to a deployment's name to start the deployment.
Troubleshooting
To troubleshoot errors that are not listed here, read the instructions in the docs folder about the possible solutions.
Error codes related to registration and changing the version
| Error code | Error name | Error description |
|---|---|---|
| 400 | VALIDATION_FAILED | The input parameters (UCF settings) are wrong. |
| 400 | INVALID_VERSION_FORMAT | The application version does not meet the system requirements (UCF settings). |
| 401 | INVALID_TOKEN | The Client ID or Client Secret is wrong for the Go registration application. |
| 409 | SIGNIN_PROFILE_MISSING | The Sign in profile is not configured. |
| 409 | ON_DEVICE_CONFIG_MISSING | The printer is not configured. |
| 409 | CAPTURE_CONFIG_MISSING | The printer is not configured for Capture. |
| 409 | CAPTURE_NOT_SUPPORTED | The printer cannot use Capture functionality during installation. |
| 422 | PRINTER_NOT_FOUND | The system cannot find a printer with the provided serial number. The serial number was not configured or the printer was not added to Printix. |
| 500 | INTERNAL_SERVER_ERROR | Unknown reason. Submit a support request to investigate the cause. |
Error codes related to de-registration
| Error code | Error name | Error description |
|---|---|---|
| 401 | INVALID_TOKEN | The Client ID or Client Secret is wrong for the Go registration application. |
| 422 | PRINTER_NOT_FOUND | The system cannot find a printer with the provided serial number. The serial number was not configured or the printer was not added to Printix. |
| 500 | INTERNAL_SERVER_ERROR | Unknown reason. Submit a support request to investigate the cause. |